
Stopwatch Using ReactJS: 4 Easy Steps to Create Your First React Application
May 20, 2024 7 Min Read 1744 Views
(Last Updated)
One of the hard-hitting truths is that “Creating simple projects is the easiest way to learn a tool instead of theoretically reading it thousands of times”.
If you are a beginner and if you want to learn something, go for a practical approach than a theoretical approach. In that way, if you are looking to learn one of the most famous tools, ReactJS, then how about you learn it by creating a stopwatch using ReactJS?
That is what we’ll be covering in this article. An easy 4-step method to create a stopwatch using ReactJS covering from scratch so you don’t have to worry even if you are a beginner to this.
So, let us get started and create your first project which is the stopwatch using ReactJS.
Table of contents
- Prerequisites for Creating a Stopwatch Using ReactJS
- Basic Understanding of ReactJS
- NodeJS and npm Installed
- Code Editor
- A Basic Understanding of HTML and CSS
- Familiarity with Command Line
- Create a Stopwatch Using ReactJS in 4-Steps
- Step 1. Setting Up Your React Environment
- Step 2: Creating the Stopwatch Component
- Step 3: Integrating the Stopwatch Component
- Step 4. Testing Your Integration
- Conclusion
- FAQs
- Why build a stopwatch using ReactJS?
- What are the essential hooks needed for a React stopwatch?
- How do I add start, stop, and reset functionality to the stopwatch?
- What are some common bugs to look out for when developing a stopwatch using ReactJS?
Prerequisites for Creating a Stopwatch Using ReactJS
Let’s take a detour before you dive into building a stopwatch using ReactJS. There are a few prerequisites that you need to have in place.
Ensuring you meet these requirements will make your development process smoother and more efficient.
Also, You Must Know About Mistakes to Avoid When Starting the First React Project
Let’s go through each prerequisite needed to create a Stopwatch using ReactJS.
1. Basic Understanding of ReactJS
To effectively build a stopwatch application, you should have a foundational knowledge of ReactJS. This includes:
- JSX
- Components
- State Management
- Lifecycle Methods
2. NodeJS and npm Installed
NodeJS is a JavaScript runtime that lets you run your JavaScript code server-side, and npm (Node Package Manager) is a tool that allows you to install JavaScript packages from the npm registry.
- Installation: If you haven’t installed NodeJS and npm yet, you can download them from nodejs.org. Installing NodeJS should automatically install npm as well.
Know More About Node.JS as Backend: Everything You Need to Know About this Popular Framework [2024]
3. Code Editor
A good code editor can significantly enhance your coding efficiency. Here are a few popular ones that are well-suited for JavaScript and React development:
- Visual Studio Code (VS Code): Highly recommended for its extensive ecosystem of extensions, built-in support for JavaScript and React, and an integrated terminal.
- Atom: Known for its customizability and being open-source.
- Sublime Text: Fast and efficient, though it requires a license for continued use.
Make sure your code editor is set up to handle JavaScript and JSX syntax highlighting and has auto-completion features enabled to aid in your development.
4. A Basic Understanding of HTML and CSS
While the focus of your project is on ReactJS, having a basic understanding of HTML and CSS will be crucial since you will need to style your stopwatch component and understand the document structure.
- HTML: Know how to use various HTML tags and their attributes.
- CSS: Understand how to style your elements, including layout techniques like Flexbox or Grid, which can help in positioning your stopwatch on the page.
5. Familiarity with Command Line
You’ll be using the command line to run various commands for creating your React app, starting the development server, and installing packages.
- Basic Commands: Be comfortable navigating directories, running scripts, and managing files from the command line.
If you are through with these prerequisites, then it is time for you to create your stopwatch using ReactJS
Learn more: A Complete Guide to HTML and CSS for Beginners
Create a Stopwatch Using ReactJS in 4-Steps
Now that the prerequisites are set up, let us jump to our main topic of the day, which is to create a stopwatch using ReactJS.
But, before you indulge further, it is a must that you know the basics of full-stack development. If not, enroll yourself in a professionally Certified Online Full-stack Development Course by a recognized institution that will not only strengthen your basic but provide you with an industry-grade certificate.
Let us now see how to create a stopwatch using ReactJS in 4-steps:
Step 1. Setting Up Your React Environment
Before you can start building your stopwatch using ReactJS, you’ll need a suitable development environment for ReactJS.
Setting this up is straightforward, but vital to ensure everything runs smoothly as you develop.
Also Explore: Build a Search Component in React [just in 3 simple steps]
Let’s break down the process step by step.
1. Create a New React Application
After you install NodeJS and npm as mentioned in the previous section, you can use the Create React App CLI tool to set up a new React project.
Create React App is an officially supported way to create single-page React applications. It offers a modern build setup with no configuration.
- Run Create React App: Open your terminal, navigate to the directory where you want your project to be, and run:
npx create-react-app stopwatch-appnpx is a package runner tool that comes with npm 5.2+ and higher. It will download the most recent Create React App release, build a new project named stopwatch-app, and install all dependencies. It will take a couple of minutes to install all the required dependencies.
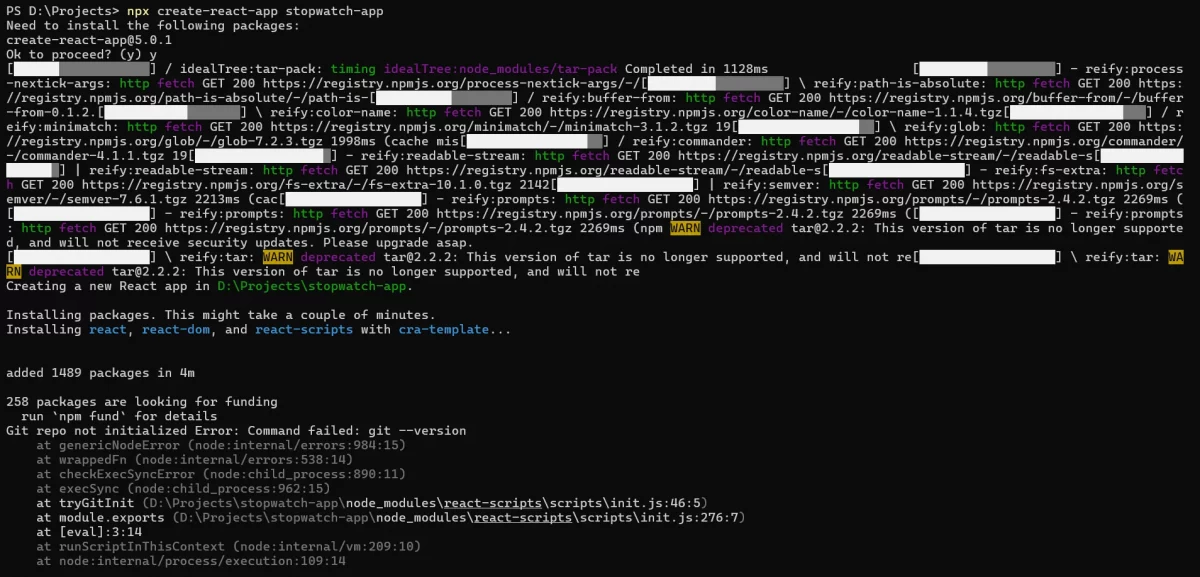
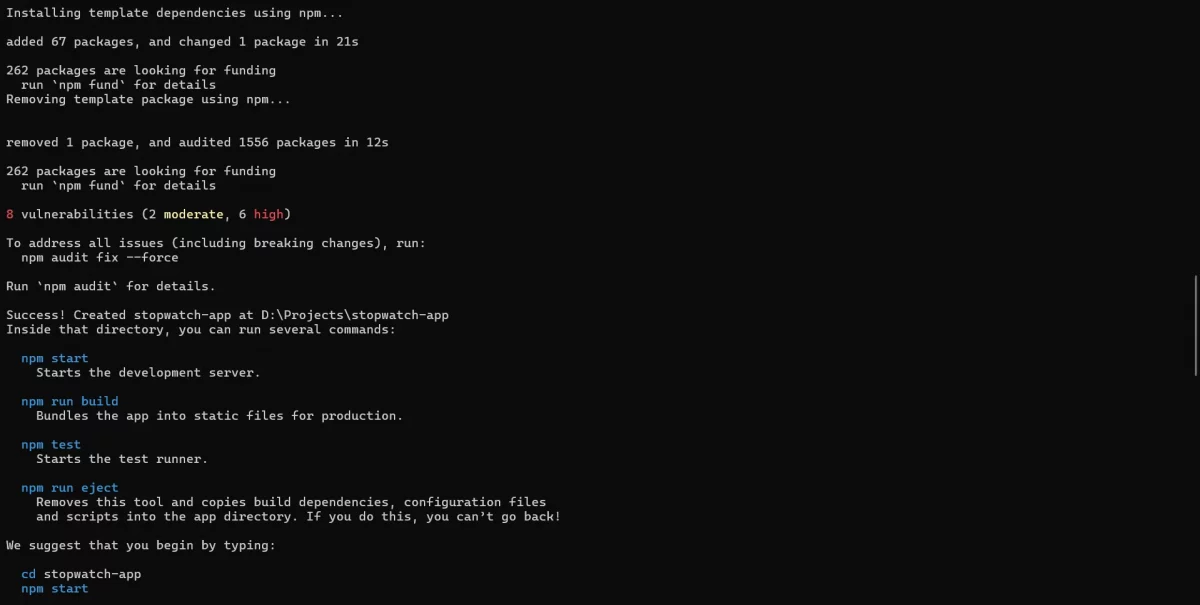
Once done, you will see something like this and now navigate to your project directory.
- Navigate into your project directory: Once the setup process is complete, you need to move into your project directory:
cd stopwatch-appKnow How to Use ReactJS to Fetch and Display Data from API – 5 Simple Steps
2. Familiarize Yourself with the Project Structure
When you open your new stopwatch-app directory in your favorite code editor, you’ll see several files and folders:
- node_modules/: Contains all packages that npm installed.
- public/: Holds static assets like the HTML file and images.
- src/: Where your JavaScript files and components will live. This is where you will spend most of your time.
- package.json: Manages your project’s dependencies, scripts, and versions.
- README.md: Provides information about scripts and the project structure.
Also Read: How to Render an Array of Objects in React? [in 3 easy steps]
3. Start the Development Server
To view your project in a browser, you need to start the development server. Still in your terminal, run:
npm startThis command starts a development server and opens up your new React application in your default web browser. The page will reload if you make edits, and you will see build errors and lint warnings in the console.
Now that your environment is set up, you’re ready to start coding your stopwatch using ReactJS. This setup process ensures you have a solid foundation for not only this project but any future React projects you might undertake. Let’s now build a stopwatch using ReactJS.
Explore: Ruby on Rails vs JavaScript: A Comprehensive Analysis for Backend Development
Step 2: Creating the Stopwatch Component
Once your React environment is set up, the next step is to create the actual stopwatch component. This component will handle everything from timing to user interactions for starting, stopping, and resetting the stopwatch.
Let’s break down each part of this process.
1. Creating the Stopwatch File
First, you’ll need a place to write your JavaScript logic for the stopwatch. Here’s how to set that up:
- Create the file: In your React application’s
srcdirectory, create a new file namedStopwatch.js. This file will house all the code related to your stopwatch component. - Open the file: Open
Stopwatch.jsin your code editor to start coding your component.
2. Setting Up the Component
To build your stopwatch using ReactJS, you will start by setting up the basic structure of a React functional component and importing the necessary hooks.
- Import React and Hooks: At the top of your file, you need to import React and the hooks you will use:
import React, { useState, useEffect } from 'react';useState is used for managing the state of your component, while useEffect is for handling lifecycle events and side effects.
- Initialize the Component: Below the imports, declare your stopwatch component:
function Stopwatch() {
// Component logic and JSX will go here }
Also Read: useState() Hook in React for Beginners | React Hooks 2024
3. Managing State with useState
Your stopwatch needs to keep track of a few pieces of state: the elapsed time and whether the stopwatch is running.
- Define State Variables: Inside your
Stopwatchfunction, use theuseStatehook to create state variables:
const [time, setTime] = useState(0);
const [isRunning, setIsRunning] = useState(false);
time holds the elapsed time in milliseconds, and isRunning is a boolean that tracks if the stopwatch is active.
4. Handling Time with useEffect
To make the stopwatch operational, you need to increment the time state every 10 milliseconds when it is running. This is where useEffect comes in.
- Set Up the Interval: Use
useEffectto start an interval when the stopwatch is running:
useEffect(() => {
    let interval;
    if (isRunning) {
        interval = setInterval(() => {
            setTime(prevTime => prevTime + 10);
        }, 10);
    } else {
        clearInterval(interval);
    }
    return () => clearInterval(interval);
}, [isRunning]);
This effect sets up an interval that updates time every 10 milliseconds, but only when isRunning is true. When isRunning changes to false, or the component unmounts, the interval is cleared.
Know About How to Setup React Router v6? | Tutorial 2024
5. Building the Component’s UI
Now, it’s time to define what your stopwatch will look like.
- Render the Stopwatch: Below your hooks and logic, define the JSX that will be returned by your component:
return (
    <div>
        <h1>{("0" + Math.floor((time / 60000) % 60)).slice(-2)}:
        {("0" + Math.floor((time / 1000) % 60)).slice(-2)}:
        {("0" + ((time / 10) % 100)).slice(-2)}</h1>
        <button onClick={() => setIsRunning(true)}>Start</button>
        <button onClick={() => setIsRunning(false)}>Stop</button>
        <button onClick={() => setTime(0)}>Reset</button>
    </div>
);
This code renders the stopwatch display and three buttons for controlling it. The time display is formatted as minutes, seconds, and hundredths of a second.
6. Export the Component
Finally, don’t forget to export your component so it can be used in other parts of your application:
export default Stopwatch;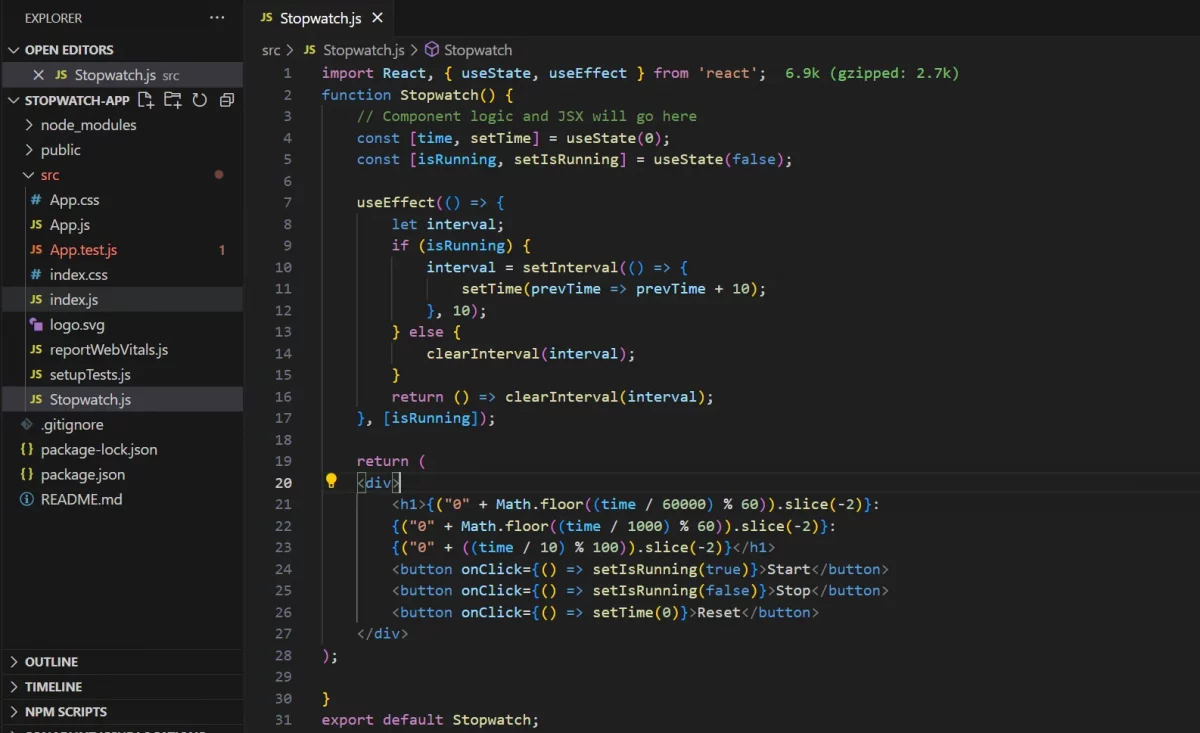
This is how your code to build a stopwatch using ReactJS would look like when you compile everything.
The full code for the Stopwatch component will be:
import React, { useState, useEffect } from 'react';
function Stopwatch() {
    // Component logic and JSX will go here
    const [time, setTime] = useState(0);
    const [isRunning, setIsRunning] = useState(false);

    useEffect(() => {
        let interval;
        if (isRunning) {
            interval = setInterval(() => {
                setTime(prevTime => prevTime + 10);
            }, 10);
        } else {
            clearInterval(interval);
        }
        return () => clearInterval(interval);
    }, [isRunning]);

    return (
    <div>
        <h1>{("0" + Math.floor((time / 60000) % 60)).slice(-2)}:
        {("0" + Math.floor((time / 1000) % 60)).slice(-2)}:
        {("0" + ((time / 10) % 100)).slice(-2)}</h1>
        <button onClick={() => setIsRunning(true)}>Start</button>
        <button onClick={() => setIsRunning(false)}>Stop</button>
        <button onClick={() => setTime(0)}>Reset</button>
    </div>
);

}
export default Stopwatch;
You’ve now set up the basic functionality of your stopwatch using ReactJS. This setup involves managing the state with hooks, updating the state based on user interactions, and rendering the UI based on the current state.
With the stopwatch component in place, you’re ready to build more interactive and dynamic applications like stopwatch using ReactJS.
Read more: Top Technologies to Learn for a JavaScript Backend Developer
Step 3: Integrating the Stopwatch Component
Now that you have created the Stopwatch component, it’s time to integrate it into your React application so that it becomes part of the user interface.
This step is crucial to build a stopwatch using ReactJS because it brings your component to life, allowing users to interact with it directly through the UI of your application.
Let’s go through how you can achieve this.
1. Importing the Stopwatch Component
Firstly, you need to ensure that the Stopwatch component is accessible where you intend to use it, typically in your application’s main component or another component of your choice.
- Open the App Component: Navigate to the
srcfolder and open the App.js file. This file usually serves as the root component in a simple React application created with the Create React App.
- Import Stopwatch: At the top of
App.js, add an import statement to bring in theStopwatchcomponent. Your import should look like this:
import Stopwatch from './Stopwatch';Explore How to use Props in React [in 3 simple steps]
2. Adding the Stopwatch to the Render Method
With the Stopwatch component imported, you can now include it in your application’s render output. This is where you decide how the stopwatch is displayed relative to other content in your app.
- Modify the JSX: In the
App.jsfile, locate thereturnstatement inside theAppfunction. This statement defines what this component will render. You will already have a component written over there, replace that with yourStopwatchcomponent is given below:
function App() {
  return (
    <div className="App">
      <header className="App-header">
        <Stopwatch />
      </header>
    </div>
  );
}- Position Your Component: The example above places the
Stopwatchinside a<header>element, which might typically be styled prominently. You can adjust this placement based on your UI design requirements, placing the stopwatch in different parts of your layout or within other components.
3. Styling the Stopwatch
To make sure the stopwatch not only works well but also looks good, consider adding some custom CSS styles. With the Create React App, you will already be equipped with a CSS file with the necessary styling. YOu can change it according to your needs.
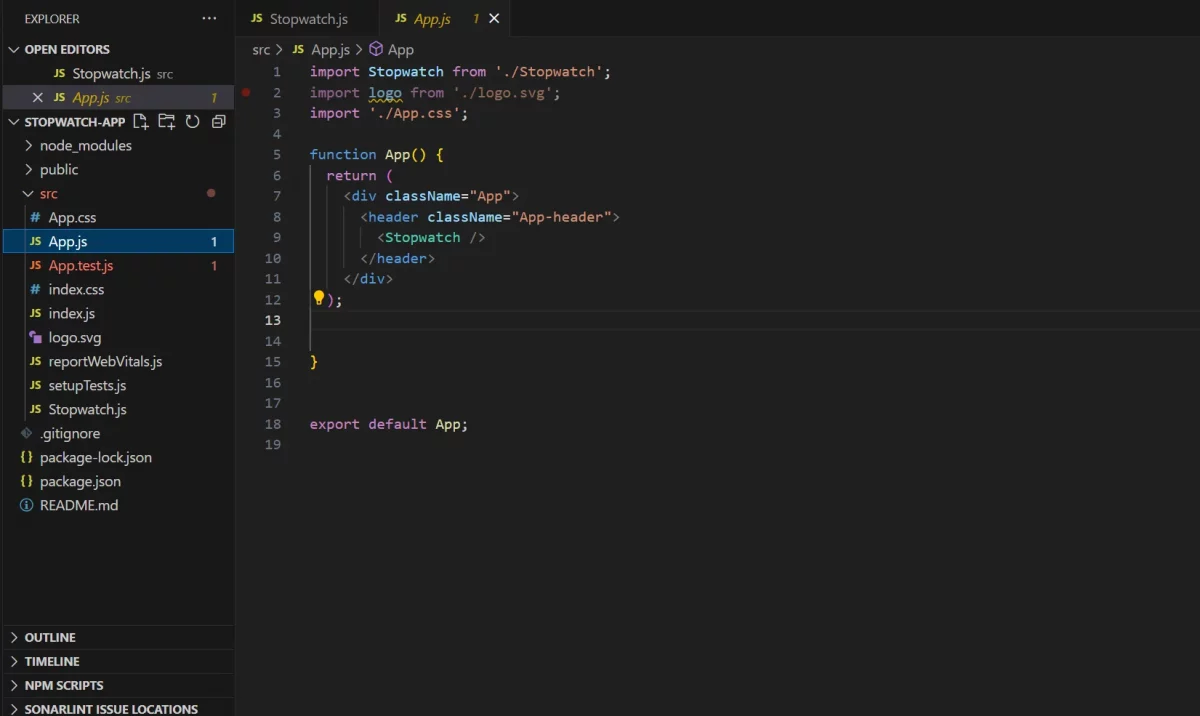
This is what the code for App.js looks like. With this, you completed the necessary operations needed to build a stopwatch using ReactJS. Now it is time to test it.
The full code for the integration will be:
import Stopwatch from './Stopwatch';
import logo from './logo.svg';
import './App.css';

function App() {
  return (
    <div className="App">
      <header className="App-header">
        <Stopwatch />
      </header>
    </div>
  );


}

export default App;
Explore More: PHP or NodeJS: Which Framework is Better For Backend
Step 4. Testing Your Integration
Once you have placed and styled your Stopwatch using ReactJS, it’s important to test it:
- Run Your App: Ensure your development server is running (use
npm startif it’s not). Open your application in a browser to see the stopwatch in action. - Interact with the Stopwatch: Click the start, stop, and reset buttons to ensure that the stopwatch behaves as expected. Watch for any UI issues or bugs in functionality.
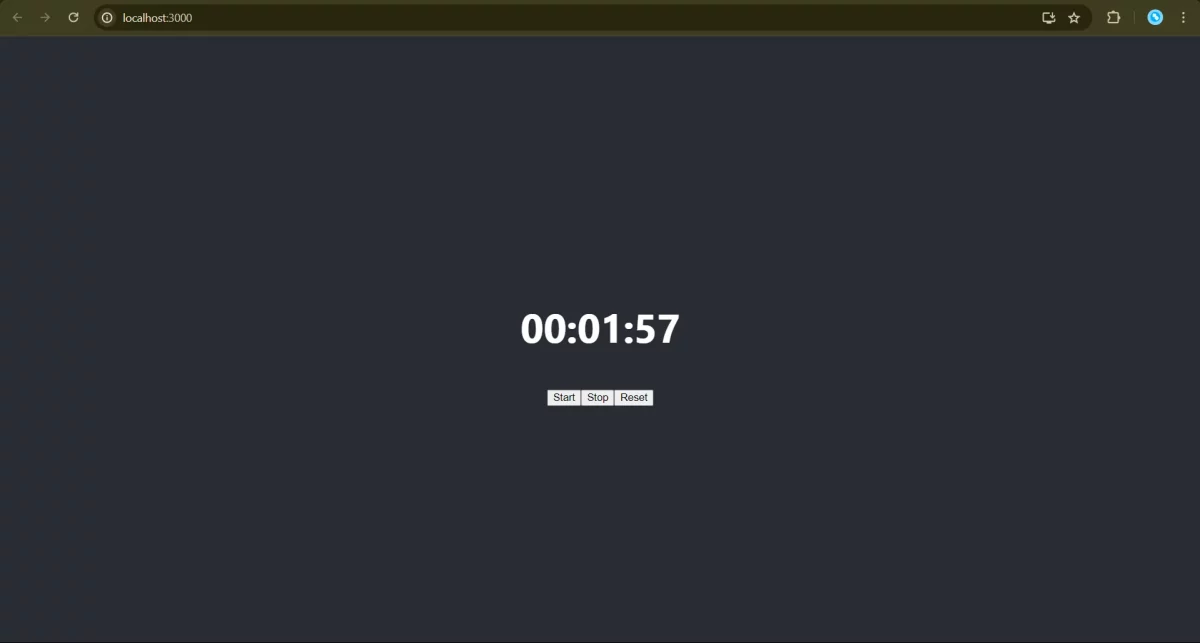
This is the output that you would get when you run the stopwatch using ReactJS. You can control this by clicking the start, stop, and reset buttons. This is a simple application built using ReactJS that is highly effective for you to strengthen your basics on ReactJS.
If you want to learn more about projects like this that are built using ReactJS, then consider enrolling in
GUVI’s Certified Full-Stack Development Career Program not only gives you theoretical knowledge but also practical knowledge with the help of real-world projects.
Also Read: 10 Best React Project Ideas for Developers [with Source Code]
Conclusion
In conclusion, creating a stopwatch using ReactJS involves setting up your development environment, building the stopwatch component with state and effects, integrating it into your main application, and running your app to see it in action.
By following these steps, you can develop a functional and interactive stopwatch using ReactJS. This project not only enhances your understanding of React’s fundamental concepts but also provides a practical application that showcases your skills in modern web development.
Must Explore Top ReactJS Interview Questions and Answers Of 2024! [Part-1]/[Part-2]
FAQs
Why build a stopwatch using ReactJS?
ReactJS makes it easy to manage state and effects, which are essential for accurately tracking and displaying time in a stopwatch application.
What are the essential hooks needed for a React stopwatch?
useState for managing time and running state, and useEffect for setting up the timer interval.
How do I add start, stop, and reset functionality to the stopwatch?
Handle these actions with buttons that modify the state, such as setting isRunning to true or false, and resetting time to zero.
What are some common bugs to look out for when developing a stopwatch using ReactJS?
Common issues when building a stopwatch using ReactJS include multiple intervals running at once, incorrect time formatting, or state updates not rendering correctly.








Did you enjoy this article?