
How to Setup React Router v6? | Tutorial 2024
Mar 25, 2024 5 Min Read 24328 Views
(Last Updated)
Are you looking to learn how to set up React Router v6 and start routing your React applications? This guide will show you step-by-step how to setup React Router v6 and start building dynamic, single-page applications. With React Router v6, you can create powerful and dynamic routing solutions with ease.
React Router v6.4.0 is a library for routing in React applications and provides a routing solution that allows developers to declaratively map routes to components and manage the URL and navigation state of the application. It also provides features like route preloading, lazy loading, and query parameters.
Routing allows the user to navigate through different pages of your app without refreshing the whole page. With the help of routing, you can create a single-page application (SPA) that allows users to navigate through different pages of your web app without refreshing the whole page and improve the overall user experience by making your application faster, more responsive, and more dynamic.
Step-by-Step Guide to Setup React Router
Follow the setup instructions carefully to add an easy navigation feature to your React app with different pages.
Getting Started with React Router:
Before diving into the next section, ensure you’re solid on full-stack development essentials like front-end frameworks, back-end technologies, and database management. If you are looking for a detailed Full Stack Development career program, you can join GUVI’s Full Stack Development Career Program with Placement Assistance. You will be able to master the MERN stack (MongoDB, Express.js, React, Node.js) and build real-life projects.
Additionally, if you want to explore JavaScript through a self-paced course, try GUVI’s JavaScript self-paced certification course.
Table of contents
- Step 1: Installing React Router
- Step 2: Adding React Router
- Step 3: Routing and Rendering Components
- Creating Multiple Components
- Define routes
- Link to Navigate to Components
- Final Code
- Output:
- FAQs
- Q1. How do I add react router v6?
- Q2. What is react router v6?
- Q3. How to install react router dom in your application?
Step 1: Installing React Router
To install React Router, you’ll need Node.js installed for the npm command line tool, after which you have to run the following command:
npm install react-router-domand wait for the installation to complete.
What is npm?
npm stands for Node Package Manager, which is a library and registry for JavaScript software packages. It is free and used by more than 11 million developers worldwide.Open source developers from every continent use npm to share and borrow packages, and many organizations use npm to manage private development as well. It also has command-line tools to help you install the different packages and manage their dependencies.
If you are using Yarn then run the following command:
yarn add react-router-domStep 2: Adding React Router
The first thing to do after installing react-router-dom is to make React Router available anywhere in your app. For this, we use a <BrowserRouter> that stores the current location in the browser’s address bar using clean URLs and navigates using the browser’s built-in history stack.
To do this, open the index.js file in the src folder and replace the <React.StrictMode> with <BrowserRouter> by importing it from react-router-dom and then wrapping the root component in it.
index.js file before changes:
import React from 'react';
import ReactDOM from 'react-dom/client';
import './index.css';
import App from './App';
import reportWebVitals from './reportWebVitals';

const root = ReactDOM.createRoot(document.getElementById('root'));
root.render(
  <React.StrictMode>
    <App />
  </React.StrictMode>
);

reportWebVitals();
index.js file after changes:
import React from 'react';
import ReactDOM from 'react-dom/client';
import './index.css';
import App from './App';
import reportWebVitals from './reportWebVitals';
import { BrowserRouter } from 'react-router-dom';

const root = ReactDOM.createRoot(document.getElementById('root'));
root.render(
  <BrowserRouter>
    <App />
  </BrowserRouter>
);

reportWebVitals();
So, now you can access all the features of react-router-dom like routers, routes, etc.

Step 3: Routing and Rendering Components
1. Creating Multiple Components
To render different components for routing, we’ll create some components in our project. In your project src folder, create a new folder as Pages. In that, create some components such as Home.js, Courses.js, Live.js, and Contact.js.
See the code for all the components below:
Home.js
import React from 'react'

function Home() {
  return (
    <div>Home</div>
  )
}

export default Home
Contact.js
import React from 'react'

function Contact() {
  return (
    <div>Contact</div>
  )
}

export default Contact
Courses.js
import React from 'react'

function Courses() {
  return (
    <div>Courses</div>
  )
}

export default Courses
Live.js
import React from 'react'

function Live() {
  return (
    <div>Live</div>
  )
}

export default Live
After creating all the component files, the project directory should look like this:
2. Define routes
Our root component is the App.js component, where our React code gets rendered initially. We will be creating all our routes in it.
To define the routes, we are going to use two things: Routes and Route. Import both components from react-router-dom and use them to route the components. The syntax for defining the routes is as follows:
<Routes>
   <Route path="/" element={<Home />} />
   <Route path="/course" element={<Courses />} />
   <Route path="/live" element={<Live />} />
   <Route path="/contact" element={<Contact />} />
</Routes>
Let’s understand this syntax in detail:
- <Routes>- The <Routes> component is used to define the different routes that are available in your application. Each individual route is defined using a <Route> component.
- <Route>- The <Route> component takes in a path prop, which is a string that defines the URL path that the route should match.
- path- The path prop defines the route path.
- element- The component prop defines the React component to render when the route path matches the current URL.
3. Link to Navigate to Components
Now we will use the <Link> component of react-router-dom to create clickable links that change the URL of the browser and render a different component based on the new URL.
This component takes in a to prop, which is a string that defines the URL path that the link should navigate to, and when the user clicks on a <Link> component, the URL of the browser will change to the path specified in the to prop, and the appropriate component associated with that route will be rendered.
In our example, we have defined a route with a path prop of ‘/contact’, therefore we can create a <Link> component with a to prop of ‘/contact’ to allow the user to navigate to the contact page. The same procedure goes for all of the components to navigate through the different pages.
We will now use <Link> to navigate to different pages based on the routes and pathnames we have defined in the App component as shown below:
import "./App.css";
import React from "react";
import { Link } from "react-router-dom";

import Home from "../src/Pages/Home";
import Courses from "../src/Pages/Courses";
import Live from "../src/Pages/Live";
import Contact from "../src/Pages/Contact";

function App() {
  return (
      <nav>
        <ul>
          <Link to="/" class="list">
            Home
          </Link>
          <Link to="/course" class="list">
            Courses
          </Link>
          <Link to="/live" class="list">
            Live course
          </Link>
          <Link to="/contact" class="list">
            Contact
          </Link>
        </ul>
      </nav>
  );
}

export default App;
Final Code
If you followed and coded along with us through the blog, then your App.js file should look like this:
import "./App.css";
import React from "react";
import { Link, Route, Routes } from "react-router-dom";

import Home from "../src/Pages/Home";
import Courses from "../src/Pages/Courses";
import Live from "../src/Pages/Live";
import Contact from "../src/Pages/Contact";

function App() {
  return (
    <div className="container">
      <nav>
        <ul>
          <Link to="/" class="list">
            Home
          </Link>
          <Link to="/course" class="list">
            Courses
          </Link>
          <Link to="/live" class="list">
            Live course
          </Link>
          <Link to="/contact" class="list">
            Contact
          </Link>
        </ul>
      </nav>

      {/* Defining routes path and rendering components as element */}
      <Routes>
        <Route path="/" element={<Home />} />
        <Route path="/course" element={<Courses />} />
        <Route path="/live" element={<Live />} />
        <Route path="/contact" element={<Contact />} />
      </Routes>
    </div>
  );
}

export default App;
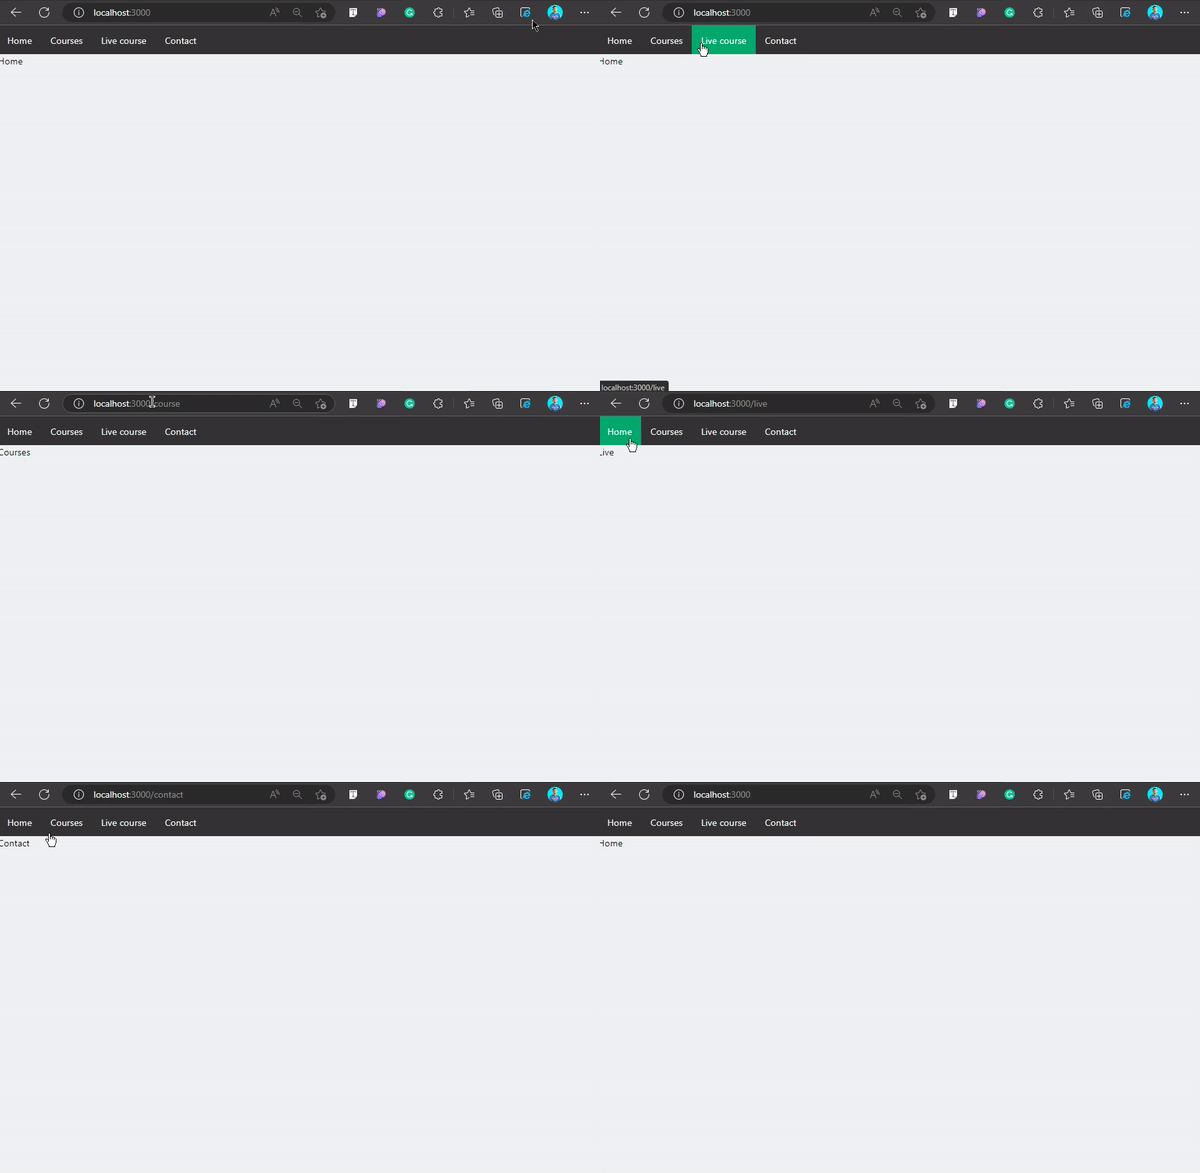
Output:
Conclusion
To Set up React Router in your application, is a straightforward process that can greatly enhance the user experience of your app. With React Router, you can easily define and manage routes, and create clickable links that change the URL without refreshing the whole page.
At this point, you have seen how setup React Router to navigate to different pages in your web application. Not only this, but you also saw how routing works and rendered the components in react.
By following these simple steps, you can add powerful routing functionality to your React application, allowing the users to easily navigate through different pages of your web app. Hope you learned a lot from this blog but don’t stop learning here!
Kickstart your Full Stack Development journey by enrolling in GUVI’s certified Full Stack Development Career Program with Placement Assistance where you will master the MERN stack (MongoDB, Express.js, React, Node.js) and build interesting real-life projects. This program is crafted by our team of experts to help you upskill and assist you in placements.
Alternatively, if you want to explore JavaScript through a self-paced course, try GUVI’s JavaScript self-paced course.
Sign up today and unleash your coding potential!
FAQs
Q1. How do I add react router v6?
Ans. Here are the few steps to add react router v6:
Step 1: Installing React Router.
Step 2: Adding React Router.
Step 3: Routing and Rendering components
Q2. What is react router v6?
Ans. React Router v6 is a popular and powerful routing library for React applications. It provides a declarative, component-based approach to routing and handles the common tasks of dealing with URL params, redirects, and loading data.






Did you enjoy this article?