


Javascript Articles
GraphQL with Strawberry Tutorial: Build Your First Python API
gRPC Tutorial: A Beginner's Guide to Building Fast, Modern APIs
Temporal Workflow Engine Tutorial: Build Reliable Workflows
Tauri 2.0 Desktop App Tutorial: Build Your First App Without the Bloat


Get In Touch For Details! Request More Information
Install React.js on Windows 2026: Step-by-Step with Node.js & Vite Setup
Sep 04, 2026 5 Min Read 42705 Views
(Last Updated)
To install React.js on Windows, you need two things: Node.js and Vite. That’s it. No extra tools, no complicated setup.
This guide walks you through every step, from installing Node.js to running your first React app in the browser. We’ll create a new project using Vite, install the required packages, and start the development server.
You’ll also see why Vite has replaced Create React App as the standard way to install React.js in 2026.
Table of contents
- TL;DR Summary
- What is React.js?
- How to Install React.js on Windows
- Step 1: Install Node.js
- Step 2: Open Terminal in Your Project Folder
- Step 3: Check Node.js and npm Installation
- Step 4: Create a New Vite React App
- Step 5: Enter Your Project Details
- Step 6: Move Inside the Project Folder
- Step 7: Install Project Dependencies
- Step 8: Start the Vite React Application
- Step 9: Explore the Vite Documentation
- Create React App vs Vite — Which to Use in 2026 (Vite Is Now Recommended)
- Fix: React App Not Starting on Windows — Common Errors
- React Install on Windows 10 vs Windows 11 — Any Difference?
- Conclusion
- FAQs
- Why do we need Node.js to install React.js?
- What is the use of npm in React.js setup?
- Why do we use Vite for React.js setup?
- What happens after running npm install?
- Why do we use npm run dev?
- Can we change the project name during setup?
- Do we need to install React.js separately, or does it come with the setup tool?
TL;DR Summary
- This blog helps you Install React.js on Windows in a simple way, even if you are a beginner, using Node.js and Vite.
- Create React App is officially deprecated as of February 2025; this guide uses Vite, the modern recommended approach, and covers it in a dedicated comparison below.
- If your React app won’t start after you Install React.js, it’s almost always a Node/npm version mismatch, a port conflict, or a missing dependency, covered in a troubleshooting section.
- There’s no meaningful difference in how you install React.js between Windows 10 and Windows 11; the commands are identical.
- You’ll also quickly understand the important features of React.js in a simple way.
What is React.js?
React.js is a popular open-source JavaScript library developed by Facebook, primarily used for building user interfaces, especially for single-page applications.
Its main focus is on rendering UI components efficiently and updating them in response to data changes, making development smoother for complex, interactive web applications.
Key features of React.js include:
- Component-Based Architecture: React breaks down the UI into reusable components, each encapsulating its own logic and rendering, making complex applications easier to develop and maintain.
- Virtual DOM: React uses a virtual representation of the actual DOM to optimize updates and minimize direct manipulation of the browser’s DOM, resulting in faster rendering.
- Declarative Programming: React allows developers to describe how the UI should look at any given time. When data changes, React efficiently updates and re-renders the components.
- Unidirectional Data Flow: React follows a one-way data flow, making it easier to track data changes, which helps with debugging and ensures predictable behavior.
- JSX Syntax: React uses a syntax extension called JSX (JavaScript XML) that allows developers to write HTML-like code directly within JavaScript.
This is exactly why so many developers choose to install React.js over other libraries. React is widely used for building web applications due to its flexibility, scalability, and strong community support.
Also Explore: Top Technologies to Learn for a JavaScript Backend Developer
After understanding the fundamental concepts of React.js, let’s move forward with a step-by-step guide on how to Install React.js on Windows.
Note:
- The old method (Create React App) is now deprecated
- We will use the latest method to Install React.js
- In this blog, we will use the Vite build tool
- Vite is faster and more modern for setup
Ready to become a job-ready developer? HCL GUVI’s Software and AI Engineer Programme teaches React.js, Node.js, Express.js, MongoDB, JavaScript, HTML, CSS, and AI-assisted development through hands-on, industry-grade projects. Get expert mentorship, 1-on-1 mock interviews, resume support, and placement guidance, plus an IITM Pravartak certification. Enroll now and start building real-world skills that top companies actually hire for!
Create React App was the official way to start React projects for nearly 8 years before it got deprecated in February 2025.
How to Install React.js on Windows
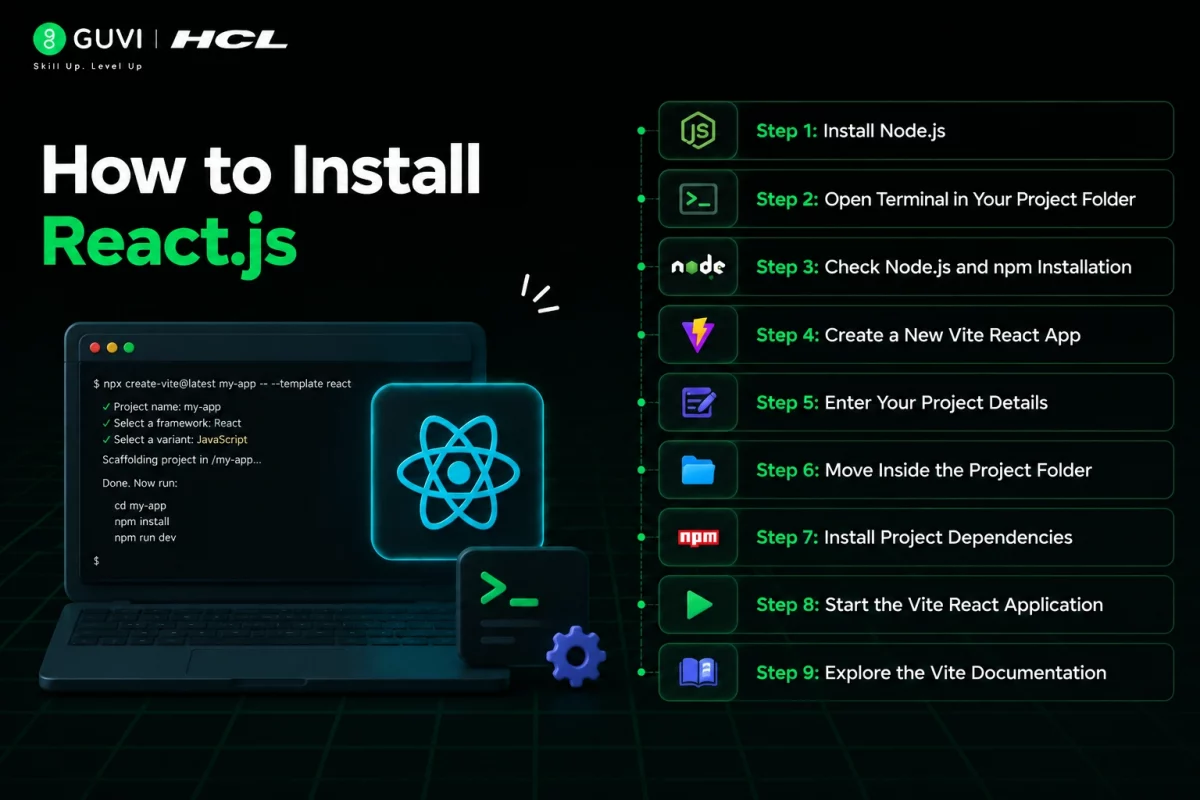
Step 1: Install Node.js
- Search for Node.js download on Google.
- Open the official Node.js website.
- Download the LTS version, the stable release recommended for most users.
- Once the file is downloaded, open the installer.
- Click “Next” and complete the installation using the default settings.
- Node.js is required because it installs npm, which helps us Install React.js and manage a Vite React application.
Step 2: Open Terminal in Your Project Folder
- Go to the location where you want to create your React project.
- Right-click inside the folder.
- Click on “Open in Terminal” or “Open PowerShell Window Here”.
- This opens the terminal directly in that folder, making setup easier.
Also Read: How to Render an Array of Objects in React? [in 3 easy steps]
Step 3: Check Node.js and npm Installation
- In the terminal, type the following commands one by one:
node -v npm -v - If both commands show version numbers, it means Node.js and npm are installed correctly.
- These two tools are required before you can Install React.js using a Vite React application.
Also Read: Use ReactJS to Fetch and Display Data from API – 5 Simple Steps
Step 4: Create a New Vite React App
- In the terminal, run the following command:
npm create vite@latest - Press Enter when asked to continue.
- Now Vite will ask a few questions.
Also Read: Top ReactJS Interview Questions and Answers Of 2026
Step 5: Enter Your Project Details
- First, enter your project name. Example:
demo - Next, select the framework. Choose React using the arrow keys and press Enter.
- After that, select the variant. Choose JavaScript if you want to create the project using JavaScript.
- You can also choose TypeScript if required.
Step 6: Move Inside the Project Folder
- After the setup is completed, Vite will show some commands.
- Move inside your project folder using:
cd demo - Replace “demo” with your project name if it is different.
Step 7: Install Project Dependencies
- Run the following command:
npm install - You can also use the short command:
npm i - This command installs all the required libraries and packages for your React application.
Step 8: Start the Vite React Application
- Run the following command:
npm run dev - After running the command, Vite will generate a localhost URL.
- Press Ctrl + Click on the URL to open it in your browser.
- You will now see your Vite React application running successfully.
Step 9: Explore the Vite Documentation
- Inside the default application page, you will see the Vite logo.
- Clicking the logo will open the official Vite documentation.
- Use the documentation to learn more about Vite features and project setup.
Explore HCL GUVI’s free React.js resources to learn faster and start building real-world web applications with ease: React eBook
Create React App vs Vite — Which to Use in 2026 (Vite Is Now Recommended)
The React team officially deprecated Create React App (CRA) on February 14, 2025. This isn’t just a stylistic preference anymore, it directly affects how you should Install React.js today.

| Factor | Create React App (CRA) | Vite |
|---|---|---|
| Official status | Deprecated by the React team; maintenance mode only | Actively maintained, officially recommended |
| Bundler | Webpack (slower builds) | Rollup and ESBuild (significantly faster) |
| Dev server startup | Slow, especially on larger projects | Near-instant, even on large codebases |
| React 19 compatibility | Breaks without manually ejecting and resolving dependency conflicts | Fully compatible out of the box |
| Security updates | None going forward | Actively patched |
| Setup command | npx create-react-app my-app | npm create vite@latest |
Why this matters practically: Create React App still technically works. Existing projects will keep building. But it receives no security patches, no dependency updates, and it breaks with React 19 unless you manually eject and fix the dependency tree.
The React team now recommends Vite (or a full framework like Next.js) for any new project. That’s exactly why this guide shows you how to Install React.js using Vite from Step 4 onward, instead of the older npx create-react-app command you may still see in older tutorials.
Fix: React App Not Starting on Windows — Common Errors
If you’ve followed every step to Install React.js above but your app still won’t run, these are the errors that come up most often on Windows specifically.
Error: “npm is not recognized as an internal or external command”
This is one of the most common blockers when you first try to Install React.js. This means Node.js wasn’t added to your system PATH during installation. Reinstall Node.js from nodejs.org, and restart your terminal (or your computer) after installation completes.
Error: “Port 5173 is already in use”
Vite’s default dev server runs on port 5173. If another project or process is already using it, Vite will usually pick the next available port automatically, but if it doesn’t, close other running dev servers or restart your terminal.
Error: Blank white screen after “npm run dev”
This is usually a browser cache issue or a component error being silently swallowed. Open your browser’s developer console (F12) to check for actual error messages, and try a hard refresh (Ctrl + Shift + R).
Error: “npm install” fails with permission errors while trying to Install React.js
This typically happens when Windows folder permissions block npm from writing files. Try running your terminal as Administrator, or move your project folder out of a restricted directory like Program Files.
Error: Dependency version conflicts during npm install
If you see peer dependency warnings or errors, delete the node_modules folder and package-lock.json file, then run npm install again for a clean install.
Error: Antivirus or firewall blocking localhost
Some antivirus tools flag Node’s local dev server as suspicious. If npm run dev runs without errors but the browser won’t load localhost, temporarily check your antivirus or Windows Firewall settings for blocked local connections.
React Install on Windows 10 vs Windows 11 — Any Difference?
There’s no meaningful difference in how you Install React.js between Windows 10 and Windows 11. The Node.js installer, npm commands, and Vite setup steps work exactly the same on both.
A few minor differences worth knowing:
- Terminal defaults: Windows 11 uses Windows Terminal by default. The “Open in Terminal” option looks slightly different from Windows 10’s Command Prompt or PowerShell menu, but every command in this guide works the same either way.
- PATH behavior: Both versions handle the Node.js installer’s PATH setup the same way. If
node -vfails on either OS, the fix is identical: reinstall with PATH options checked, then restart your terminal. - Windows Defender/SmartScreen: Windows 11’s security settings are a bit stricter, so you might see a SmartScreen prompt when running the Node.js installer for the first time. This isn’t a problem, just click “More info” then “Run anyway.”
If you can run a terminal and install software on your machine, your Windows version won’t change any steps in this guide.
Conclusion
Setting up a React development environment with Node.js and Vite/Create React App is the first step to building modern web apps. It gives you all the essential tools to create fast, scalable, and interactive applications, work with reusable components, and manage state efficiently. This setup is the base for starting your journey into the React ecosystem and building real-world projects.
Must Explore: 10 Best React Project Ideas for Developers [with Source Code]
FAQs
1. Why do we need Node.js to install React.js?
Node.js provides npm, which is required to install and manage React.js packages.
2. What is the use of npm in React.js setup?
npm installs all required libraries and dependencies for the project.
3. Why do we use Vite for React.js setup?
Vite gives a faster development environment and quick project startup.
4. What happens after running npm install?
It downloads and sets up all required project dependencies.
5. Why do we use npm run dev?
It starts the React development server and opens the project in the browser.
6. Can we change the project name during setup?
You can set the project name when creating the Vite React app.
7. Do we need to install React.js separately, or does it come with the setup tool?
No, you don’t install React.js separately. Tools like Vite add React to your project files, and npm install downloads it for you.
Success Stories

Did you enjoy this article?
Comments









nice. Very helpful. thanks
Insightful and very detail approach.