


Full Stack Development Articles
Claude for Architecture and Engineering Documentation
Freelancing as a Python Developer: Getting Your First Client


Get In Touch For Details! Request More Information
Fly.io Tutorial: Step-by-Step Guide to Deploy Your App
Sep 21, 2026 5 Min Read 376 Views
(Last Updated)
Deploying an application can feel complex when you are moving from local development to production. Fly.io makes this process easier by helping developers deploy apps globally, manage secrets, configure domains, monitor logs, and scale services through a simple CLI-based workflow.
In this Fly.io tutorial, we will walk through the complete deployment process, from installing flyctl and creating a Fly.io app to setting environment variables, connecting databases, checking logs, and launching a production-ready application.
Read the full blog to learn how to deploy your app on Fly.io step by step.
Table of contents
- TL;DR
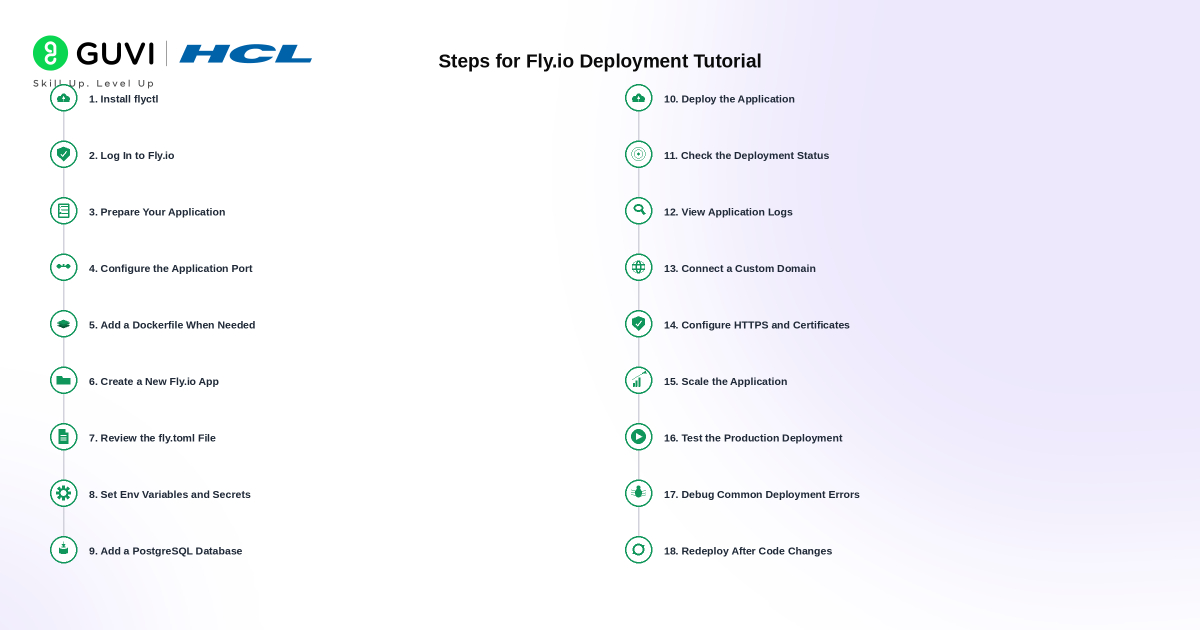
- Fly.io Deployment Tutorial: Step-by-Step Guide to Deploy Your App
- Step 1: Install flyctl
- Step 2: Log in to Fly.io
- Step 3: Prepare Your Application for Deployment
- Step 4: Configure the Application Port
- Step 5: Add a Dockerfile When Needed
- Step 6: Create a New Fly.io App
- Step 7: Review the fly.toml File
- Step 8: Set Environment Variables and Secrets
- Step 9: Add a PostgreSQL Database
- Step 10: Deploy the Application
- Step 11: Check the Deployment Status
- Step 12: View Application Logs
- Step 13: Connect a Custom Domain
- Step 14: Configure HTTPS and Certificate Validation
- Step 15: Scale the Application
- Step 16: Test the Production Deployment
- Step 17: Debug Common Fly.io Deployment Errors
- Step 18: Redeploy After Code Changes
- Conclusion
- FAQs
- What is Fly.io?
- What is flyctl?
- What is fly.toml in Fly.io?
- What is the default port for Fly.io apps?
- What is Fly.io used for?
TL;DR
- Fly.io helps developers deploy apps, APIs, and backend services across global regions.
- The deployment process starts with installing flyctl, logging in, and running fly launch.
- Your app must use the correct internal port, usually 8080, for smooth routing.
- Secrets, databases, logs, custom domains, and scaling can be managed through Fly.io commands.
- A successful Fly.io deployment needs correct fly.toml settings, clean logs, and proper production testing.
Fly.io Deployment Tutorial: Step-by-Step Guide to Deploy Your App
Step 1: Install flyctl
Install flyctl before deploying your application. It is the command-line tool used to create Fly.io apps, authenticate accounts, deploy code, manage Machines, configure secrets, and check logs.
For macOS, run:
brew install flyctlFor Linux or macOS without Homebrew, run:
curl -L https://fly.io/install.sh | shFor Windows, run:
pwsh -Command "iwr https://fly.io/install.ps1 -useb | iex"Fly.io recommends installing the correct flyctl version based on your operating system.
Step 2: Log in to Fly.io
After installing flyctl, log in to your Fly.io account.
fly auth loginNew users can create an account directly through the CLI.
fly auth signupThis connects your local system with Fly.io and allows deployments from the terminal. Fly.io’s quickstart flow uses fly auth signup or fly auth login before launching an app.
Step 3: Prepare Your Application for Deployment
Before deployment, test your app locally and confirm that all dependencies install correctly. Your application should have a valid production start command.
For a Node.js app, package.json may include:
{

  "scripts": {

    "start": "node server.js"

  }

}
Your app should also include all required files, such as package.json, lock files, framework configuration, and production-ready environment handling.
Step 4: Configure the Application Port
Fly.io routes traffic to the internal port defined in fly.toml. The default internal_port is 8080, and Fly.io recommends using this default for most applications.
For a Node.js Express app, configure the server like this:
const express = require("express");

const app = express();

const PORT = process.env.PORT || 8080;

app.get("/", (req, res) => {

  res.send("App running on Fly.io");

});

app.listen(PORT, "0.0.0.0", () => {

  console.log(`Server running on port ${PORT}`);

});
The app must listen on the same port defined in fly.toml. It should also bind to 0.0.0.0, so Fly.io can route external traffic into the running Machine.
Step 5: Add a Dockerfile When Needed
Fly.io deploys applications as Docker images. Fly Launch can detect a Dockerfile, build it, and deploy the app automatically.
A simple Node.js Dockerfile may look like this:
FROM node:20-alpine

WORKDIR /app

COPY package*.json ./

RUN npm ci --omit=dev

COPY . .

EXPOSE 8080

CMD ["npm", "start"]
The EXPOSE 8080 instruction helps Fly.io detect the service port during launch. When no port is detected, Fly.io uses 8080as the default internal port.
Step 6: Create a New Fly.io App
Move into your project folder and run:
fly launchFly Launch scans your source code, detects common frameworks, creates a Fly.io app, generates a fly.toml file, and deploys the app for most supported projects.
Use this option when you want to review configuration before deployment:
fly launch --no-deployThis is useful when you need to edit secrets, ports, regions, or service settings before the first deployment.
Step 7: Review the fly.toml File
Fly.io stores app deployment settings inside fly.toml. This file can define the app name, primary region, build settings, environment variables, public services, ports, volumes, and release commands.
A basic fly.toml file may look like this:
app = "your-app-name"

primary_region = "sin"

[build]

[http_service]

  internal_port = 8080

  force_https = true

  auto_stop_machines = "stop"

  auto_start_machines = true

  min_machines_running = 0
The primary_region tells Fly.io where to create new Machines. The internal_port tells Fly Proxy which port your application uses inside the Machine.
Step 8: Set Environment Variables and Secrets
Production apps often need API keys, database URLs, JWT secrets, payment keys, and service tokens. Do not hardcode these values in source code.
Set encrypted secrets using:
fly secrets set NODE_ENV=production JWT_SECRET=your_secret_key

Fly.io uses fly secrets set to store one or more encrypted secrets for an application.

For non-sensitive values, you can use the [env] section inside fly.toml.

[env]

  NODE_ENV = "production"
Secrets should be used for private values. The [env] section should be used only for safe configuration values.
Step 9: Add a PostgreSQL Database
Fly.io offers Managed Postgres for production database needs. You can create a Managed Postgres cluster and attach it to your application through the dashboard or CLI.
Create a Managed Postgres cluster using:
fly mpg create

Then attach the database to your app:

fly mpg attach <clusterID> -a <app-name>
Fly.io adds the database connection details as a secret, usually named DATABASE_URL. Your app can then read the connection string from process.env.DATABASE_URL.

Step 10: Deploy the Application
Run the deployment command from your project directory:
fly deploThe fly deploy command builds your app, creates a Docker image, pushes it to Fly.io’s internal registry, and starts it on one or more Fly Machines using the local fly.toml configuration.
Run this command whenever you update your code or change deployment configuration.
Step 11: Check the Deployment Status
After deployment, check the current app status.
fly statusThis command shows application details, recent deployment details, Machine allocation, and active regions.
Open the deployed app in your browser:
fly apps openThe command opens the current deployed application from the terminal.
Step 12: View Application Logs
Use logs to debug failed builds, missing secrets, startup errors, runtime crashes, and database connection problems.
fly logsBy default, fly logs streams application logs continuously until the command is stopped. You can also fetch buffered logs without tailing.
Use this command when the app deploys successfully but does not respond correctly.
fly logs --no-tailStep 13: Connect a Custom Domain
Fly.io gives every app a .fly.dev subdomain for testing. For production, attach your custom domain and configure DNS records through your domain provider.
Add a custom domain using:
fly certs add example.comCheck certificate and DNS status using:
fly certs check example.comFly.io shows the required DNS configuration after adding the domain. A and AAAA records are recommended for direct app connections, while CNAME records work well for subdomains.
Step 14: Configure HTTPS and Certificate Validation
Fly.io uses Let’s Encrypt certificates for custom domains after domain ownership is verified. Certificate validation may use TLS-ALPN, HTTP-01, or DNS-01 validation, depending on your domain setup.
Use this command to view setup instructions:
fly certs setup example.comDNS changes may take time to propagate. Certificate validation can fail when records are missing, incorrect, proxied incorrectly, or rate-limited.
Step 15: Scale the Application
Fly.io allows apps to scale by Machine count, VM size, memory, and region. To increase Machine count, run:
fly scale count The fly scale count command changes the app’s VM count to the given value.
Check the current scale configuration using:
fly scale showUse scaling carefully because more Machines and larger VM sizes can increase hosting cost.
Step 16: Test the Production Deployment
After deployment, test the full production flow. Check pages, API routes, authentication, database reads, database writes, webhooks, file uploads, and third-party integrations.
Test common endpoints such as:
GET /

GET /health

POST /api/login

GET /api/users
Also confirm that frontend URLs, backend URLs, CORS settings, cookies, and callback URLs use the production Fly.io domain or custom domain.
Step 17: Debug Common Fly.io Deployment Errors
Common Fly.io deployment issues usually come from wrong ports, missing secrets, failed Docker builds, database connection errors, or incorrect start commands.
Check these points first:
fly logs

fly status

fly secrets list

fly config show
Confirm that your app listens on the same port as internal_port. Also confirm that private values are stored with fly secrets set and not inside committed source code.
Step 18: Redeploy After Code Changes
After updating your application, commit the changes and redeploy.
git add .

git commit -m "Update Fly.io deployment"

fly deploy
Fly.io builds a new image and updates or creates Machines during each deployment. This keeps your production app aligned with the latest source code and configuration.
Conclusion
Fly.io gives developers a practical way to deploy full-stack apps, APIs, backend services, Dockerized projects, and database-connected applications. A successful Fly.io deployment depends on a working local app, correct port configuration, valid fly.toml settings, secure secrets, clean logs, and proper domain setup.
The most important technical detail is port handling. Your app should listen on the same internal port configured in fly.toml, usually 8080. After deployment, use fly status, fly logs, fly apps open, and fly certs check to verify that the app works correctly in production.
FAQs
What is Fly.io?
Fly.io is a cloud platform that helps developers deploy applications, APIs, and backend services close to users across global regions.
What is flyctl?
flyctl is the official Fly.io command-line tool used to create apps, deploy code, manage secrets, check logs, and scale services.
What is fly.toml in Fly.io?
fly.toml is the Fly.io configuration file that stores app settings such as app name, region, internal port, services, and deployment rules.
What is the default port for Fly.io apps?
Fly.io commonly uses 8080 as the internal application port. Your app should listen on the same port defined in fly.toml.
What is Fly.io used for?
Fly.io is used to deploy web apps, APIs, backend services, Dockerized applications, and database-connected projects in production.
Success Stories

About the Author
Vaishali
I'm a seasoned writer with four years of experience across technical, non-technical, and just about every genre or niche you can imagine. Adaptable and curious, I enjoy exploring new topics and making information engaging and easy to understand. Fueled by a steady stream of tea, I approach each project with creativity, reliability, and genuine enthusiasm for storytelling.
View all posts by Vaishali
Connect with me @



































Did you enjoy this article?