

Artificial Intelligence and Machine Learning Articles
Data Analyst vs Machine Learning Engineer: Which Career Grows Faster?
Finance Manager to Data Analytics: Career Growth, Salary and Seniority
How to Evaluate LLM Outputs in Production Deployments
AI/ML Skills Gap 2026: Why Companies Can't Find Job-Ready Talent


Get In Touch For Details! Request More Information

How to Use NotebookLM: Create Study Notes & Presentations
Nov 09, 2026 5 Min Read 12400 Views
(Last Updated)
NotebookLM (now Gemini Notebook) turns your own documents into study notes and presentation outlines. Upload your files to a notebook, then ask it to summarize them into notes or build a slide structure. Every answer comes from your sources, with citations you can check.
Most people spend hours converting long PDFs and reports into notes and slides. This guide gives you the exact steps and prompts to do it in much less time. It also covers how NotebookLM compares to ChatGPT and whether it is safe to use.
How to Use NotebookLM in 5 Steps:
- Sign in to NotebookLM with your Google account and create a new notebook.
- Upload your sources, such as PDFs, Google Docs, Slides or web links.
- For study notes, ask it to summarize your sources into notes with headings and bullet points.
- For a presentation, ask for a slide outline, then expand each slide and add speaker notes.
- Check the citations, then move your content into Google Slides, PowerPoint or Canva.
Table of contents
- What is NotebookLM?
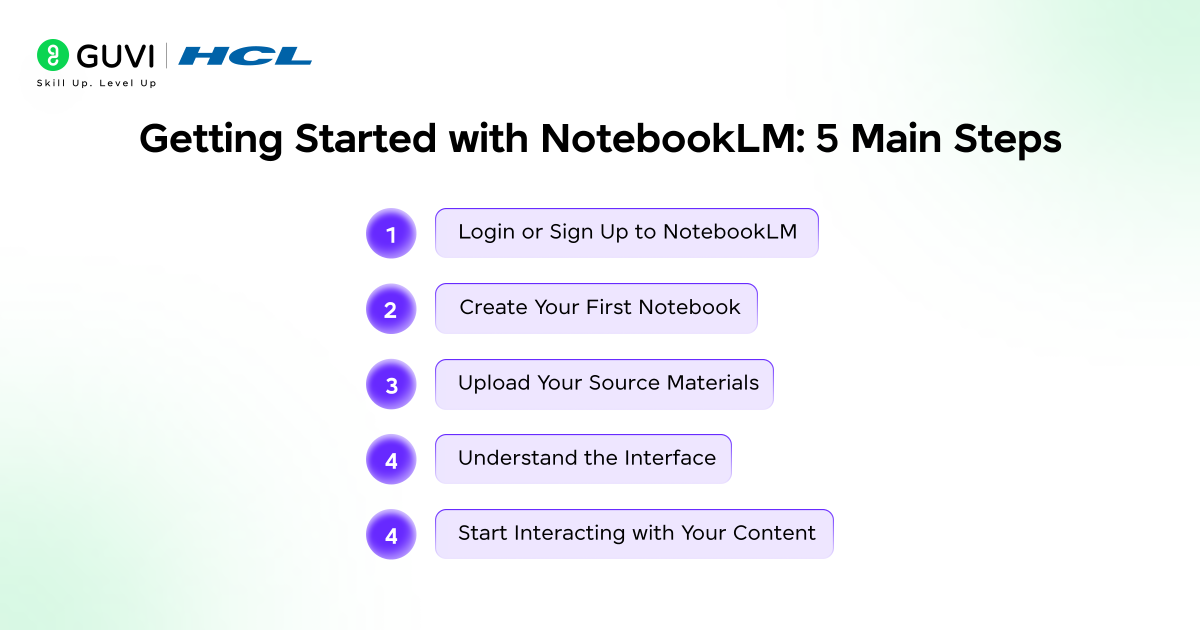
- Getting Started with NotebookLM
- Login or Sign Up to NotebookLM
- Create Your First Notebook
- Upload Your Source Materials
- Understanding the NotebookLM Interface
- Your First Interaction with NotebookLM
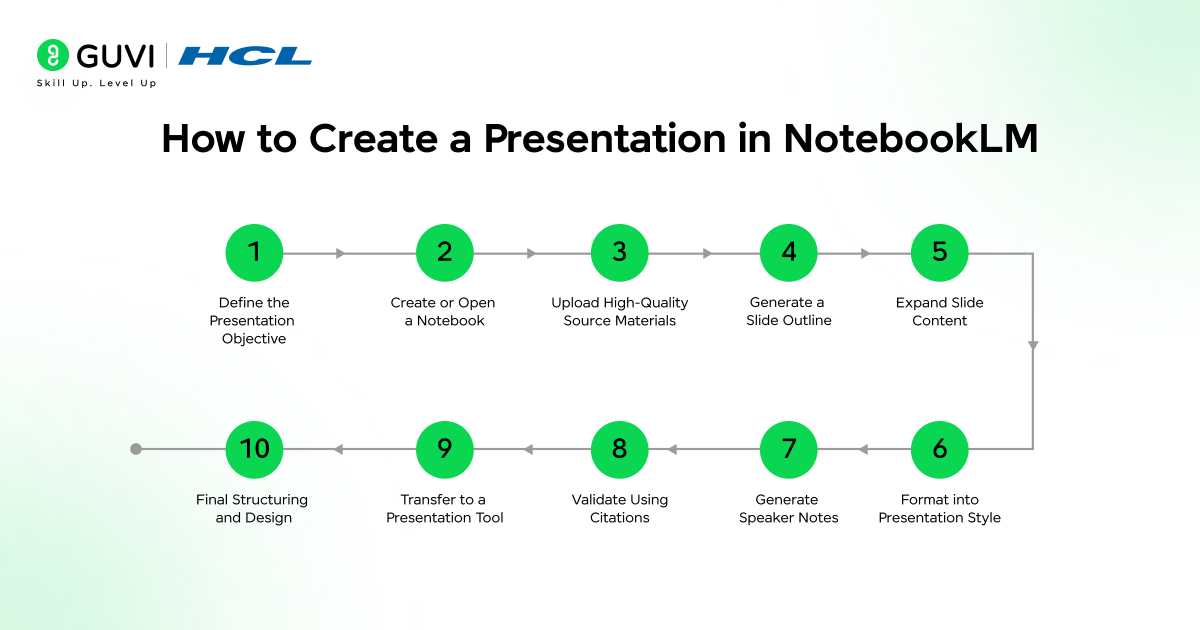
- How to Create a Presentation in NotebookLM
- Step 1: Define the Presentation Objective
- Step 2: Create or Open a Notebook
- Step 3: Upload High-Quality Source Materials
- Step 4: Generate a Slide Outline
- Step 5: Expand Slide Content
- Step 6: Format into Presentation Style
- Step 7: Generate Speaker Notes (Optional but Recommended)
- Step 8: Validate Using Citations
- Step 9: Transfer to Presentation Tool
- Step 10: Final Structuring and Design
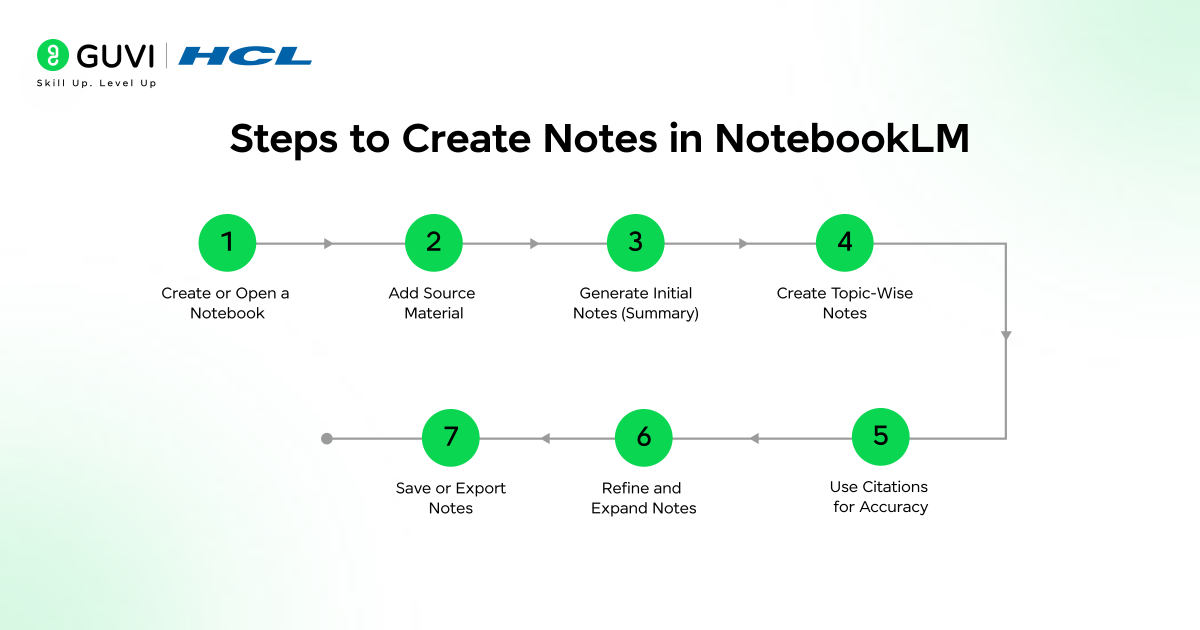
- Steps to Create Notes in NotebookLM
- Step 1: Create or Open a Notebook
- Step 2: Add Source Material
- Step 3: Generate Initial Notes (Summary)
- Step 4: Create Topic-Wise Notes
- Step 5: Use Citations for Accuracy
- Step 6: Refine and Expand Notes
- Step 7: Save or Export Notes
- NotebookLM Use Cases and Prompt Examples
- a. NotebookLM Prompts for Students
- b. NotebookLM Prompts for Professionals
- NotebookLM vs ChatGPT: Which One Should You Use?
- Is NotebookLM Safe?
- FAQs
- Is NotebookLM free?
- Can NotebookLM create study notes?
- Can NotebookLM make a presentation?
- Is NotebookLM better than ChatGPT?
- Is NotebookLM safe to use?
What is NotebookLM?
NotebookLM (now Gemini Notebook) is an AI-powered research and knowledge synthesis tool developed by Google. It lets users upload documents and interact with them through natural-language queries.
Unlike generic chatbots, it grounds every response in user-provided sources such as PDFs, Google Docs, and web content, using retrieval-augmented generation (RAG) to ensure accuracy and contextual relevance.
It parses, indexes, and semantically links information across documents, enabling tasks like summarization and insight extraction with inline citations.
Curious how tools like NotebookLM actually work? The same AI and machine learning skills behind them can be yours. Explore HCL GUVI’s Intel & IITM Pravartak Certified AI/ML Course, open to beginners and career switchers, even with no coding experience.
Getting Started with NotebookLM
1. Login or Sign Up to NotebookLM
To begin, visit the NotebookLM platform and sign in using your Google account.
Once logged in, you’ll land on the homepage, your central dashboard. Here, you can:
- View existing notebooks
- Create new notebooks
- Resume ongoing research or projects
This workspace is designed to keep all your knowledge organized in one place.
2. Create Your First Notebook
Click on “Create New” to start a fresh notebook.
Think of a notebook as a dedicated workspace for:
- A research topic
- A content project
- A business use case
- A learning module
For example:
- Notebook Name: Generative AI Research
This naming structure helps you stay clear when managing multiple notebooks.
Best practice: Use one notebook per topic instead of mixing unrelated documents. This improves response accuracy and context relevance.
3. Upload Your Source Materials
NotebookLM becomes powerful when you provide it with high-quality inputs. It supports multiple formats, making it flexible for different workflows.
Supported Source Types:
- Google Docs: Directly import from Drive
- PDFs: Research papers, reports, whitepapers
- Text Files: Notes, Markdown, documentation
- Web URLs: Blogs, articles, documentation pages
- Google Slides: Presentation content
How to Upload:
- Click “Upload a Source”
- Select a file or paste a link
- Wait for processing to complete
Example:
Upload a report like: “Deep Point of View on Generative AI” by LTI Mindtree
This allows NotebookLM to:
- Understand enterprise AI trends
- Extract insights across sections
- Provide contextual answers with references
Pro Tip: Upload multiple related documents to enable cross-source insights instead of isolated answers.
4. Understanding the NotebookLM Interface
Once your sources are uploaded, NotebookLM organizes everything into a clean, functional layout.
Left Panel: Sources
- Displays all uploaded documents
- Click to open and read full content
- Highlight key sections
- Remove or manage sources
Center Panel: AI Interaction Area
This is where the core functionality happens.
You can:
- Ask questions
- Generate summaries
- Request structured outputs
- Compare insights across documents
Key Feature: Inline Citations
Every response includes references like [1], [2]:
- These link directly to the original text
- Clicking them shows the exact passage used
This ensures:
- Transparency
- Accuracy
- Trust in generated outputs
Download HCL GUVI’s GenAI eBook to learn how to build smarter note-taking systems, apply prompt strategies, and create structured outputs for real-world use.
5. Your First Interaction with NotebookLM
Once your notebook is ready, start with a prompt to understand the content.
Example Prompt: “Summarize the main themes and key findings from this generative AI report in 5 bullet points.”
What Happens:
- NotebookLM scans the entire document
- Extracts key insights
- Presents them in structured bullets
- Adds citations for verification
How to Create a Presentation in NotebookLM
Step 1: Define the Presentation Objective
Before using NotebookLM, clearly define:
- Topic and scope
- Target audience (beginner, technical, business)
- Number of slides or depth required
This ensures the AI generates relevant, structured output.
Step 2: Create or Open a Notebook
- Log in to NotebookLM
- Click “Create New” or open an existing notebook
- Keep one notebook per topic for better context handling
Step 3: Upload High-Quality Source Materials
- Click “Upload a Source”
- Add PDFs, Google Docs, URLs, or Slides
- Wait for indexing to complete
Important Note: NotebookLM generates content only from uploaded sources, so input quality directly impacts output.
Step 4: Generate a Slide Outline
Ask NotebookLM to create a structured presentation flow.
Prompt example:
- “Create a 10-slide presentation outline on [topic] with slide titles and key points”
Output:
- Logical sequence (Introduction → Core → Conclusion)
- Slide-wise structure
Step 5: Expand Slide Content
Refine each slide with more depth.
Prompt examples:
- “Expand each slide with 3-5 bullet points”
- “Add examples and key insights to each slide”
This creates content-ready slides.
Step 6: Format into Presentation Style
Convert content into clean slide format.
Prompt example:
- “Rewrite this into presentation-ready slides with concise bullet points and clear headings”
Optional refinements:
- Limit bullets per slide
- Simplify language
- Adjust tone (technical or business)
Step 7: Generate Speaker Notes (Optional but Recommended)
Add explanation for delivery.
Prompt example:
- “Add speaker notes for each slide explaining the key points”
Step 8: Validate Using Citations
- Check inline citations like [1], [2]
- Verify accuracy by reviewing source passages
Ensures:
- Source-backed content
- No incorrect assumptions
Step 9: Transfer to Presentation Tool
NotebookLM can also generate a slide deck from your sources in the Studio panel. Use it as a starting point, then copy your content into:
- Google Slides
- Microsoft PowerPoint
- Canva
Step 10: Final Structuring and Design
- Add visuals (charts, icons, diagrams)
- Keep slides concise (3-5 bullets each)
- Ensure consistent formatting
Steps to Create Notes in NotebookLM
Step 1: Create or Open a Notebook
- Log in to NotebookLM
- Click “Create New” or open an existing notebook
- Treat each notebook as a focused topic workspace
Step 2: Add Source Material
- Click “Upload a Source”
- Upload PDFs, Google Docs, or paste URLs
- Wait for indexing to complete
Tip: The quality of your notes depends on the quality of your sources.
Step 3: Generate Initial Notes (Summary)
Start with a structured prompt:
Example:
- “Summarize this document into clear notes with headings and bullet points”
This creates a base layer of notes from the entire document.

Step 4: Create Topic-Wise Notes
Refine your notes by focusing on specific sections.
Examples:
- “Create notes on enterprise use cases of generative AI”
- “Extract key challenges and limitations in bullet points”
This helps break large content into organized sub-notes.
Step 5: Use Citations for Accuracy
- Every output includes citation markers like [1], [2]
- Click them to verify the exact source text
This ensures your notes are:
- Source-backed
- Reliable
- Traceable
Step 6: Refine and Expand Notes
You can iteratively improve notes:
Follow-up prompts:
- “Expand point 3 with examples”
- “Convert this into structured study notes”
- “Simplify this for beginners”
Step 7: Save or Export Notes
- Copy notes directly
- Use them for blogs, research, or study material
- Organize them externally if needed
NotebookLM turns note-making from a manual task into a structured, AI-assisted knowledge-extraction process.
You just turned hours of reading into minutes of work. That is what AI skills do. Imagine building such tools yourself, with live classes by industry experts and Intel engineers, plus 20+ real projects, in HCL GUVI’s Intel & IITM Pravartak Certified AI/ML Course.
NotebookLM Use Cases and Prompt Examples
NotebookLM (now Gemini Notebook) answers only from the files you upload, so a clear prompt gives you a better result. Use the prompts below as they are, or replace the topic and source names with your own.
a. NotebookLM Prompts for Students
1. Study notes
Create structured study notes from my uploaded chapter. Use a heading for each topic, bullet points for key ideas, and bold every important term.Turns a long chapter into clean, organized notes.
2. Summaries
Summarize this source in 150 words. Then list the five most important points in simple language.Gives you a quick overview before you read in detail.
3. Quiz questions
Write 10 multiple-choice questions from my sources. Give four options for each, mark the correct answer, and explain why it is correct.Lets you test yourself on what you have studied.
4. Exam revision
Make a revision sheet from my sources. Include key definitions, important dates or formulas, and the topics most likely to be asked.Gives you one page to revise from before the exam.
b. NotebookLM Prompts for Professionals
1. Meeting notes
Turn this meeting transcript into notes. List the decisions made, action items with the person responsible, and any open questions.Converts a long transcript into a clear follow-up list.
2. Research reports
Compare the findings across my sources. Write a one-page report with the main insights, the points where sources disagree, and a short conclusion.Helps you pull several documents into one report.
3. Presentations
Create a 10-slide outline from my sources. For each slide, give a title, three key points, and one idea for a visual.Gives you a ready structure to build your slides on.
Tip: Be specific. Name the source, state the format you want, and set a length. For example, “Using only the Q3 report, list the top five risks in a table.” Then check the citations to confirm each answer matches your source.
NotebookLM vs ChatGPT: Which One Should You Use?
NotebookLM is better when you need answers based on your own documents, with citations you can check. ChatGPT is better for open-ended work like brainstorming, writing, and questions that need general or current knowledge. Many people use both.
| Feature | NotebookLM | ChatGPT |
|---|---|---|
| Answers based on | Only the sources you upload | Its general training, plus the web and your files when you add them |
| Citations | Inline citations that point to the passage in your sources | Can cite web pages when it searches, but not tied to your documents by default |
| Saved files | Sources stay in your notebook for later sessions | Files can be added to a chat or a Project |
| Study tools | Audio and video overviews, flashcards, quizzes, slide decks, mind maps | Can write flashcards, quizzes and outlines in chat |
| Creative writing and brainstorming | Limited, since it stays within your sources | Strong |
| Pricing | Free plan. Paid plans start at ₹399/month in India through Google AI Plus | Free plan. Plus costs ₹1,999/month |
| When to choose | Studying from your notes, reading research papers, summarizing reports, and working from meeting transcripts | Brainstorming, drafting, coding, and questions that need general or current knowledge |
Also Read: Claude vs NotebookLM for Research: Which One Should You Use?
Learning to use AI is the first step. Building it is where careers take off. HCL GUVI’s Intel & IITM Pravartak Certified AI/ML Course gives you live classes, 20+ projects, a joint certification and placement guidance. Your AI career can start today!
Is NotebookLM Safe?
Yes, NotebookLM is safe for most study and work use. Google’s privacy terms say it doesn’t use your uploads to train its AI models unless you send feedback. Your notebooks stay private unless you share them.
On a personal account, feedback is the one exception. If you click thumbs up or thumbs down and send feedback, trained reviewers may see that conversation. Google removes your account details first and keeps the reviewed data for up to three years.
Work and school accounts get stronger protection. On Google Workspace and Workspace for Education accounts, your uploads, chats and answers are not reviewed by humans or used to train AI models, even if you send feedback. This depends on your license, so check with your admin.
FAQs
1. Is NotebookLM free?
Yes, NotebookLM has a free plan with a Google account, and paid plans only raise the limits.
2. Can NotebookLM create study notes?
Yes, upload your sources and ask it to summarize them into notes with headings and bullet points.
3. Can NotebookLM make a presentation?
Yes, it can generate a slide outline or a slide deck from your sources, which you can refine in Google Slides, PowerPoint or Canva.
4. Is NotebookLM better than ChatGPT?
NotebookLM is better for answers from your own documents with citations, while ChatGPT is better for brainstorming and general knowledge.
5. Is NotebookLM safe to use?
Yes, under its privacy terms, your uploads are not used to train its AI models unless you send feedback.
Success Stories
















Did you enjoy this article?