


Cloud Computing Articles
Cloud Cost Optimization: 10 Tricks to Cut Your Bill
Advanced DNS Interview Questions for Senior Engineers: What to Expect in 2026
Advantages of Computer Network: Key Benefits, Limitations & Practical Applications


Get In Touch For Details! Request More Information
NATS Messaging Tutorial: Simple Guide for Beginners in 2026
Jun 29, 2026 4 Min Read 46 Views
(Last Updated)
NATS is quietly becoming one of the most talked-about tools in modern cloud systems, especially when things need to move fast without any delay. There’s something interesting about how it connects everything behind the scenes, almost like an invisible layer keeping systems in sync.
What makes NATS even more intriguing is how simple it looks on the surface, yet it’s trusted in some of the most demanding environments. Once you start exploring it, you begin to wonder how something so light can handle so much without breaking a sweat.
Table of contents
- TL;DR Summary
- What is NATS: Quick Overview
- Installing NATS — Step-by-Step Implementation
- Step 1: Check supported OS and architecture
- Step 2: Choose an installation method
- Step 3a: Install via command line (simplest method)
- Step 3b: Install via Docker
- Step 3c: Install via a package manager
- Step 3d: Download a release build manually
- Step 3e: Install from source (requires Go)
- Step 4: Verify the installation
- Starting Your First NATS Server
- Publish and Subscribe (Hands-On Example)
- Request-Reply Example
- Common Mistakes to Avoid
- Conclusion
- FAQs
- Do I need to install NATS on a server before using it in an application?
- Can NATS work without storing messages permanently?
- What happens if a subscriber starts after a message is published?
- Why do developers use subjects like greet.joe instead of direct connections?
- What is the main risk in request–reply communication?
- Can NATS handle large-scale systems with many services?
TL;DR Summary
- NATS is a lightweight messaging system used for fast communication between distributed applications in cloud-native environments.
- NATS can be installed using multiple methods, such as command-line scripts, Docker, package managers, manual downloads, or Go source.
- In NATS, the publish–subscribe model allows messages to be sent to subjects and received instantly by subscribed services.
- With NATS, request–reply communication enables applications to send a message and receive an immediate response.
- NATS also includes JetStream for message storage and replay, along with common beginner mistakes like missing server startup or subject mismatches.
NATS was created by Derek Collison to build a fast, lightweight messaging system for cloud applications, making it a popular choice for modern distributed systems. “`
What is NATS: Quick Overview
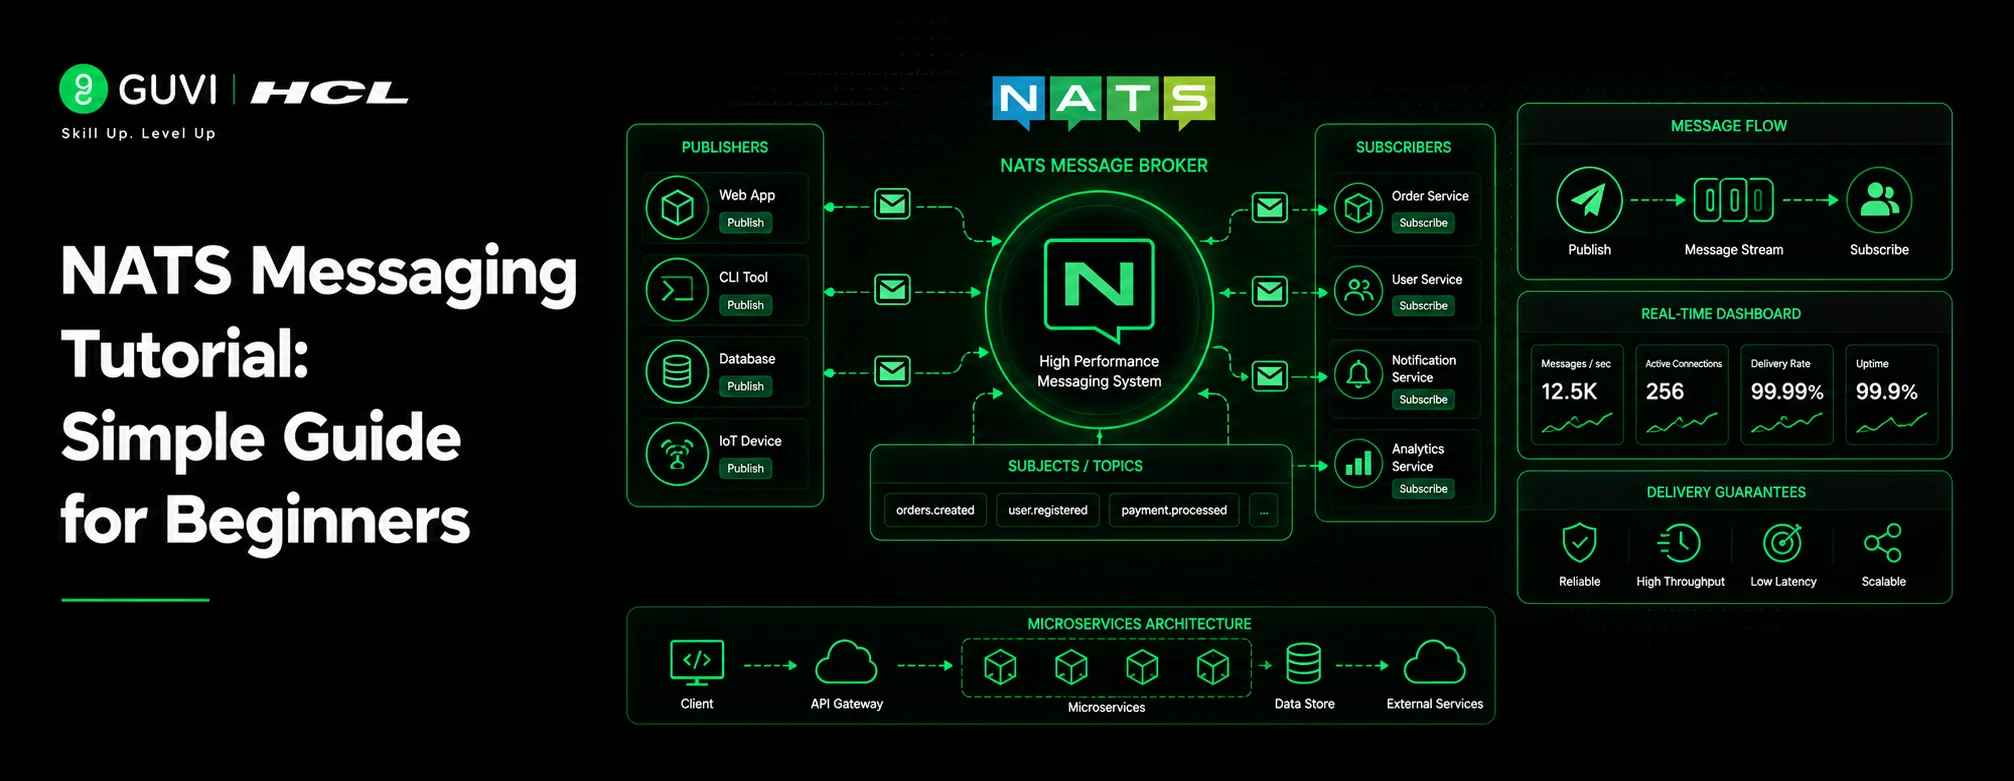
NATS (Neural Autonomic Transport System) is an open-source messaging system that lets applications communicate with each other via named topics (subjects) rather than connecting directly via fixed addresses. A service publishes a message to a subject, and anything listening on that subject receives it instantly.
What makes NATS popular is its lightweight, fast nature. It ships as a single small binary with no extra dependencies, yet handles large message volumes with very low latency and even supports storing and later replaying messages through a feature called JetStream.
Want to understand how real-world systems are built at scale? HCL GUVI’s System Design course helps you learn core concepts like scalability, caching, and fault tolerance. Move from basic concepts to designing production-level systems. Enroll now and level up your skills!
Installing NATS — Step-by-Step Implementation
The following are the step-by-step instructions for installing NATS on your system:
Step 1: Check supported OS and architecture
Before installing anything, just make sure your computer or server is actually supported. NATS runs on almost everything — Mac, Linux, Windows, and a few others — so this step is just a quick check, not really “work.”
- macOS (Darwin): amd64, arm64
- Linux: amd64, 386, arm6, arm7, arm64, mips64le, s390x
- Windows: amd64, 386, arm6, arm7, arm64
- FreeBSD: amd64
- (NetBSD and IBM z/OS are experimental)
Step 2: Choose an installation method
There’s no single “correct” way to install NATS — there are several options, and you just pick the one that fits how you work.
If you prefer quick terminal commands, use the command-line method. If you already use Docker, use that. If you’re a Mac/Windows/Arch user who likes package managers, use that instead.
- Command line (quick install script)
- Docker
- Package manager (Homebrew, Scoop, AUR)
- Release zip/tarball download
- From source (Go)
Step 3a: Install via command line (simplest method)
This is the fastest way — one command downloads and installs the NATS server for you automatically. No extra steps needed.
shell
curl -fsSL https://binaries.nats.dev/nats-io/nats-server/[email protected] | sh
Use @latest to get the most recent release, or @main for the development tip.

Step 3b: Install via Docker
If you already use Docker, this is the cleanest option — it keeps NATS in its own isolated container instead of installing files directly on your system.
Pull the image:
shell
docker pull nats:latest
Run the server:
shell
docker run -p 4222:4222 -ti nats:latest
Expected output:
[1] 2019/05/24 15:42:58.228063 [INF] Starting nats-server version #.#.#
[1] 2019/05/24 15:42:58.228115 [INF] Git commit [#######]
[1] 2019/05/24 15:42:58.228201 [INF] Starting http monitor on 0.0.0.0:8222
[1] 2019/05/24 15:42:58.228740 [INF] Listening for client connections on 0.0.0.0:4222
[1] 2019/05/24 15:42:58.228765 [INF] Server is ready
Step 3c: Install via a package manager
If you’re used to installing apps with a simple command (like brew install something), you can do the same here — your package manager handles the download and setup for you.
Windows (Scoop):
shell
scoop install main/nats-server
macOS (Homebrew):
shell
brew install nats-server
Arch Linux (AUR):
shell
yay -S nats-server
Step 3d: Download a release build manually
This is the “do it yourself” method — you manually download the file, unzip it, and place it where your system can find it. Good if you want full control or a specific version.
Go to the nats-server GitHub releases page, then:
shell
curl -L https://github.com/nats-io/nats-server/releases/download/vX.Y.Z/nats-server-vX.Y.Z-linux-amd64.tar.gz -o nats-server.tar.gz
Extract it:
shell
tar -xvzf nats-server.tar.gz
Copy the binary to your path:
shell
sudo cp nats-server-vX.Y.Z-linux-amd64/nats-server /usr/bin
Step 3e: Install from source (requires Go)
This option is mainly for developers who already have Go installed and want the very latest (possibly unreleased) version straight from the source code.
shell
go install github.com/nats-io/nats-server/v2@main
Step 4: Verify the installation
Once installed, this step just confirms everything worked. You simply type one command, and if NATS is running properly, it’ll show a “Server is ready” message.
Run:
nats-server
You should see output like:
[41634] 2019/05/13 09:42:11.745919 [INF] Starting nats-server version 2.*.*
[41634] 2019/05/13 09:42:11.746240 [INF] Listening for client connections on 0.0.0.0:4222
[41634] 2019/05/13 09:42:11.746249 [INF] Server id is NBNYNR4ZNTH4N2UQKSAAKBAFLDV3PZO4OUYONSUIQASTQT7BT4ZF6WX7
[41634] 2019/05/13 09:42:11.746252 [INF] Server is ready
Starting Your First NATS Server
Once installed, running NATS is just one command — you don’t have to specify anything, and the server will start listening for client connections on port 4222 by default.
Run:
nats-server
You should see output confirming it’s running:
[41634] 2019/05/13 09:42:11.745919 [INF] Starting nats-server version 2.*.*
[41634] 2019/05/13 09:42:11.746240 [INF] Listening for client connections on 0.0.0.0:4222
[41634] 2019/05/13 09:42:11.746252 [INF] Server is ready
That’s it — your local NATS server is now live and ready to accept connections. Keep this terminal window open; you’ll need it running in the background for the next steps.
Publish and Subscribe (Hands-On Example)
The most basic way to use NATS is publish-subscribe: a publisher sends a message on a subject, and any active subscriber listening to that subject receives it. Let’s see this in action using Node.js.
First, install the official NATS client for Node.js:
npm install nats
Subscriber (save as subscriber.js):
import { connect } from “nats”;
const nc = await connect({ servers: “localhost:4222” });
console.log(“Connected to NATS”);
const sub = nc.subscribe(“greet.*”);
for await (const msg of sub) {
console.log(`Received: ${msg.string()} on subject ${msg.subject}`);
}
Publisher (save as publisher.js):
import { connect } from “nats”;
const nc = await connect({ servers: “localhost:4222” });
nc.publish(“greet.joe”, “hello joe”);
nc.publish(“greet.pam”, “hello pam”);
await nc.flush();
await nc.close();
Run the subscriber first, then the publisher in a separate terminal:
node subscriber.js
node publisher.js
The subscriber will print each message as it arrives, since it’s listening on greet.* — a wildcard that matches any subject starting with greet.. This is the foundation of almost everything else you’ll build with NATS.
Request-Reply Example
Sometimes you don’t just want to send a message — you want a response back too, like calling an API.
NATS handles this using the request-reply pattern: a request is published on a subject with a reply subject attached, and the responder sends its reply to that subject.
This reply subject is called an “inbox,” dynamically created for each request, so the response always finds its way back to the right requester.
Responder (save as responder.js):
javascript
import { connect } from “nats”;
const nc = await connect({ servers: “localhost:4222” });
console.log(“Responder ready, waiting for requests…”);
const sub = nc.subscribe(“time”);
for await (const msg of sub) {
msg.respond(new Date().toString());
}
Requester (save as requester.js):
javascript
import { connect } from “nats”;
const nc = await connect({ servers: “localhost:4222” });
const reply = await nc.request(“time”, undefined, { timeout: 1000 });
console.log(`Got reply: ${reply.string()}`);
await nc.close();
Run the responder first, then the requester in another terminal:
shell
node responder.js
node requester.js
The requester sends a message on the time subject and waits up to one second for a reply.
The responder receives it and immediately sends back the current time. If no responder is listening, the request simply times out — a useful signal that something on the other end isn’t running.
Common Mistakes to Avoid
Here are the following common mistakes beginners make when working with NATS:
- Forgetting to start the NATS server first — your client code will fail to connect if nats-server isn’t already running in the background.
- Publishing before subscribing — since NATS doesn’t store messages by default, a subscriber that starts late misses any messages published before it connected.
- Mixing up subjects — a small typo like greet.joe vs greet.Joe means your subscriber simply won’t receive the message, since subject names are case-sensitive.
- Not setting a timeout on requests — in the request-reply pattern, forgetting the timeout means your code can hang indefinitely if no responder is listening.
- Confusing Core NATS with JetStream — expecting messages to be saved and replayed later, when that’s only possible if JetStream is explicitly enabled.
Conclusion
NATS is one of the simplest ways to get your applications talking to each other, and as you’ve seen, getting started takes only a few lines of code. With your server running and these basic patterns under your belt, you’re ready to start building real, message-driven applications of your own.
FAQs
Do I need to install NATS on a server before using it in an application?
Yes, the nats-server must be running before any client can connect and communicate.
Can NATS work without storing messages permanently?
By default, messages are not stored, so they are lost if no subscriber is active at that moment.
What happens if a subscriber starts after a message is published?
The subscriber will miss the message because NATS does not retain it unless JetStream is enabled.
Why do developers use subjects like greet.joe instead of direct connections?
Subjects allow flexible routing, so multiple services can communicate without tight coupling.
What is the main risk in request–reply communication?
If no responder is active, the request can time out or hang, depending on the configuration.
Can NATS handle large-scale systems with many services?
It is built for high scalability and low-latency communication across distributed systems.
Success Stories


Did you enjoy this article?