


Javascript Articles
Astro Framework Tutorial: Build Your First Fast Website
Turborepo Tutorial: Build Faster JavaScript and TypeScript


Get In Touch For Details! Request More Information
Vite 6 Tutorial: The Fastest Way to Start Building Web Apps
Jun 29, 2026 4 Min Read 29 Views
(Last Updated)
Table of contents
- TL;DR Summary
- What Is Vite 6 and Why Should You Care?
- What's New in Vite 6?
- The Environment API (The Big One)
- Sass Gets an Upgrade
- Better HTML Processing
- Setting Up Your First Vite 6 Project (Step-by-Step)
- Step 1: Create a New Project
- Step 2: Choose Your Framework
- Step 3: Install Dependencies and Start the Dev Server
- Understanding Your Project Structure
- Building for Production
- What to Do Next
- Key Takeaways
- FAQs
- What is Vite 6 used for?
- Is Vite 6 good for beginners?
- How do I install Vite 6?
- What Node.js version does Vite 6 require?
- What is the Environment API in Vite 6?
- Does Vite 6 support TypeScript?
- How is Vite different from Webpack?
- Can I use Vite 6 with React?
TL;DR Summary
- Vite 6 is a next-generation frontend build tool that makes your dev workflow significantly faster
- It introduces the Environment API, letting you run multiple environments (client + server) at once
- Setup takes under 5 minutes with a single npm create vite@latest command
- Hot Module Replacement (HMR) in Vite 6 updates your UI in milliseconds, not seconds
- It works out of the box with React, Vue, Svelte, TypeScript, and more
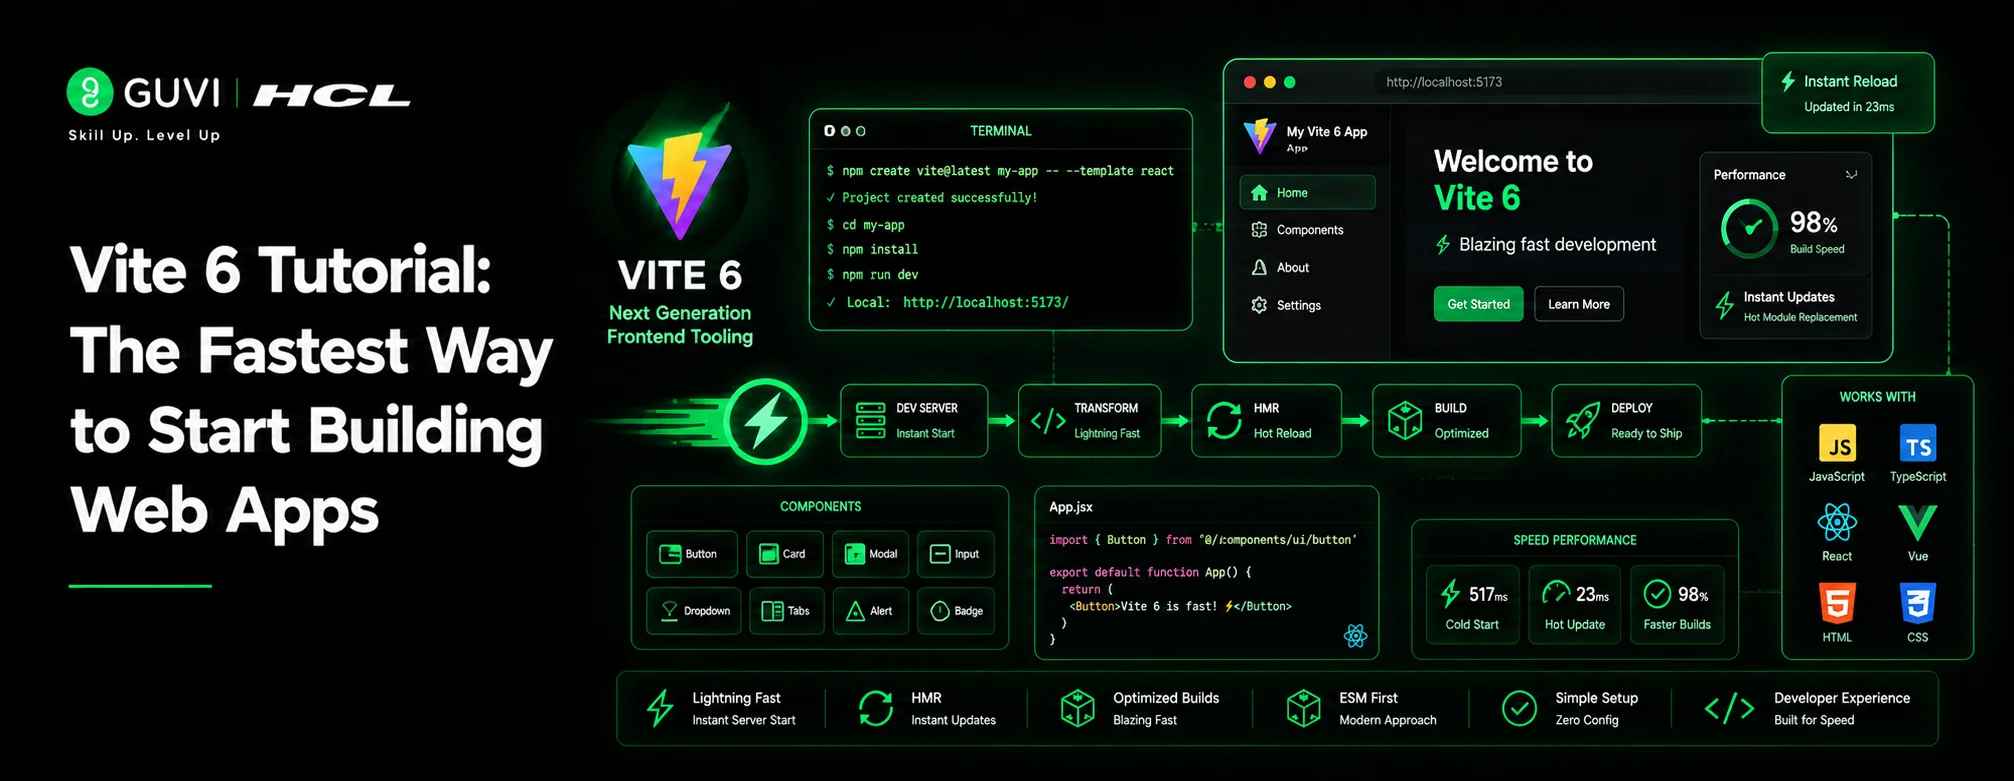
Vite 6 is a frontend build tool that uses native ES modules to serve files on demand during development — no bundling needed. It starts in milliseconds, supports React, Vue, and TypeScript out of the box, and includes blazing-fast Hot Module Replacement. To get started, run npm create vite@latest in your terminal and follow the prompts.
Whether you’re picking up frontend development for the first time or you’re tired of slow build tools slowing you down, this Vite 6 tutorial will walk you through everything you need to get started — clearly, without the fluff.
What Is Vite 6 and Why Should You Care?
Vite serves files on demand over native ES modules during development, so no bundling is required. It also includes Hot Module Replacement that stays fast regardless of how large your app gets.
Think of it this way: traditional bundlers like Webpack have to package your entire app before you can see anything in the browser. Vite skips that step completely during development. It only processes the file you’re currently looking at — nothing more.
Vite also includes a development server and supports Hot Module Replacement, the ability to modify your code and have changes reflected in the running application immediately, in development environments.
The result? You get instant feedback every time you save a file.
Pro Tip: Vite isn’t just fast — it’s consistently fast. Most bundlers slow down as your project grows. Vite’s dev speed stays roughly the same whether your project has 10 files or 10,000.
What’s New in Vite 6?
Before jumping into the hands-on part, let’s quickly cover what’s changed. You don’t need to memorize this — just know these improvements are working for you in the background.
The Environment API (The Big One)
Vite 6 introduces the experimental Environment API, designed to provide framework authors with a development experience closer to production environments. This API allows for the configuration of multiple environments with distinct entry points and environment variables, facilitating more flexible and powerful development setups.
In plain English: you can now run your client code and server-side code as separate environments — simultaneously — inside one Vite setup.
For SPA developers, there’s no change to the workflow. Vite continues to deliver the same smooth and fast experience as before. So if you’re building a regular React or Vue app, none of this affects your day-to-day experience. It’s more relevant when you start working with SSR (Server-Side Rendering) setups down the line.
Sass Gets an Upgrade
From Vite 6, the modern API is used by default for Sass. If you wish to still use the legacy API, you can set css.preprocessorOptions.sass.api: ‘legacy’, but the legacy API support will be removed in Vite 7.
If you use Sass in your projects, your styles will now build faster and more reliably.
Better HTML Processing
Vite 6 extends support to even more HTML elements. To opt out of HTML processing on certain elements, you can add the vite-ignore attribute on the element.
This means Vite can now handle more of your HTML assets automatically — fewer manual configurations to worry about.
Setting Up Your First Vite 6 Project (Step-by-Step)
Let’s build something. This section assumes you have Node.js installed. The minimum required Node.js version for Vite 6 is Node.js 20.0.0. Run node -v in your terminal to check your version before starting.

Step 1: Create a New Project
Open your terminal and run:
npm create vite@latest my-first-vite-app
You’ll get an interactive prompt asking you to choose a framework and a variant.
Step 2: Choose Your Framework
The prompt will show you options like:
- Vanilla (plain JavaScript)
- React
- Vue
- Svelte
- Lit
For this tutorial, select React, then choose JavaScript (or TypeScript if you’re comfortable with it).
Step 3: Install Dependencies and Start the Dev Server
//bash

cd my-first-vite-app

npm install

npm run dev
Your terminal will show something like:
VITE v6.x.x ready in 312 ms
➜ Local: http://localhost:5173/
Open that URL in your browser. Done. You have a running React app — in under 5 minutes.
📊 Data Point: On a fresh install, Vite 6’s dev server typically starts in under 400 milliseconds. A comparable Webpack setup can take 15–30 seconds for the same project.
Understanding Your Project Structure
Once you’re inside the project folder, here’s what you’ll see:
my-first-vite-app/
├── public/ → Static files (images, fonts, etc.)
├── src/ → Your actual app code lives here
│ ├── App.jsx → Main component
│ └── main.jsx → Entry point
├── index.html → Root HTML file
└── vite.config.js → Vite configuration
One thing that surprises a lot of beginners: index.html is in the root, not inside public/. That’s intentional. Vite treats it as the entry point of your application, so it can process script tags and assets directly.
Building for Production
When you’re ready to ship your app, run:
npm run build
Vite bundles and optimizes everything into a dist/ folder. To preview what the production build looks like locally:
npm run preview
This spins up a local server serving your production files — so you can catch any last issues before deploying.
⚠️ Warning: Don’t skip npm run preview. Sometimes assets that work fine in dev can break in production builds due to path differences. Always check before deploying.
Create React App is no longer actively maintained. If you’re starting a new project today, Vite 6 is the right call.
What to Do Next
You’ve got a working Vite 6 project. Here’s how to keep moving:
- Add TypeScript — run npm create vite@latest and select TypeScript variant, or add it manually to your existing project
- Explore Vite plugins — check out the official plugin list at vite.dev for things like PWA support, SVG imports, and more
- Try deploying — drag your dist/ folder into Netlify or Vercel. You’ll have a live URL in about 60 seconds
- Read the Vite docs — the official documentation at vite.dev is genuinely one of the clearest in the frontend world
If you want a structured, mentor-supported path through everything in a roadmap, HCL GUVI’s IIT-M Pravartak Certified Full Stack Developer Course with AI Integration covers the entire journey, from HTML to deployment, with real projects, live sessions, and placement support. Over 10,000 students have used it to break into product-based companies.
Key Takeaways
- Vite 6 starts your dev server in milliseconds using native ES modules — no pre-bundling
- Setup is one command: npm create vite@latest
- HMR keeps your app state intact while you code, saving real development time
- The new Environment API is powerful for SSR setups, but doesn’t affect basic SPA development
- Vite works with React, Vue, Svelte, TypeScript — you’re not locked into one framework
- For production, npm run build handles all optimization automatically
FAQs
1. What is Vite 6 used for?
Vite 6 is a frontend build tool used to create and develop web applications. It provides a fast development server with hot module replacement and builds optimized production bundles. It works with frameworks like React, Vue, and Svelte.
2. Is Vite 6 good for beginners?
Yes. Vite 6 is one of the easiest tools to get started with. A single command sets up a full project, and the default configuration works for most use cases without any changes. The official documentation is also very clear and beginner-friendly.
3. How do I install Vite 6?
Run npm create vite@latest your-project-name in your terminal. Follow the prompts to choose a framework, then run npm install and npm run dev to start your project.
4. What Node.js version does Vite 6 require?
5. What is the Environment API in Vite 6?
6. Does Vite 6 support TypeScript?
Yes. Vite 6 includes out-of-the-box support for TypeScript, JSX, CSS, and more. You can select TypeScript when creating a new project, or add it manually to an existing one.
7. How is Vite different from Webpack?
Webpack bundles your entire application before serving it in development, which gets slower as your app grows. Vite serves files on demand using native ES modules, so startup time stays fast regardless of project size. Vite is also much easier to configure.
8. Can I use Vite 6 with React?
Absolutely. React is one of the most popular choices with Vite. When you run npm create vite@latest, simply select React as your framework and you’ll have a working React app running in minutes.
Success Stories

About the Author
Lukesh S
A professional content writer who has experience in freelancing and now working as a Technical Content Writer at HCL GUVI having sound knowledge in Blog Writing and Creative Writing!
View all posts by Lukesh S
Connect with me @


Did you enjoy this article?