


Javascript Articles
Vite 6 Tutorial: The Fastest Way to Start Building Web Apps
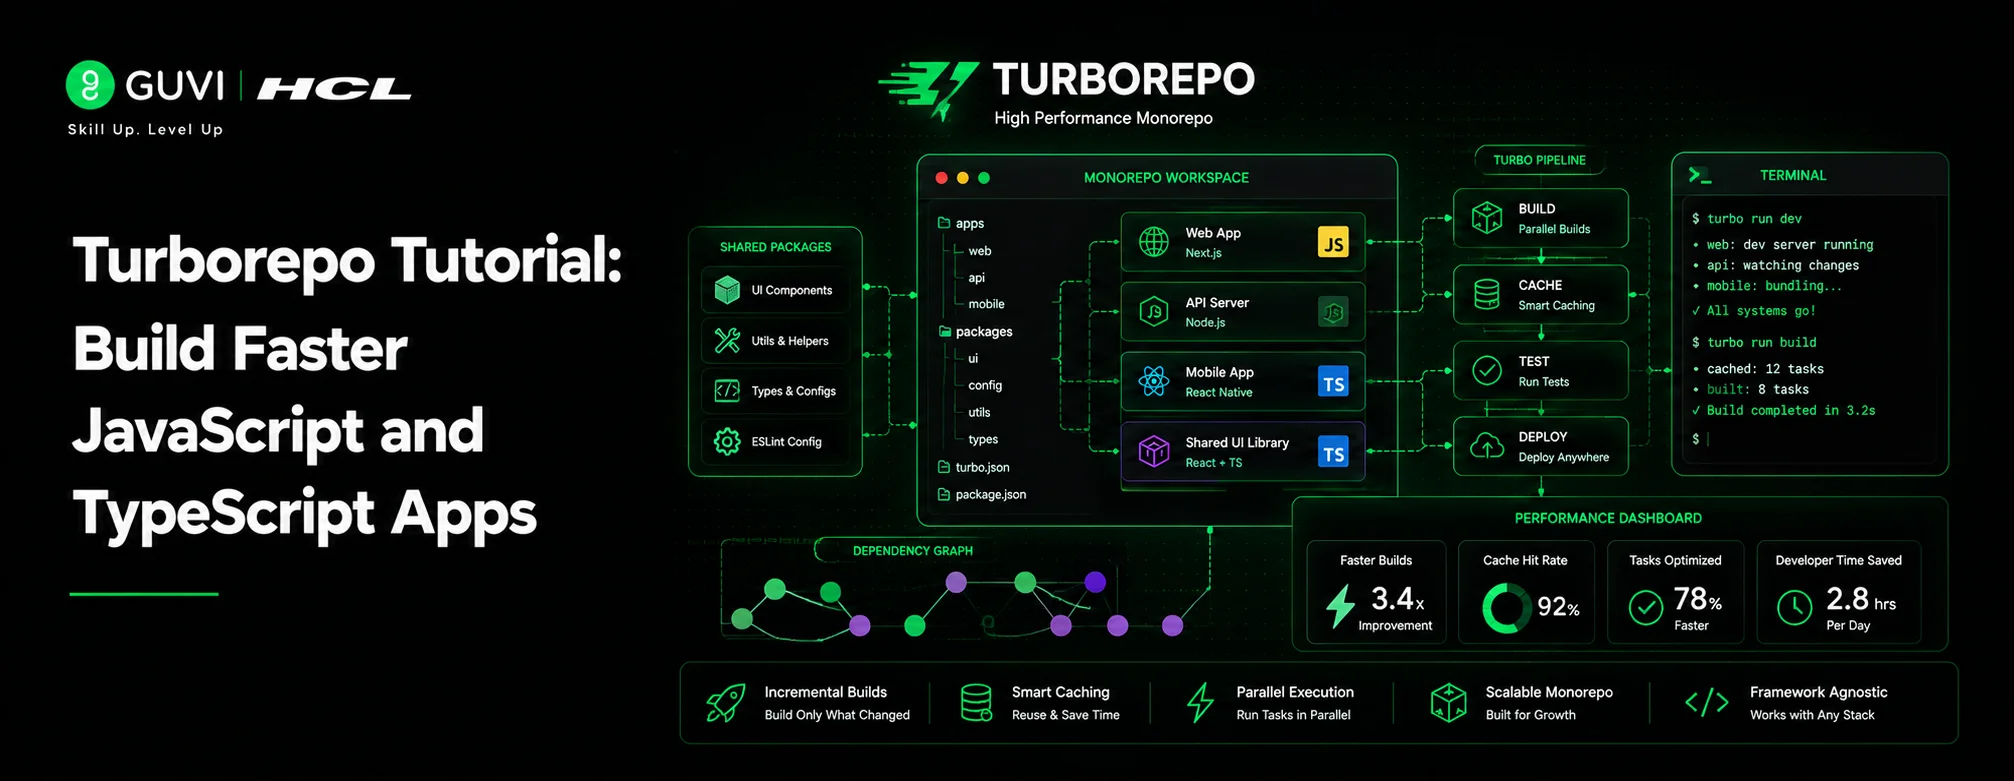
Turborepo Tutorial: Build Faster JavaScript and TypeScript


Get In Touch For Details! Request More Information
Astro Framework Tutorial: Build Your First Fast Website
Jun 29, 2026 4 Min Read 34 Views
(Last Updated)
Table of contents
- TL;DR Summary
- What Is the Astro Framework?
- Why Should You Learn Astro in 2026?
- How to Set Up Astro: Step-by-Step
- Step 1: Create a New Astro Project
- Step 2: Understand the File Structure
- Step 3: Write Your First Astro Component
- Step 4: Create a Reusable Layout
- What Is Astro's Islands Architecture?
- What to Do Next
- Key Takeaways
- FAQs
- Q1: Is Astro good for beginners?
- Q2: Does Astro replace React?
- Q3: Is Astro free to use?
- Q4: Can I use Tailwind CSS with Astro?
- Q5: How is Astro different from Next.js?
- Q6: Does Astro support dynamic routing?
TL;DR Summary
- Astro framework is a modern web framework that ships zero JavaScript by default — making your site faster out of the box.
- It uses a .astro component format that looks like HTML but supports JSX-style logic.
- Astro’s “Islands Architecture” lets you add React, Vue, or Svelte only where you need interactivity.
- You can build a working Astro site in under 30 minutes with its CLI tool.
- It’s perfect for blogs, docs, portfolios, and content-heavy sites.
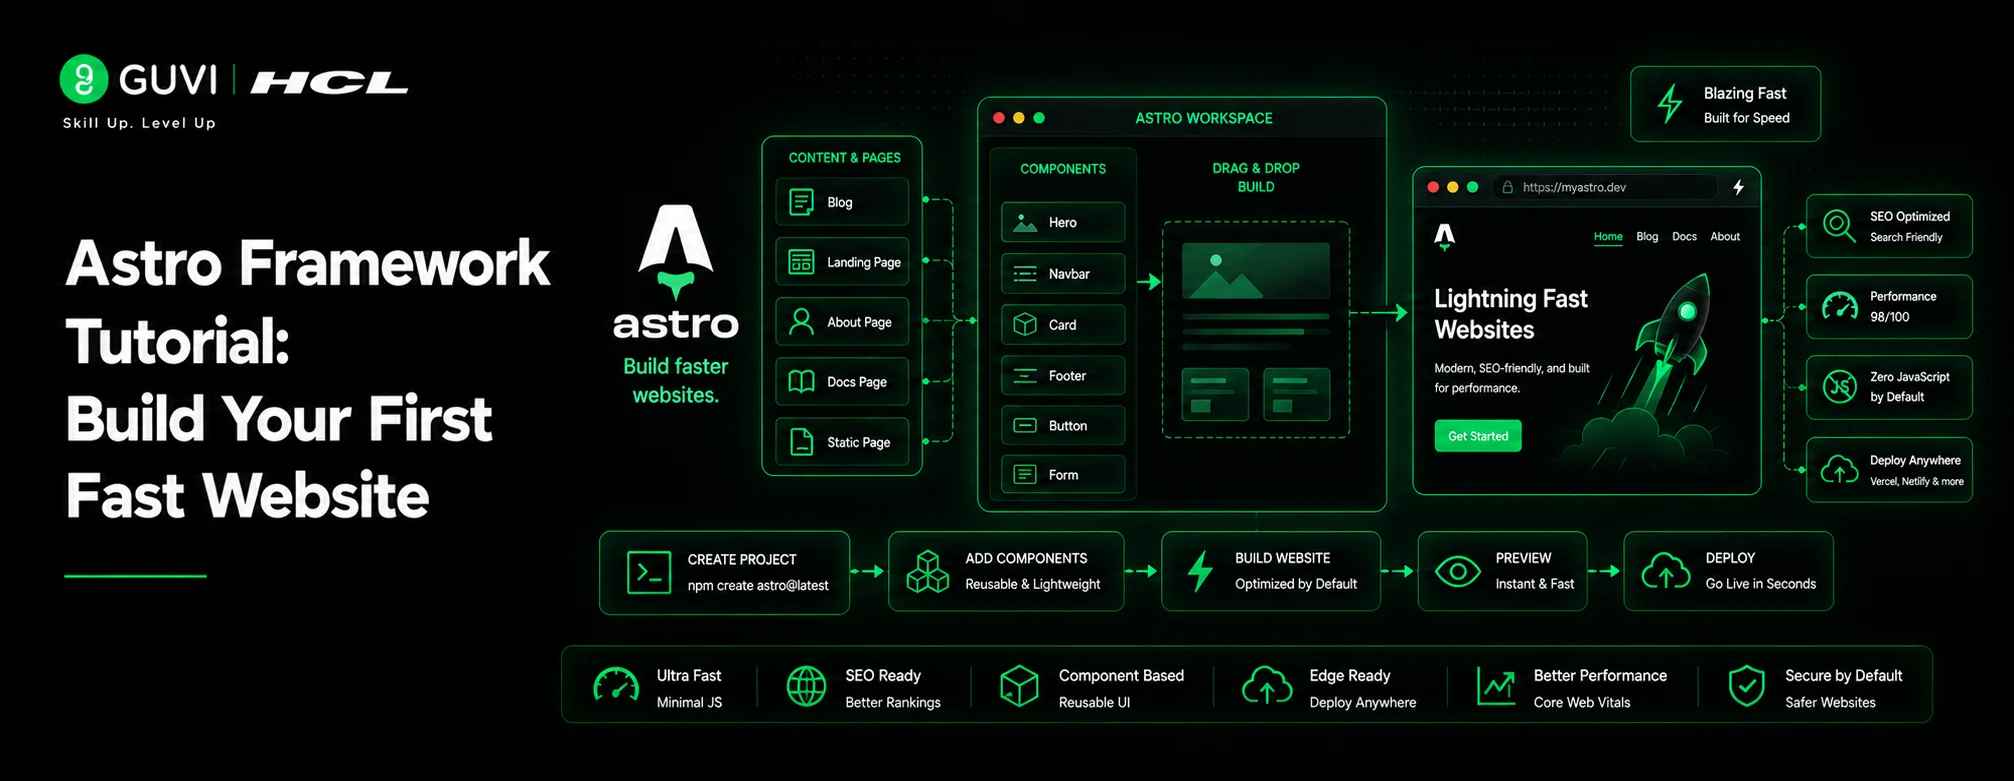
Astro is an open-source web framework built for content-rich, performance-first websites. It renders your pages as static HTML at build time and ships zero JavaScript to the browser unless you specifically ask for it. This makes Astro sites significantly faster than traditional React or Vue apps, and a great starting point for anyone learning modern web development.
If you’ve been curious about Astro but didn’t know where to start, this Astro framework tutorial is written for you. By the end, you’ll understand what Astro is, how to set it up, how its file structure works, and how to build your first page — step by step.
What Is the Astro Framework?
Astro is a JavaScript web framework released in 2021 and now used by teams at companies like Google, Microsoft, and Netlify for their documentation and content sites.
What makes it different from Next.js or Nuxt is its core philosophy: ship less JavaScript. By default, Astro renders everything to HTML at build time. There’s no hydration overhead, no virtual DOM, and no bundle bloat — unless you add it intentionally.
📊 Data Point: According to the 2024 State of JS survey, Astro’s retention rate jumped to 94% — the highest of any framework that year. That number tells you developers who try it, keep using it.
Astro works best for:
- Blogs and content sites
- Documentation portals
- Portfolio websites
- Marketing landing pages
- E-commerce product pages
Why Should You Learn Astro in 2026?
Before getting into the code, it’s worth understanding why Astro has become a go-to framework — especially for developers tired of fighting slow build pipelines and bloated bundles.
Three reasons Astro stands out:
- Performance by default — Your Lighthouse score doesn’t require manual optimization. You start fast.
- Bring your own framework — You can use React, Vue, Svelte, Solid, or Preact inside Astro. You’re not locked in.
- Simple mental model — Astro’s .astro files look like HTML. If you can read HTML, you can read Astro.
💡 Pro Tip: If you’re building a portfolio site or a blog and you’ve been using plain HTML/CSS, Astro is the perfect first “real framework” to learn. The learning curve is gentle.
How to Set Up Astro: Step-by-Step
Let’s get your first Astro project running. This takes about 10 minutes.
What you need before starting:
- Node.js v18 or higher installed
- A terminal (VS Code’s built-in terminal works great)
- Basic familiarity with HTML and CSS
Step 1: Create a New Astro Project
Open your terminal and run:
npm create astro@latest
Astro’s CLI (they call it “Houston”) will walk you through a setup wizard. You’ll be asked:
- What to name your project
- Which starter template to use (pick “Empty” for this tutorial)
- Whether to install dependencies automatically (say Yes)
Once it finishes, navigate into your project folder:
cd my-astro-site
npm run dev
Open your browser and go to http://localhost:4321. You should see a blank Astro page. That’s your canvas.
Step 2: Understand the File Structure
Here’s what Astro creates for you:
my-astro-site/
├── public/ → Static assets (images, fonts, favicon)
├── src/
│ ├── pages/ → Every file here becomes a URL route
│ ├── components/ → Reusable UI pieces
│ └── layouts/ → Page wrapper templates
├── astro.config.mjs → Your Astro configuration
└── package.json
The most important folder is src/pages/. Any .astro file you create here automatically becomes a page on your site.
- src/pages/index.astro → your homepage (/)
- src/pages/about.astro → your about page (/about)
- src/pages/blog/first-post.astro → your blog post (/blog/first-post)
No router config needed. Astro handles it for you.

Step 3: Write Your First Astro Component
Open src/pages/index.astro and replace its contents with this:
//astro

---

const name = "Kiran";

const skills = ["HTML", "CSS", "Astro"];

---

<html lang="en">

  <head>

    <meta charset="UTF-8" />

    <title>My Astro Site</title>

  </head>

  <body>

    <h1>Hello, {name}!</h1>

    <p>Things I know:</p>

    <ul>

      {skills.map(skill => <li>{skill}</li>)}

    </ul>

  </body>

</html>
See those — fences at the top? That’s the frontmatter section — it’s where you write JavaScript that runs at build time, not in the browser. Variables defined here are available in your HTML below.
Save the file. Your browser should hot-reload and show your name and list. That’s a working Astro component.
Step 4: Create a Reusable Layout
Most pages on a real site share a header, footer, and base HTML. In Astro, you handle this with a Layout component.
Create a new file: src/layouts/BaseLayout.astro
//astro

---

const { title } = Astro.props;

---

<html lang="en">

  <head>

    <meta charset="UTF-8" />

    <title>{title}</title>

  </head>

  <body>

    <header>

      <nav>My Site</nav>

    </header>

    <main>

      <slot />

    </main>

    <footer>© 2026</footer>

  </body>

</html>
The <slot /> tag is where your page content gets injected. Think of it like a template hole that each page fills in.
Now update your index.astro to use it:
//astro

---

import BaseLayout from '../layouts/BaseLayout.astro';

---

<BaseLayout title="Home">

  <h1>Welcome to my site</h1>

  <p>Built with Astro — fast by default.</p>

</BaseLayout>
Clean, right? That’s the Astro way.
What Is Astro’s Islands Architecture?
This is where Astro gets genuinely interesting — and where most tutorials gloss over it.
Astro uses a concept called Islands Architecture. The idea is simple: your page is mostly static HTML (the “sea”), but you can drop interactive “islands” into it wherever you actually need them.
For example, let’s say you have a blog post with a comment section that needs React. You don’t want React loading for your entire page — just for that one component.
In Astro, you’d do this:
//astro

---

import CommentBox from '../components/CommentBox.jsx';

---

<article>

  <p>Your static blog content here...</p>

  <CommentBox client:load />

</article>
The client:load directive tells Astro: hydrate this component on the client side. Everything else stays as static HTML.
Available client directives:
| Directive | When it loads |
| client:load | Immediately on page load |
| client:idle | When the browser is idle |
| client:visible | When the component scrolls into view |
| client:only | Only on client, never server-rendered |
✅ Best Practice: Default to no directive (static). Add client:visible for below-the-fold interactive components to save load time.
What to Do Next
You’ve covered the core of what makes Astro special. Here’s your natural next step:
- Add a blog — Use Astro’s content collections to manage markdown blog posts
- Deploy to Netlify or Vercel — Astro supports one-click deploys to both
- Add a UI framework — Try dropping a React or Svelte component using Islands
- Explore Astro integrations — Tailwind CSS, MDX, and image optimization are all one command away
If you want a structured, mentor-supported path and learn all these new tools, then HCL GUVI’s IIT-M Pravartak Certified Full Stack Developer Course with AI Integration covers the entire journey, from HTML to deployment, with real projects, live sessions, and placement support. Over 10,000 students have used it to break into product-based companies.
Key Takeaways
- Astro sends zero JavaScript by default — making your site fast without extra work.
- .astro files use a frontmatter section for build-time logic and HTML below it for markup.
- File-based routing means every page in src/pages/ becomes a real URL.
- Layouts and <slot /> help you avoid repeating HTML across pages.
- Islands Architecture lets you use React/Vue/Svelte only where you need interactivity.
FAQs
Q1: Is Astro good for beginners?
Yes. Astro’s syntax is close to plain HTML, which makes it easier to pick up than React or Vue. If you know HTML and basic JavaScript, you can build a working Astro site in a single afternoon.
Q2: Does Astro replace React?
No — Astro works with React. You can use React components inside Astro using the Islands system. Astro handles the static shell; React handles the interactive parts.
Q3: Is Astro free to use?
Yes. Astro is fully open-source and free. Hosting on platforms like Netlify, Vercel, or Cloudflare Pages is also free for personal and small projects.
Q4: Can I use Tailwind CSS with Astro?
Absolutely. Run npx astro add tailwind and Astro sets it up automatically. It’s one of the most popular Astro integrations.
Q5: How is Astro different from Next.js?
Next.js is React-based and great for apps with heavy interactivity. Astro is framework-agnostic and built for content-first sites. Astro sites typically load faster with less setup for things like blogs, docs, and portfolios.
Q6: Does Astro support dynamic routing?
Yes. You can create dynamic routes using bracket syntax — for example, src/pages/blog/[slug].astro — and use getStaticPaths() to generate pages from a data source.
Success Stories

About the Author
Lukesh S
A professional content writer who has experience in freelancing and now working as a Technical Content Writer at HCL GUVI having sound knowledge in Blog Writing and Creative Writing!
View all posts by Lukesh S
Connect with me @


Did you enjoy this article?