


AWS Kubernetes Articles
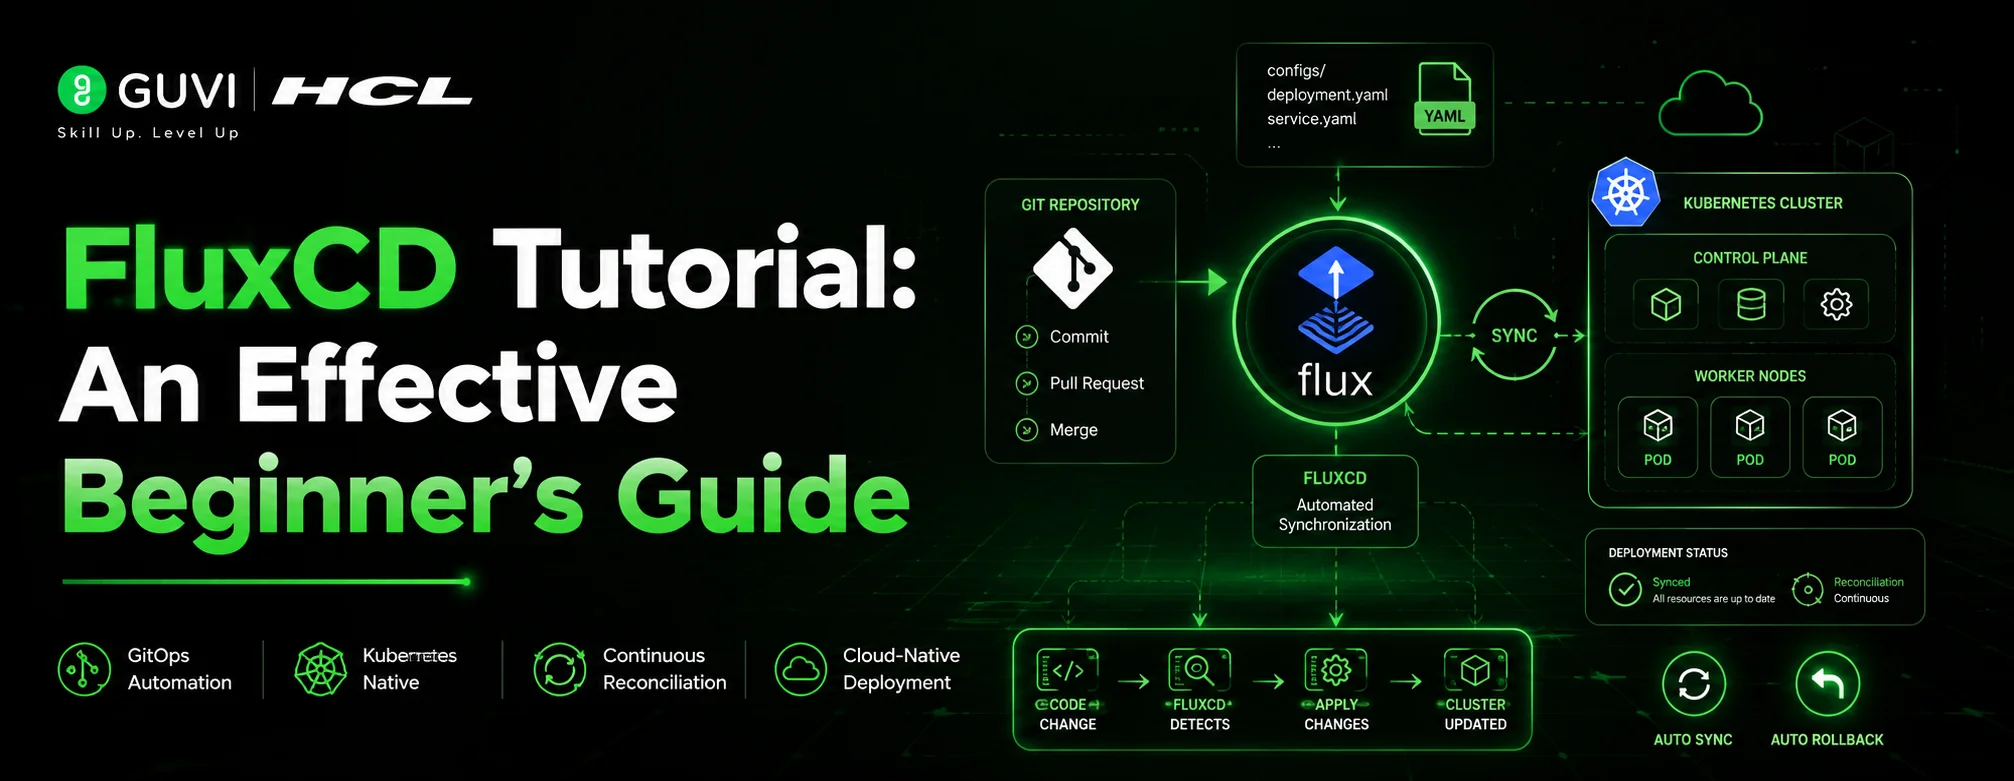
FluxCD Tutorial: An Effective Beginner's Guide
ArgoCD GitOps Tutorial: A Complete Beginner's Guide to Continuous Delivery


Get In Touch For Details! Request More Information
Kubernetes Tutorial: A Complete Beginner’s Guide from Scratch
Jul 01, 2026 6 Min Read 19 Views
(Last Updated)
Here’s a stat that surprises most newcomers: 8 out of 10 organizations now run Kubernetes in production or are evaluating it, according to the Cloud Native Computing Foundation’s surveys. That’s not a niche DevOps tool anymore — it’s the default way modern companies run software.
And yet, most people who try to learn Kubernetes quit within the first hour. Not because it’s impossible, but because most tutorials throw fifteen new vocabulary words at you before explaining why any of them matter.
This guide does it differently. By the end, you’ll understand what Kubernetes actually does, why it exists, and how to deploy a real application on your own machine — no cloud account required.
Table of contents
- TL;DR Summary
- What Is Kubernetes?
- Importance of Kubernetes
- Core Kubernetes Concepts You Need to Understand
- Kubernetes Architecture, Explained Simply
- Setting Up Your First Local Cluster
- Step-by-Step Setup with Minikube
- Step-by-Step: Deploying Your First Application
- Kubernetes vs. Docker Compose vs. Docker Swarm
- Common Beginner Mistakes
- What to Do Next
- Key Takeaways
- FAQs
- Is Kubernetes hard to learn for beginners?
- Do I need to know Docker before learning Kubernetes?
- Can I run Kubernetes on my own laptop without the cloud?
- What's the difference between a Pod and a container?
- How long does it take to become proficient in Kubernetes?
TL;DR Summary
- Kubernetes is a container orchestration platform that automatically deploys, scales, and manages containerized applications across clusters of machines.
- You don’t need to be a Linux wizard to get started — you just need the basics of Docker and patience, as the learning curve flattens quickly once the core concepts click.
- Pods, Deployments, and Services are the three building blocks you’ll use in almost every real-world setup.
- A local cluster (Minikube or Kind) is the fastest way to practice without cloud bills or risk.
- This guide takes you from “what is Kubernetes” to deploying your first app, with the mental models that actually stick.
Google was running containerized workloads internally for over a decade through a system called Borg before open-sourcing the ideas behind it as Kubernetes in 2014.
What Is Kubernetes?
Kubernetes is an open-source platform that automates the deployment, scaling, and management of containerized applications.
Think of it like an air traffic control system for your applications. You’re not personally flying every plane — you’re telling the system how many planes need to be in the air, and it handles takeoffs, landings, rerouting around storms, and replacing a plane that breaks down mid-flight.
In technical terms, Kubernetes manages containers — lightweight, portable packages that bundle an application with everything it needs to run. If you’ve used Docker, you already understand containers. Kubernetes is what takes those containers and runs them reliably across many machines at once.
Ready to master Kubernetes with real-world skills? The HCL GUVI Kubernetes Course helps you learn Kubernetes architecture, YAML, deployments, networking, storage, security, and cluster management through practical training. Enroll today and start building production-ready applications with confidence!
Importance of Kubernetes
Imagine you’ve containerized your app with Docker. It runs perfectly on your laptop. Now you need to run it in production, where thousands of users might hit it at once.
Suddenly, you’re facing real questions: What happens when a server crashes at 3 a.m.? How do you run five copies of your app instead of one? How do new copies find each other on the network? Who restarts a container that silently died?
Doing this manually doesn’t scale. That’s the gap Kubernetes fills.
- Self-healing is one of its core promises — if a container crashes or a server goes offline, Kubernetes automatically restarts or reschedules the workload elsewhere. You don’t get paged at 3 a.m. because the system already fixed it before you woke up.
- Horizontal scaling lets you go from one running copy of an app to a hundred with a single command or an automated rule. This matters because traffic spikes — a flash sale, a viral post — don’t wait for you to provision new servers by hand.
- Service discovery and load balancing are built in, so containers can find and talk to each other without hardcoded IP addresses. This matters because containers are disposable; they get replaced constantly, and their addresses change every time.
⚠️ Warning: Kubernetes solves orchestration problems, but it doesn’t replace good application design. A poorly architected app will still struggle under load — Kubernetes just gives you better tools to manage the struggle.

Core Kubernetes Concepts You Need to Understand
Before touching any commands, you need a handful of vocabulary words. Skip this section, and the rest of Kubernetes won’t make sense.
- A Pod is the smallest deployable unit in Kubernetes — it’s a wrapper around one or more containers that need to run together and share resources like storage and networking. Most of the time, a Pod holds exactly one container.
- Deployment describes the desired state for a group of identical Pods — how many copies should run, which container image to use, and how updates should roll out. This matters because you almost never create Pods directly in real projects; you create Deployments, and Kubernetes creates and manages the Pods for you.
- Service gives a stable network address to a group of Pods, even as individual Pods are created and destroyed behind the scenes. This matters because without it, every Pod restart would mean a new, unpredictable IP address — and anything trying to talk to your app would break constantly.
- A Node is a single machine — physical or virtual — that’s part of your Kubernetes cluster and actually runs your Pods. A Cluster is the full set of Nodes working together under one control plane.
A typical production cluster runs dozens to hundreds of Pods spread across a handful of Nodes, with Kubernetes deciding placement based on available CPU and memory — not a human picking which server gets which workload.
Now that you know the core components, here’s how they fit together:
- You create a Deployment.
- Kubernetes creates Pods to match the Deployment.
- Those Pods run on whichever Nodes have available resources.
- A Service ensures that traffic reaches the Pods, regardless of where they are running.
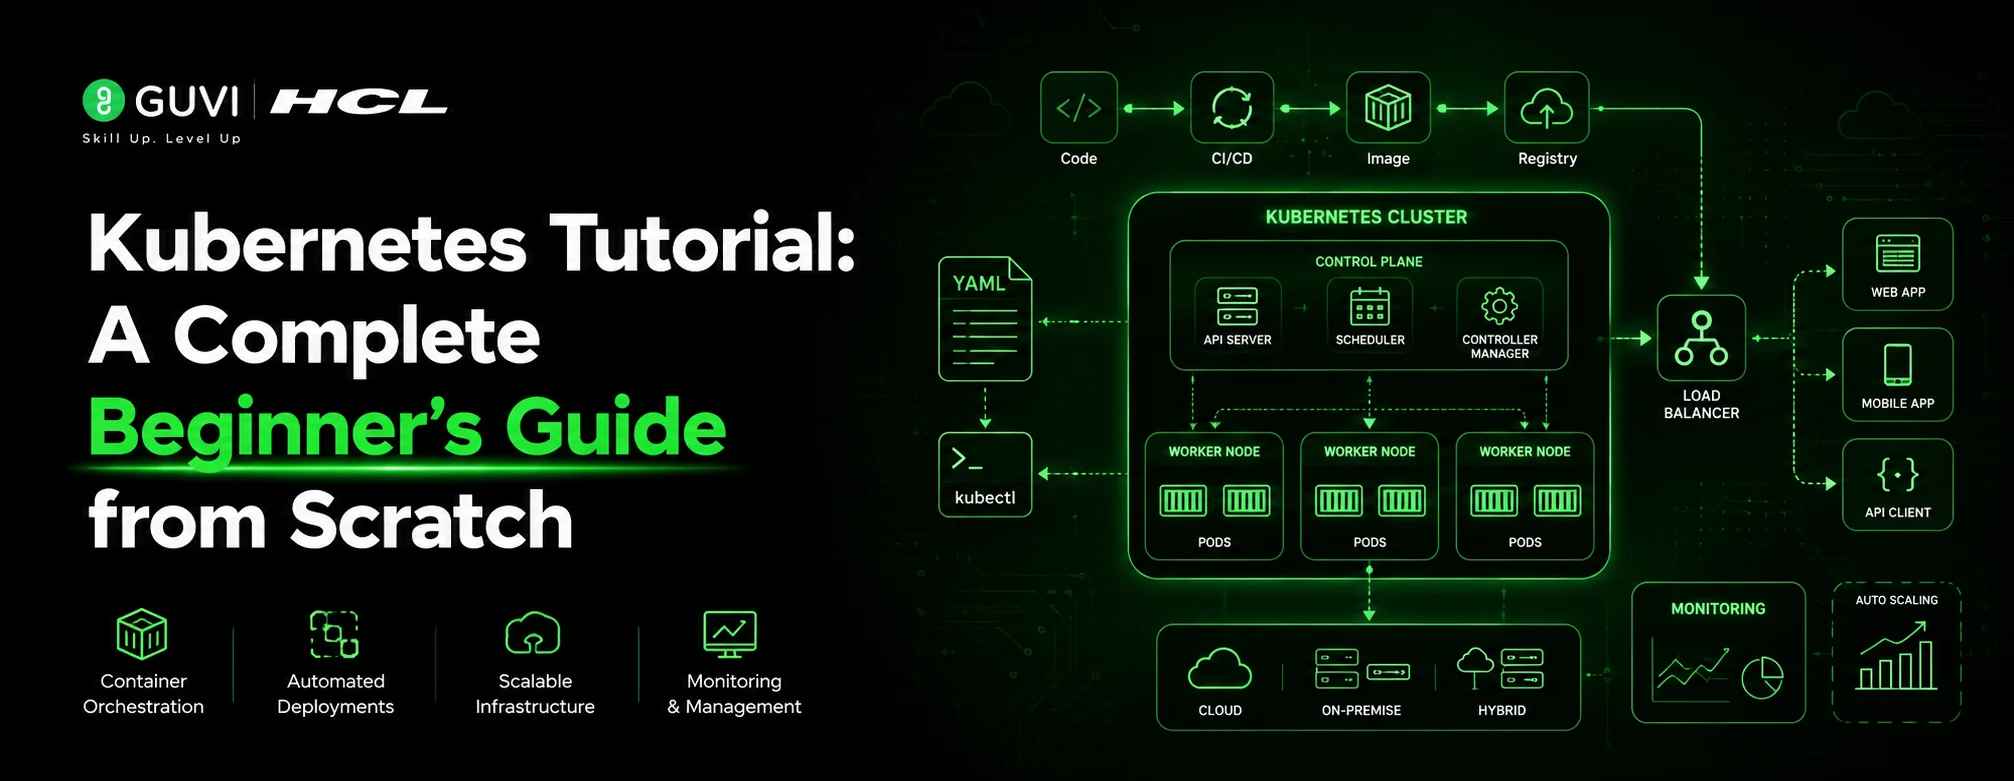
Kubernetes Architecture, Explained Simply
Every Kubernetes cluster splits into two halves: the control plane and the worker nodes.
The control plane is the brain. It decides what should run where, monitors for problems, and keeps the cluster’s actual state in sync with the state you described. The worker nodes are the muscle — they’re the machines that actually run your containers.
- The API server is the front door to the entire cluster — every command you run and every internal component talks to Kubernetes through it. This matters because it’s your single point of interaction, whether you’re using a command-line tool or a dashboard.
- etcd is the cluster’s database, storing the current state of everything — which Pods exist, which Nodes are healthy, what configuration is active. This matters because if etcd loses data, the cluster effectively loses its memory of what it’s supposed to be running.
- The scheduler decides which Node a new Pod should run on, based on available resources and constraints you define. This matters because it’s what makes “just run three copies of this app” possible without you having to manually pick servers.
- kubelet is the agent running on every worker Node that actually starts and stops containers based on instructions from the control plane. This matters because it’s the component translating the cluster’s intentions into real, running processes.
This division of labour is why Kubernetes self-heals. The control plane constantly compares “what should be running” with “what is running,” and the moment they disagree, it acts to close the gap.
Setting Up Your First Local Cluster
✅ Best Practice: Start local. Don’t spend money on a cloud Kubernetes cluster until you’re comfortable with the basics — a free local cluster teaches the same concepts.
You have two solid beginner-friendly options for running Kubernetes on your own laptop:
- Minikube runs a single-node Kubernetes cluster inside a virtual machine or container on your machine, and it’s the most widely documented option for beginners. It works well because almost every tutorial assumes you’re using it, so troubleshooting help is easy to find.
- Kind (Kubernetes in Docker) runs cluster nodes as Docker containers rather than full virtual machines, making them faster to start and stop. It’s a good choice if you already have Docker installed and want a lighter-weight setup.
Step-by-Step Setup with Minikube
- Install Docker Desktop (or another container runtime) — Kubernetes needs a way to run containers, and Docker is the most common starting point.
- Install Minikube and kubectl — kubectl is the command-line tool you’ll use to talk to your cluster; Minikube is what creates the cluster itself.
- Start your cluster by running minikube start — this provisions a single-node cluster and automatically configures kubectl to point to it.
- Verify it’s running with kubectl get nodes — you should see one Node listed with a status of “Ready.”
💡 Pro Tip: If kubectl get nodes hangs or errors out, it’s almost always a context issue — run kubectl config current-context to confirm you’re pointed at your local cluster and not a leftover cloud connection.
Step-by-Step: Deploying Your First Application
With your cluster running, it’s time to deploy something real. We’ll use a simple Nginx web server as the example.
- Create a Deployment by running kubectl create deployment my-app –image=nginx. This tells Kubernetes: “I want a Pod running the Nginx container image, and keep one copy alive.”
- Check that the Pod is running with kubectl get pods. You’re looking for a status of “Running” — if you see “Pending” or “CrashLoopBackOff,” something needs attention before moving on.
- Expose the Deployment as a Service using kubectl expose deployment my-app –type=NodePort –port=80. This gives your app a stable way to receive traffic instead of relying on the Pod’s internal, ever-changing IP address.
- Access your running app with minikube service my-app, which opens the app in your browser through the NodePort you just created.
- Scale it up by running kubectl scale deployment my-app –replicas=3. Run kubectl get pods again, and you’ll see three Pods instead of one — this is horizontal scaling in action, with zero manual server provisioning.
When we walked a cohort of junior engineers through this exact sequence in early 2026, the moment it clicked for almost everyone was step five — watching one Pod become three with a single command, after spending their whole career manually SSHing into servers to do the same thing.
Kubernetes vs. Docker Compose vs. Docker Swarm
A common beginner question is when Kubernetes is actually necessary and when it’s overkill. Here’s how the three options compare for a small-to-mid-size team:
| Tool | Best For | Scaling | Learning Curve | Production-Ready at Scale |
| Docker Compose | Local development, single-machine setups | Manual, single host only | Low | No |
| Docker Swarm | Small production clusters, simpler orchestration needs | Built-in, multi-host | Moderate | Limited |
| Kubernetes | Production workloads, multi-team, multi-cloud environments | Automated, highly configurable | High | Yes |
Common Beginner Mistakes
- Editing live cluster resources by hand instead of through version-controlled YAML files is one of the most common early habits — and one of the hardest to break later. It matters because manual changes get lost, aren’t reproducible, and make rollbacks nearly impossible.
- Ignoring resource requests and limits on Deployments leads to clusters where one misbehaving app starves every other workload of CPU or memory. Setting them explicitly, even with rough estimates, prevents one container from taking down its neighbours.
- Treating Pods as permanent rather than disposable causes confusion when a Pod restarts and its stored data disappears. Persistent data belongs in volumes or external storage, never inside the container itself.
⚠️ Warning: Never store anything you care about — databases, uploaded files, logs you need later — directly inside a container’s filesystem. Pods are temporary by design, and Kubernetes will eventually replace them.
What to Do Next
- Spin up a local cluster with Minikube or Kind and complete the deployment walkthrough above using your own small app instead of Nginx.
- Read through the official Kubernetes documentation’s concepts section to deepen your understanding of Deployments, Services, and ConfigMaps.
- Practice writing YAML manifests by hand instead of using kubectl create shortcuts — this is how you’ll actually work in real teams.
Key Takeaways
- Kubernetes automates the deployment, scaling, and recovery of containerized applications, removing the need to manually manage individual servers.
- Pods, Deployments, and Services are the three concepts you’ll use constantly — master those before anything else.
- The control plane and worker Nodes split responsibilities: one decides, the other executes.
- Local tools like Minikube and Kind let you learn the entire workflow without any cloud costs.
- Kubernetes isn’t always the right tool — smaller, simpler apps may be better served by Docker Compose.
- Treat Pods as disposable and never store important data directly inside them.
- The fastest way to actually learn Kubernetes is to deploy something real, not just read about it.
FAQs
Is Kubernetes hard to learn for beginners?
Kubernetes has a real learning curve, but it’s manageable if you focus on core concepts first — Pods, Deployments, and Services — before touching advanced topics like networking policies or custom controllers.
Do I need to know Docker before learning Kubernetes?
Yes, basic Docker knowledge is important because Kubernetes manages containers, and understanding how to build and run a single container makes every Kubernetes concept easier to grasp.
Can I run Kubernetes on my own laptop without the cloud?
Yes — tools like Minikube and Kind create fully functional local clusters on your machine, which is the recommended way to practice before touching a cloud provider.
What’s the difference between a Pod and a container?
A container is the actual running application, while a Pod is Kubernetes’ wrapper around one or more containers that need to share networking and storage.
How long does it take to become proficient in Kubernetes?
Most people grasp the core concepts within a few weeks of regular practice, though comfort with production-grade configuration, security, and troubleshooting typically takes several months of hands-on experience.
Success Stories


Did you enjoy this article?