


Artificial Intelligence and Machine Learning Articles
AI/ML Skills Gap 2026: Why Companies Can't Find Job-Ready Talent
20 AI/ML Interview Questions Recruiters Can Use Without a Tech Background - Best Guide
How Industry-Backed AI/ML Bootcamps Are Changing the AI/ML Hiring Pipeline - Best Guide 2026
From IT Support to AI Engineer: A Realistic Career Switch Guide 2026

Get In Touch For Details! Request More Information
Feast Feature Store Tutorial: Key Steps for ML Workflows
Sep 17, 2026 4 Min Read 343 Views
(Last Updated)
Training a model is the easy part. Keeping its features consistent between training and production is where most ML teams trip up. You build a slick model in a notebook, it performs great, then it falls apart in production because the features it sees in real time don’t match what it learned on. That’s the exact problem Feast was built to solve.
This tutorial walks you through setting up Feast step by step, from installing the SDK to materializing features into an online store, so your models get clean, consistent data every single time they make a prediction.
Table of contents
- TL;DR
- What is Feast Feature Store?
- Top Benefits of Feast
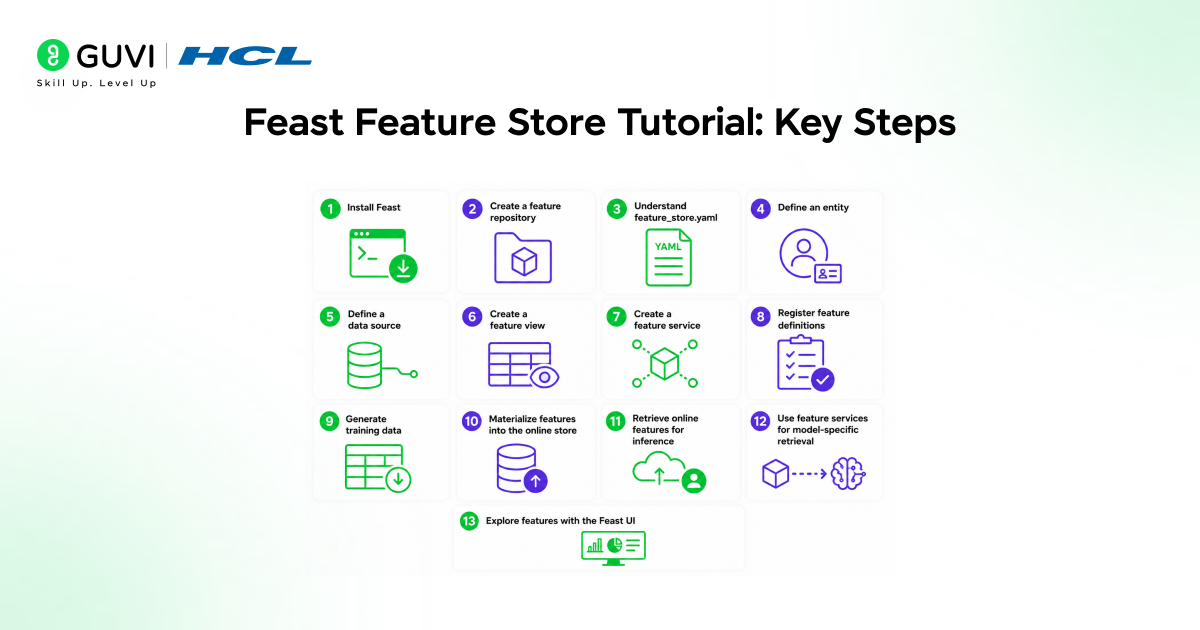
- Feast Feature Store Tutorial: Key Steps
- Step 1: Install Feast
- Step 2: Create a Feature Repository
- Step 3: Understand feature_store.yaml
- Step 4: Define an Entity
- Step 5: Define a Data Source
- Step 6: Create a Feature View
- Step 7: Create a Feature Service
- Step 8: Register Feature Definitions
- Step 9: Generate Training Data
- Step 10: Materialize Features into the Online Store
- Step 11: Retrieve Online Features for Inference
- Step 12: Use Feature Services for Model-Specific Retrieval
- Step 13: Explore Features with the Feast UI
- Key Feast Concepts to Remember
- Conclusion
- FAQs
- What is Feast feature store used for?
- Is Feast an online or offline feature store?
- What is materialization in Feast?
TL;DR
- Feast is used to manage ML features across training and inference.
- It uses a feature repository as the source of truth for feature definitions.
- A FeatureView defines a logical group of features from a data source.
- An Entity represents the business object linked to features, such as driver, customer, user, or product.
- The offline store is used for training data and batch scoring.
- The online store is used for real-time feature retrieval during inference.
What is Feast Feature Store?

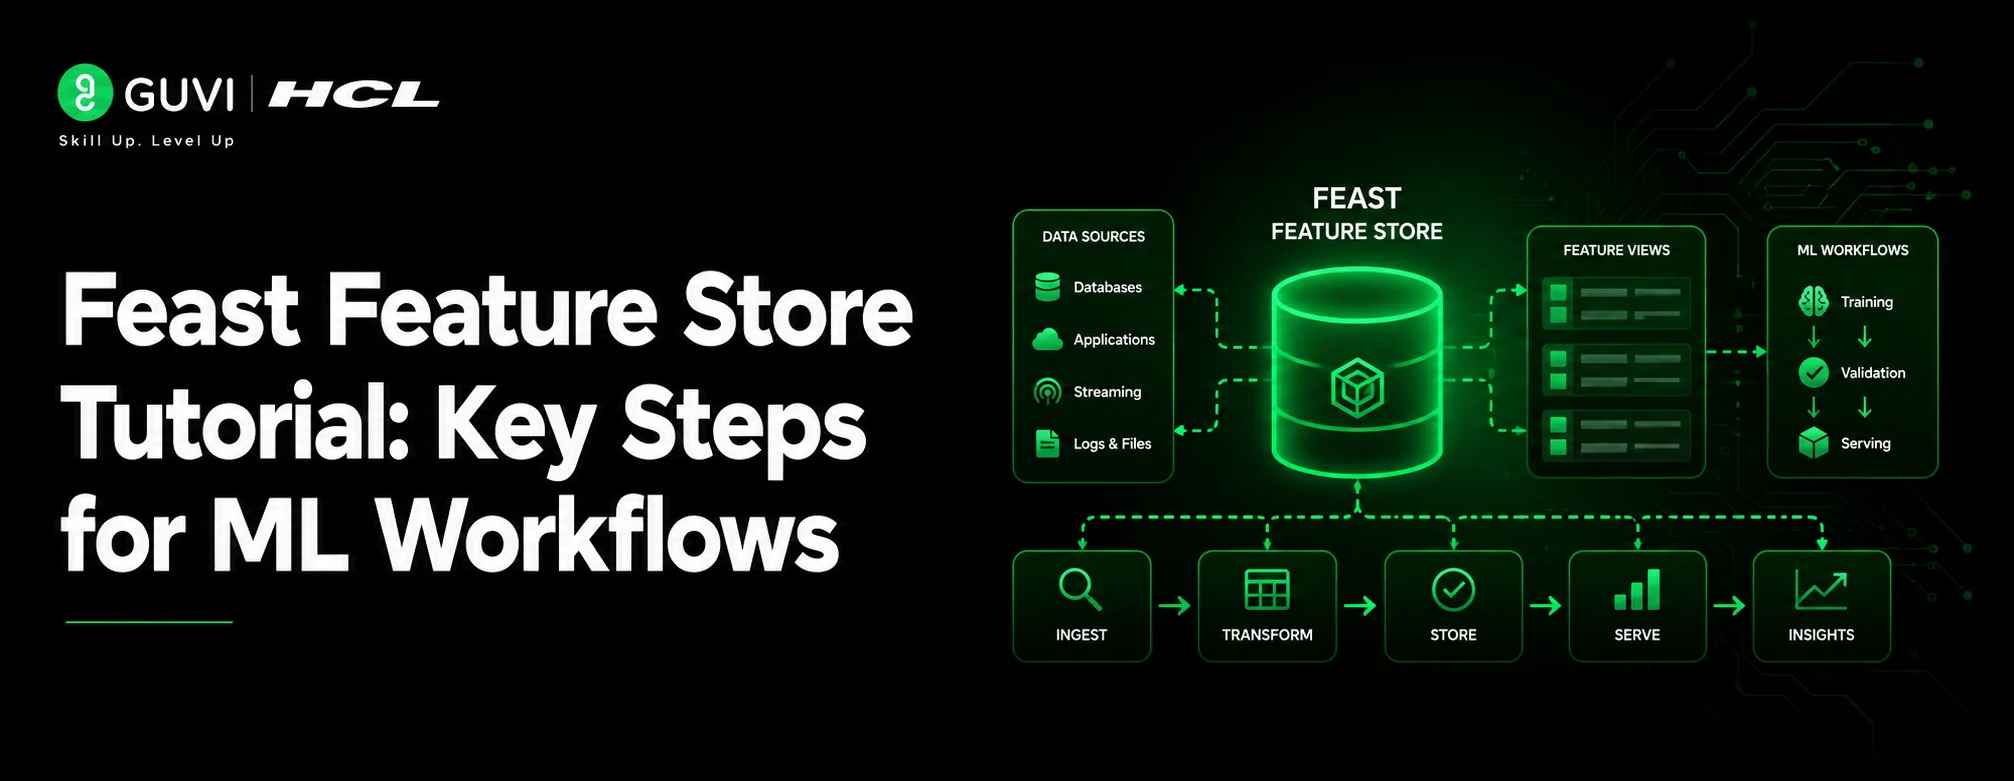
Feast, also called Feature Store, is an operational data system for managing machine learning features across offline training and online serving. It lets ML teams define entities, feature views, data sources, feature services, and feature retrieval logic through Python and configuration files.
Feast stores feature definitions in a feature repository, retrieves historical point-in-time features for model training, and serves the latest features from an online store during real-time inference.
Feast retrieves historical features using point-in-time joins, so your training data never accidentally leaks future information.
Top Benefits of Feast
- Centralizes ML feature definitions: Keeps feature logic, entities, and feature views organized in one repository.
- Reduces duplicate feature engineering logic: Avoids rebuilding the same features across different ML projects.
- Supports offline and online feature retrieval: Provides historical features for training and fresh features for inference.
- Improves training and serving consistency: Uses shared feature definitions across model development and production serving.
- Helps prevent point-in-time data leakage: Retrieves historical features based on event timestamps for accurate training data.
- Supports feature reuse through feature services: Groups model-specific features for cleaner experiment and deployment workflows.
- Works with Python-based ML workflows: Fits naturally into Python, pandas, and common ML development pipelines.
- Fits production AI and MLOps pipelines: Supports scalable feature management for real-time and batch ML systems.
Feast Feature Store Tutorial: Key Steps
Step 1: Install Feast
Install the Feast SDK and CLI in your Python environment.
pip install feast
The Feast quickstart uses the Python SDK for a local feature store workflow.
Step 2: Create a Feature Repository
Create a new Feast project using the CLI.
feast init my_project
cd my_project/feature_repo
A Feast feature repository usually contains raw demo data, Python feature definition files, feature_store.yaml, and workflow files. The feature repository acts as the declarative source of truth for the feature store.
Step 3: Understand feature_store.yaml
The feature_store.yaml file defines the project, registry, provider, and online store configuration.
project: my_project
registry: data/registry.db
provider: local
online_store:
  type: sqlite
  path: data/online_store.db
entity_key_serialization_version: 3
In a local setup, Feast can use a file-based registry and SQLite online store. Larger production systems can use cloud or scalable infrastructure depending on the provider and store configuration.
Step 4: Define an Entity
An entity represents the object for which features are stored and retrieved. Examples include driver_id, customer_id, user_id, product_id, or merchant_id.
from feast import Entity

driver = Entity(
    name="driver",
    join_keys=["driver_id"],
)
In Feast, feature views can map to zero or more entities, and the entity key is used during feature retrieval.
Step 5: Define a Data Source
A data source tells Feast where feature data is stored. For a local tutorial, a Parquet file is commonly used.
from feast import FileSource

driver_stats_source = FileSource(
    path="data/driver_stats.parquet",
    timestamp_field="event_timestamp",
    created_timestamp_column="created",
)
The event timestamp is important because Feast uses timestamps during point-in-time joins. This helps retrieve the correct historical feature values without leaking future information into model training.
Build strong Python programming skills to understand ML workflows, feature pipelines, and backend automation better with HCL GUVI’s Python Zero to Hero Course. Learn Python fundamentals, problem-solving, scripting logic, and real-world programming concepts through 100% online self-paced learning, globally recognised certification, lifetime content access, dedicated forum support, 4 gamified practice platforms, and a 7-day refund policy.
Step 6: Create a Feature View
A FeatureView defines a logical group of time-series features from a data source. It includes the feature schema, entity mapping, source, and time-to-live setting.
from datetime import timedelta
from feast import FeatureView, Field
from feast.types import Float32, Int64

driver_hourly_stats = FeatureView(
    name="driver_hourly_stats",
    entities=[driver],
    ttl=timedelta(days=1),
    schema=[
        Field(name="conv_rate", dtype=Float32),
        Field(name="acc_rate", dtype=Float32),
        Field(name="avg_daily_trips", dtype=Int64),
    ],
    source=driver_stats_source,
    online=True,
)
A FeatureView represents a logical group of feature data as it exists in a source. It usually contains a data source, entities, feature schema, and optional transformation logic.
Step 7: Create a Feature Service
A FeatureService groups features needed by a specific model version. This is useful when different models need different feature sets.
from feast import FeatureService

driver_activity_v1 = FeatureService(
    name="driver_activity_v1",
    features=[driver_hourly_stats],
)
Feast recommends feature services when models move toward experimentation or serving because they group model-specific features and help track feature sets across model versions.

Step 8: Register Feature Definitions
Run feast apply from the feature repository.
feast apply
The apply command scans Python files in the current directory, registers entities and feature views, and deploys required infrastructure such as online store tables in the configured backend.
Step 9: Generate Training Data
Use get_historical_features() to create a training dataset. The entity dataframe must include entity keys and timestamps.
from datetime import datetime
import pandas as pd
from feast import FeatureStore

store = FeatureStore(repo_path=".")

entity_df = pd.DataFrame.from_dict({
    "driver_id": [1001, 1002, 1003],
    "event_timestamp": [
        datetime(2024, 4, 12, 10, 59, 42),
        datetime(2024, 4, 12, 8, 12, 10),
        datetime(2024, 4, 12, 16, 40, 26),
    ],
})

training_df = store.get_historical_features(
    entity_df=entity_df,
    features=[
        "driver_hourly_stats:conv_rate",
        "driver_hourly_stats:acc_rate",
        "driver_hourly_stats:avg_daily_trips",
    ],
).to_df()

print(training_df.head())
Feast uses get_historical_features() to join features onto entity rows for training data or batch scoring. This helps create point-in-time correct datasets from one or more feature views.
Step 10: Materialize Features into the Online Store
Load feature values from the offline store into the online store.
feast materialize 2024-04-07T00:00:00 2024-04-08T00:00:00
For incremental updates, use:
feast materialize-incremental 2024-04-08T00:00:00
Materialization loads feature data into the online store so models can retrieve the latest features during online prediction. The materialize command loads features over a selected time range, while materialize-incremental loads new data since the last materialization run.
Step 11: Retrieve Online Features for Inference
Use get_online_features() during real-time model serving.
from pprint import pprint
from feast import FeatureStore

store = FeatureStore(repo_path=".")

feature_vector = store.get_online_features(
    features=[
        "driver_hourly_stats:conv_rate",
        "driver_hourly_stats:acc_rate",
        "driver_hourly_stats:avg_daily_trips",
    ],
    entity_rows=[
        {"driver_id": 1004},
        {"driver_id": 1005},
    ],
).to_dict()

pprint(feature_vector)
Online feature retrieval does not need timestamps because the model usually needs the latest available feature value for each entity key. Feast supports online retrieval through the Python SDK or an optional feature server.
Step 12: Use Feature Services for Model-Specific Retrieval
Use the registered feature service when retrieving features for a model version.
from feast import FeatureStore

feature_store = FeatureStore(repo_path=".")
feature_service = feature_store.get_feature_service("driver_activity_v1")

feature_vector = feature_store.get_online_features(
    features=feature_service,
    entity_rows=[
        {"driver_id": 1004},
        {"driver_id": 1005},
    ],
).to_dict()

print(feature_vector)
Feature services help keep feature retrieval aligned with model versions. A single training dataset may include features from multiple feature views, and online retrieval can also pull features from multiple feature views through a feature service.
Step 13: Explore Features with the Feast UI
Start the Feast UI.
feast ui
The Feast UI helps teams view and explore feature information defined in the project. Feast also provides CLI tooling, Python SDK APIs, and an optional feature server for reading and writing feature data.
Key Feast Concepts to Remember
- Entity
An entity is the business object linked to features, such as a driver, user, customer, product, or merchant.
- Feature View
A FeatureView defines a logical group of features from a data source. It includes schema, source, entity mapping, and serving settings.
- Offline Store
The offline store is used for historical feature retrieval, model training, and batch scoring.
- Online Store
The online store serves low-latency features for production inference.
- Feature Service
A FeatureService groups features from one or more feature views for a specific model version.
- Materialization
Materialization moves features from offline storage into the online store for fast inference-time lookup.
Conclusion
Feast is useful for teams that have moved beyond experiments and now need their machine learning models to work reliably in production. It gives data scientists and ML engineers a clear way to define features, build training datasets, push fresh features to an online store, and fetch them quickly when a model makes a prediction.
A good Feast setup keeps everything connected, from raw data and feature definitions to training, serving, and model-specific feature sets. This helps AI teams reuse features, reduce confusion, and keep training and real-time predictions consistent.
FAQs
What is Feast feature store used for?
Feast is used to define, manage, and serve machine learning features for training, batch scoring, and real-time inference.
Is Feast an online or offline feature store?
Feast supports both. It uses an offline store for historical features and an online store for low-latency inference features.
What is materialization in Feast?
Materialization is the process of loading feature values from an offline source into an online store so production models can retrieve them quickly.
Success Stories

About the Author
Vaishali
I'm a seasoned writer with four years of experience across technical, non-technical, and just about every genre or niche you can imagine. Adaptable and curious, I enjoy exploring new topics and making information engaging and easy to understand. Fueled by a steady stream of tea, I approach each project with creativity, reliability, and genuine enthusiasm for storytelling.
View all posts by Vaishali
Connect with me @










Did you enjoy this article?