


Software Automation & Testing Articles
How to Use Claude for A/B Testing Content Variations
Load Testing Your Application with k6: A Practical Introduction
Manual Tester Roles and Responsibilities: 12 Important Duties for Career Growth
Quality Assurance Roles and Responsibilities: 12 Essential Duties for Success


Get In Touch For Details! Request More Information
Cypress Component Testing Tutorial: Test Your UI in a Real Browser, Not a Fake One
Sep 19, 2026 7 Min Read 713 Views
(Last Updated)
Cypress Component Testing is a feature built into Cypress (since version 10) that lets you mount individual UI components, React, Vue, Angular, or Svelte directly in a real browser and test them without running your full application. Unlike jsdom-based tools such as Jest + React Testing Library, Cypress renders your component in an actual Chrome or Firefox browser, giving you real CSS, real layout, and real user interaction behavior.
Table of contents
- TL;DR - What You Need to Know
- What Is Cypress Component Testing?
- Cypress Component Testing vs E2E Testing vs Jest + RTL
- How Does Cypress Component Testing Work?
- Step-by-Step: Setting Up Cypress Component Testing in a React Project
- Prerequisites
- Step 1 - Install Cypress
- Step 2 - Open Cypress and Choose Component Testing
- Step 3 - Confirm Your Config
- Step 4 - Create the Support File
- Writing Your First Cypress Component Test
- Run the Component Tests
- Testing User Interactions and Events
- Testing Props, Slots, and Edge Cases
- Real-World Scenario: Catching a CSS-Dependent Bug
- Pros and Cons of Cypress Component Testing
- Best Practices for Cypress Component Testing
- Key Takeaways
- Conclusion
- Frequently Asked Questions
- What is Cypress Component Testing?
- Is Cypress Component Testing different from Cypress E2E testing?
- Does Cypress Component Testing replace Jest and React Testing Library?
- Can I use Cypress Component Testing with Vue or Angular?
- How do I run Cypress component tests in CI?
- What is cy.mount() in Cypress?
TL;DR – What You Need to Know
- Cypress Component Testing lets you mount and test UI components in isolation – directly in a real browser, without a full app or server.
- It’s built into Cypress 10+ and works with React, Vue, Angular, and Svelte out of the box.Component tests are faster than E2E tests because they skip routing, authentication, and network calls.This tutorial walks you through setup, mounting your first component, and writing assertions – from scratch.
- Cypress Component Testing is not a replacement for E2E tests. It complements them by catching component-level bugs earlier.
You’ve written the component. The unit tests pass. You push to staging and the dropdown doesn’t open. The button is there, the click handler is there, but something about the actual browser behavior is off.
This is the gap that Cypress component testing was built to close. Not your whole app. Not a mocked DOM. A real browser, your real component, and tests you can actually watch run.
In this tutorial, you’ll learn what Cypress Component Testing is, how it differs from both E2E tests and jsdom-based unit tests, and how to write your first component test step by step. We’ll use React, but the approach is the same for Vue and Angular.
What Is Cypress Component Testing?
Cypress Component Testing is a testing mode built into Cypress that lets you import and mount individual UI components in a real browser, interact with them, and assert on their behavior without spinning up your full application.
It was introduced in Cypress 7 as an experimental feature and became stable in Cypress 10 (released mid-2022). It supports React, Vue 3, Angular, and Svelte through official framework adapters.
| 📊 Data Point: Cypress is the most widely used JavaScript E2E testing tool, with over 46,000 GitHub stars and 5 million weekly npm downloads as of early 2026. Component testing is now one of its fastest-growing feature areas. |
The key thing that sets Cypress Component Testing apart from jsdom-based tools (Jest, Vitest + RTL) is the runtime: your component runs in a real browser. Real CSS renders. Real layout applies. Real scroll behavior happens. This catches an entire class of bugs that jsdom silently misses.
Cypress Component Testing vs E2E Testing vs Jest + RTL
There are now three main options for testing UI components. Here’s how they actually compare:
| Jest + RTL | Cypress E2E | Cypress Component Testing | |
| Runtime | jsdom (simulated) | Real browser | Real browser |
| Tests full app? | No | Yes | No |
| Needs running server? | No | Yes | No |
| Real CSS/layout? | No | Yes | Yes |
| Speed | Very fast | Slow | Fast |
| Best for | Logic, accessibility, output | Full flows, routing, auth | Component behavior, interactions, visual state |
| Setup complexity | Low | Medium | Low-Medium |
| 💡 Contrarian Take: A lot of teams treat Cypress Component Testing as ‘Jest but in a browser.’ That undersells it. The real value isn’t speed it’s fidelity. When a component only breaks because of a CSS specificity conflict or a scroll container, Jest will never catch it. Cypress will. The question isn’t which tool is better; it’s which failure modes matter most to you. |
How Does Cypress Component Testing Work?
When you run a Cypress component test, here’s what actually happens:
- Cypress starts a lightweight dev server (using your existing Vite, webpack, or Angular build config).
- It opens a real browser (Chrome, Firefox, or Edge).
- Your test file imports the component and calls cy.mount() to render it inside a blank HTML page.
- Cypress runs your assertions and interactions against the rendered component — click, type, scroll, hover.
- The Cypress Test Runner shows a live preview of the component alongside the command log.
There’s no routing, no authentication, no network calls (unless you explicitly stub them). Just your component, rendered in isolation, in a real browser.
| 💡 Pro Tip: The Cypress component testing preview pane is one of the most useful debugging tools in frontend development. You can see exactly what your component looks like at every step of the test — including the state it’s in when an assertion fails. Time-travel debugging for your components. |
Step-by-Step: Setting Up Cypress Component Testing in a React Project
Prerequisites
- Node.js 16 or later
- An existing React project (Vite or Create React App both work)
- npm or yarn
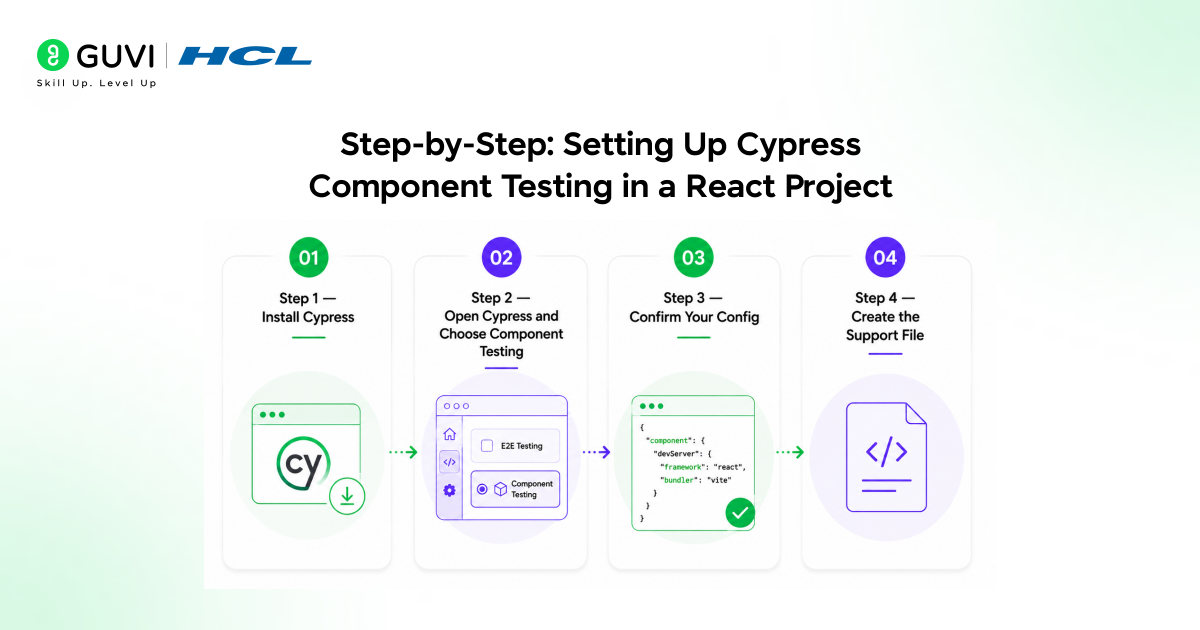
Step 1 – Install Cypress
| npm install –save-dev cypress |
Step 2 – Open Cypress and Choose Component Testing
| npx cypress open |
The Cypress Launchpad will open. Select ‘Component Testing’, then choose your framework (React) and bundler (Vite or webpack). Cypress auto-generates a cypress.config.js with the correct settings.
| ✅ Best Practice: Let the Cypress setup wizard run fully before editing anything. It detects your framework and bundler automatically and writes a working config. Manually editing the config before the wizard finishes is a common source of first-run failures. |
Step 3 – Confirm Your Config
Your generated cypress.config.js should look something like this:
| import { defineConfig } from ‘cypress’; export default defineConfig({ component: { devServer: { framework: ‘react’, bundler: ‘vite’, }, },}); |
Step 4 – Create the Support File
Cypress also generates a cypress/support/component.js file. For React, add the mount command import:
| import { mount } from ‘cypress/react18’; Cypress.Commands.add(‘mount’, mount); |
| ⚠️ Warning: Use cypress/react18 if you’re on React 18. Use cypress/react for React 17 and below. Mixing these causes a silent failure where components render but hooks behave incorrectly. |
Writing Your First Cypress Component Test
Let’s say you have a Button component that accepts a label prop and calls an onClick handler:
| // src/components/Button.jsxexport function Button({ label, onClick }) { return ( <button onClick={onClick} className=’btn’> {label} </button> );} |
Here’s the Cypress component test for it:
| // src/components/Button.cy.jsximport { Button } from ‘./Button’; describe(‘Button’, () => { it(‘renders the label’, () => { cy.mount(<Button label=’Submit’ onClick={cy.stub()} />); cy.get(‘button’).should(‘contain.text’, ‘Submit’); }); it(‘calls onClick when clicked’, () => { const handleClick = cy.stub().as(‘clickHandler’); cy.mount(<Button label=’Submit’ onClick={handleClick} />); cy.get(‘button’).click(); cy.get(‘@clickHandler’).should(‘have.been.calledOnce’); });}); |
A few things worth noticing:
- cy.mount() replaces cy.visit(). You pass the JSX directly — no URL, no server.
- cy.stub() creates a fake function you can assert on. Alias it with .as() to reference it cleanly.
- The file convention is ComponentName.cy.jsx — Cypress picks up files matching *.cy.{js,jsx,ts,tsx}.
Run the Component Tests
| npx cypress open –component |
The Cypress runner opens, shows your component test files, and lets you click through each spec. You’ll see your Button component rendered in the preview pane on the right — live, in a real browser.
Testing User Interactions and Events
Cypress’s command API works exactly the same in component tests as in E2E tests. You can click, type, focus, blur, select, scroll all the real browser actions you’d expect.
| // Testing a search inputit(‘calls onSearch when the user types’, () => { const onSearch = cy.stub().as(‘searchHandler’); cy.mount(<SearchInput onSearch={onSearch} />); cy.get(‘input’).type(‘cypress’); cy.get(‘@searchHandler’).should(‘have.been.calledWith’, ‘cypress’);}); // Testing a dropdownit(‘shows options when opened’, () => { cy.mount(<Dropdown options={[‘React’, ‘Vue’, ‘Angular’]} />); cy.get(‘[data-testid=dropdown-trigger]’).click(); cy.get(‘[data-testid=dropdown-menu]’).should(‘be.visible’); cy.contains(‘Vue’).should(‘be.visible’);}); |
| ✅ Best Practice Use data-testid attributes as your primary selectors in component tests — not class names or text. Class names change with styling refactors. Text changes with copy edits. data-testid is an explicit test contract that doesn’t break for the wrong reasons. |
Testing Props, Slots, and Edge Cases
One area where Cypress Component Testing really shines is testing the full range of prop combinations — including the ones that only cause problems in the browser.
| // Test the empty stateit(‘shows empty state when items array is empty’, () => { cy.mount(<ItemList items={[]} />); cy.get(‘[data-testid=empty-state]’).should(‘be.visible’); cy.get(‘[data-testid=item]’).should(‘not.exist’);}); // Test a loading stateit(‘shows a spinner while loading’, () => { cy.mount(<ItemList items={[]} loading={true} />); cy.get(‘[data-testid=spinner]’).should(‘be.visible’);}); // Test with many items (layout stress test)it(‘renders 100 items without layout breakage’, () => { const items = Array.from({ length: 100 }, (_, i) => ({ id: i, name: `Item ${i}` })); cy.mount(<ItemList items={items} />); cy.get(‘[data-testid=item]’).should(‘have.length’, 100);}); |
| 💡 Pro Tip The 100-item layout stress test is something jsdom-based tests simply can’t do meaningfully. In jsdom, there’s no real rendering — 100 items look the same as 1. In Cypress, you can scroll the list, confirm items are visible in the viewport, and catch overflow or truncation bugs that only appear with real data volumes. |

Real-World Scenario: Catching a CSS-Dependent Bug
Here’s a concrete example of why the real-browser runtime matters.
Say you have a Modal component. Your Jest tests confirm it renders, shows the title, and closes when the close button is clicked. All green. You ship.
In production, users report the modal is there — but they can’t see it. The z-index on the modal is 100, but a parent container somewhere in the app has an isolated stacking context (triggered by transform: translateZ(0)). The modal renders behind it. Invisible.
Jest never catches this. There’s no CSS in jsdom. Cypress Component Testing catches it the first time you mount the modal inside a wrapper that mimics your app’s layout — because real CSS applies, real stacking contexts form, and real visibility is computed.
Pros and Cons of Cypress Component Testing
| Pros | Cons |
| Tests run in a real browser — real CSS, real layout | Slower than Jest/Vitest unit tests (though faster than E2E) |
| Same Cypress API you already know from E2E tests | Requires Cypress 10+ — older projects need an upgrade |
| Live visual preview of the component while tests run | No built-in visual regression (need Percy or Applitools add-on) |
| Works with React, Vue, Angular, Svelte out of the box | CI setup needs a browser environment (Electron or Chrome headless) |
| Time-travel debugging see component state at each step | Doesn’t test routing, auth, or multi-page flows (that’s E2E’s job) |
Best Practices for Cypress Component Testing
- Co-locate test files with components: Button.cy.jsx next to Button.jsx. This makes it obvious which component has coverage and makes deleting dead test files trivial.
- Test behavior, not implementation: assert on what the user sees (visible text, enabled/disabled state) not on internal component state or function call counts, except for event handlers.
- Use cy.intercept() for API calls: if your component fetches data, stub the network request with cy.intercept() so your test doesn’t depend on a real API being available.
- Test edge cases with props: empty arrays, null values, very long strings, and loading states are all easy to test in isolation and often skipped entirely in E2E suites.
- Run component tests in CI with –headless — they run fine in Chrome headless mode on any standard CI runner (GitHub Actions, GitLab CI, CircleCI).
- Don’t port your entire Jest suite to Cypress — keep Jest for pure logic (hooks, utilities, reducers). Cypress Component Testing is for anything that involves rendering and user interaction.
| ✅ Best Practice Start by writing Cypress component tests for your most bug-prone or most complex components first — not by trying to achieve 100% coverage of everything. Complex form components, multi-state modals, and drag-and-drop interfaces are where component tests deliver the most immediate value. |
Key Takeaways
- Cypress Component Testing runs your components in a real browser catching CSS, layout, and interaction bugs that jsdom-based tests miss.
- It’s built into Cypress 10+ and supports React, Vue, Angular, and Svelte with official adapters.
- cy.mount() replaces cy.visit(). The rest of the Cypress API cy.get(), cy.click(), cy.stub() works identically.
- Component tests are faster than E2E tests (no full app, no server) but slower than Jest (real browser required).
- The ideal testing strategy combines Jest/Vitest for logic, Cypress Component Testing for rendering and interaction, and Cypress E2E for full user flows.
| ➡️ What to Do Next 1. Install Cypress in your project if you haven’t already. 2. Run ‘npx cypress open’ and select Component Testing. 3. Pick your most complex or most bug-prone component. 4. Write one test that covers its most important interaction. 5. Run it — watch the component render in the preview pane. Then read the related articles below to build a full frontend testing strategy. |
If you want a structured, mentor-supported path and learn all these new tools, then HCL GUVI’s IIT-M Pravartak Certified Full Stack Developer Course with AI Integration covers the entire journey, from HTML to deployment, with real projects, live sessions, and placement support. Over 10,000 students have used it to break into product-based companies.
Conclusion
The gap between ‘tests pass’ and ‘works in the browser’ is real — and it’s wider than most testing setups account for. CSS stacking contexts, scroll containers, focus management, and real event bubbling all behave differently in a real browser than in jsdom.
Cypress Component Testing fills that gap without forcing you to run your entire app. You get browser fidelity at component-test speed. And you get to watch your components actually render while the tests run — which, honestly, changes how you think about what you’re testing.
Pick one component. Mount it. Assert on what a user would actually see. That’s all it takes to start.
Head to the GUVI blog for more hands-on guides on frontend testing, Cypress, and building a complete quality strategy for your UI.
Frequently Asked Questions
1. What is Cypress Component Testing?
Cypress Component Testing is a mode built into Cypress 10+ that lets you mount and test individual UI components in a real browser, without running your full application. It supports React, Vue, Angular, and Svelte through official framework adapters.
2. Is Cypress Component Testing different from Cypress E2E testing?
Yes. E2E tests visit a full running application via a URL and test complete user flows. Component tests mount a single component in isolation — no server, no routing, no authentication. Component tests are faster and more targeted; E2E tests are more realistic. Most teams use both.
3. Does Cypress Component Testing replace Jest and React Testing Library?
No — and it shouldn’t. Jest and React Testing Library are excellent for testing logic, hooks, and accessibility in a fast feedback loop. Cypress Component Testing adds value specifically for rendering fidelity, real browser interactions, and visual state. Use both: Jest for logic, Cypress for rendering.
4. Can I use Cypress Component Testing with Vue or Angular?
Yes. Cypress has official support for React (17 and 18), Vue 3, Angular 12+, and Svelte. You select your framework during the Cypress setup wizard, and it configures the mount command and dev server automatically.
5. How do I run Cypress component tests in CI?
Run ‘npx cypress run –component’ in your CI pipeline. Cypress runs in headless Chrome or Electron by default. Most CI platforms (GitHub Actions, GitLab CI, CircleCI) support this without additional configuration — just make sure Node.js and the necessary browser dependencies are available.
6. What is cy.mount() in Cypress?
cy.mount() is the Cypress command that renders a component into the test browser. You pass it JSX (for React) or a component definition (for Vue/Angular) along with any props. It’s equivalent to render() in React Testing Library, but the output renders in a real browser instead of jsdom.
Success Stories

About the Author
Vishalini Devarajan
An Aerospace Engineer turned content writer, I focus on making complex concepts easy to understand through well-structured, reader-friendly blogs. Whether it’s a technical topic or a non-technical one, I love creating content that is clear, engaging, and impactful.
View all posts by Vishalini Devarajan
Connect with me @












Did you enjoy this article?