


DevOps Articles
Claude for IT Help Desks: Reducing Ticket Volume
From Beginner to DevOps Engineer: How HCL GUVI Zen Class Helps You Get There

Get In Touch For Details! Request More Information
Snyk Vulnerability Scanning Tutorial: How to Scan Your Code for Security Issues
Aug 18, 2026 4 Min Read 404 Views
(Last Updated)
Shipping vulnerable code is no longer an acceptable risk in 2026. Supply chain attacks, insecure dependencies, and misconfigured infrastructure are among the most exploited vectors in modern breaches, and most of them are entirely preventable if you catch them before deployment. This Snyk vulnerability scanning tutorial shows you exactly how to do that. Whether you are a solo developer or part of a team, following this Snyk vulnerability scanning tutorial will help you integrate security scanning into the way you already work and flag issues in your IDE, your pull request, or at the command line.
Table of contents
- TL;DR Summary
- What is Snyk and Why Use It?
- What Snyk Scans: 4 Key Areas
- Snyk Vulnerability Scanning Tutorial: Step-by-Step Setup
- Step 1: Create a Free Snyk Account
- Step 2: Install the Snyk CLI
- Step 3: Authenticate the CLI
- Step 4: Navigate to Your Project
- Running Your First Scan
- Reading and Understanding Snyk Results
- Fixing Vulnerabilities with Snyk
- Integrating Snyk into GitHub Actions
- 💡 Did You Know?
- Common Mistakes to Avoid
- Conclusion
- FAQs
- What is a Snyk vulnerability scanning tutorial and who is it for?
- Is Snyk free to use?
- What languages and package managers does Snyk support?
- How is Snyk different from npm audit or pip check?
- How do I add Snyk to GitHub Actions?
- What is the difference between snyk test and snyk monitor?
TL;DR Summary
- A Snyk vulnerability scanning tutorial walks you through finding security flaws in your code, dependencies, containers, and infrastructure before they reach production.
- Snyk is free to start and works with npm, pip, Maven, Docker, and Terraform out of the box.
- Setup takes under 10 minutes: create an account, install the CLI, authenticate, and run snyk test.
- Snyk covers four areas: open source dependencies, application code (SAST), container images, and Infrastructure as Code (IaC).
- You can embed Snyk directly into GitHub Actions so every pull request is scanned automatically.
What is Snyk and Why Use It?
Snyk is a developer-first security platform that scans your project for vulnerabilities and gives you actionable fix guidance, not just a list of problems. Unlike traditional security tools that sit at the end of the pipeline and block releases, Snyk is designed to be used from day one of development.
The free tier is genuinely useful and covers all four scanning categories with enough test limits for individual developers and small teams. Paid plans start at $25 per contributing developer per month for teams that need higher limits and enterprise features.
What Snyk Scans: 4 Key Areas
Before starting this Snyk vulnerability scanning tutorial, it helps to know what Snyk actually checks.
| Scan Type | What It Checks | Snyk Product |
| Open source dependencies | Vulnerable npm, pip, Maven, Go packages | Snyk Open Source |
| Application code | Security bugs in your own code (SQL injection, XSS, etc.) | Snyk Code (SAST) |
| Container images | Known CVEs in Docker base images and layers | Snyk Container |
| Infrastructure as Code | Misconfigurations in Terraform, Kubernetes, CloudFormation | Snyk IaC |
This tutorial focuses primarily on Open Source and Code scanning since those are the most useful starting points for developers new to security tooling.
Snyk Vulnerability Scanning Tutorial: Step-by-Step Setup
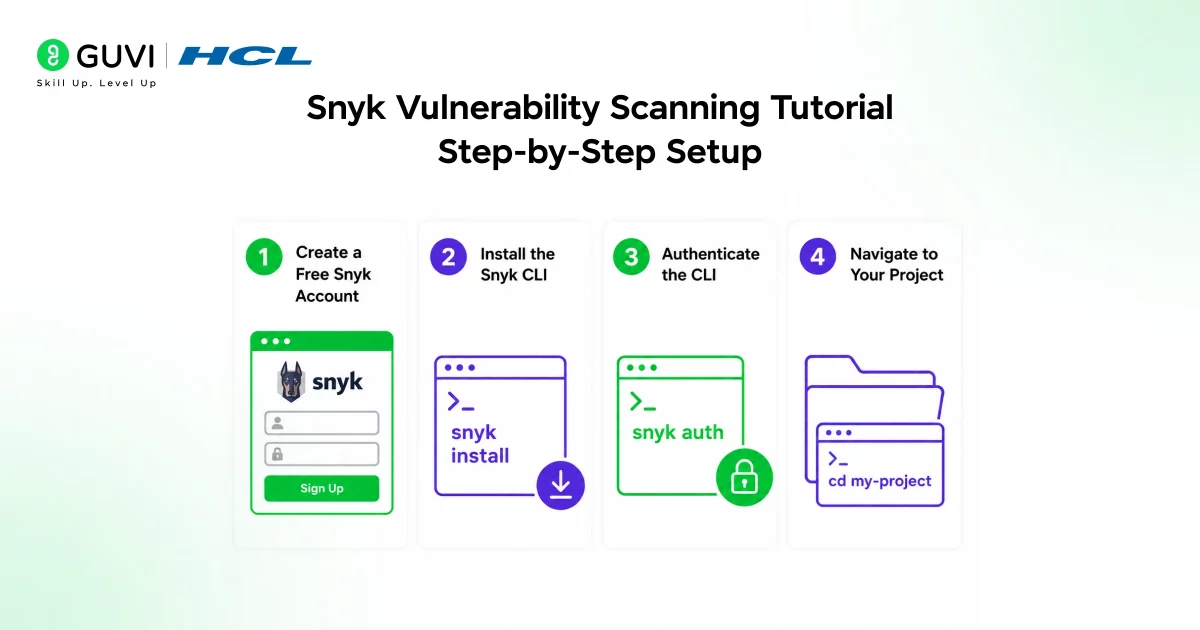
Step 1: Create a Free Snyk Account
Go to snyk.io and sign up with your GitHub, Google, or email account. The free tier requires no credit card and gives you unlimited open source scans for public repos and a generous limit for private ones.

Step 2: Install the Snyk CLI
Install the Snyk CLI using npm with the command npm install -g snyk.
If you do not use Node.js, you can also install Snyk via Homebrew on macOS with brew install snyk, or download a standalone binary directly from the Snyk GitHub releases page.
Step 3: Authenticate the CLI
Run snyk auth in your terminal. This opens a browser window where you log in to your Snyk account and authorise the CLI. Once complete, your terminal confirms authentication and you are ready to scan.
Step 4: Navigate to Your Project
Use cd /my/project/ to change the current directory to a folder containing a supported package manifest file, such as package.json, pom.xml, or composer.lock.
Snyk automatically detects your package manager from the manifest file in the directory.
Running Your First Scan
With setup complete, the core of this Snyk vulnerability scanning tutorial is running your first actual scan.
Scan open source dependencies: Run snyk test in your project directory. Snyk reads your manifest file, checks every dependency against its vulnerability database, and returns a report in your terminal.
Scan your application code: Run snyk code test to run static analysis on your source files. All vulnerabilities identified are listed, including their path and fix guidance.
Scan a Docker container image: Run snyk container test your-image-name:tag to check for known CVEs in your container layers and base image.
Scan Infrastructure as Code files: Run snyk iac test to check Terraform, Kubernetes, or CloudFormation files for security misconfigurations.
Monitor a project continuously: Run snyk monitor to get alerted for new vulnerabilities. This snapshots your project and sends you alerts whenever a new vulnerability is published that affects one of your dependencies.
Reading and Understanding Snyk Results
After running snyk test, your terminal shows a report organised by severity.
- Critical and High: Fix immediately. These are actively exploited or trivially exploitable.
- Medium: Fix in your next planned sprint, especially in dependencies exposed to user input.
- Low: Informational. Address in the next planned update cycle.
For each vulnerability, Snyk shows the affected package, the CVE number, severity score, a risk description, and the version you need to upgrade to. This context is what makes Snyk more useful than a raw dependency audit.
Fixing Vulnerabilities with Snyk
In the CLI: Run snyk fix to automatically apply recommended upgrades to your manifest file for supported ecosystems.
In GitHub: Connect your repo to Snyk via the dashboard and enable automated pull requests. Snyk raises a PR that upgrades the vulnerable dependency and shows the before and after vulnerability count in the PR description. You review, test, and merge.
For code vulnerabilities flagged by Snyk Code, Snyk shows the vulnerable line, explains what is wrong, and links to the relevant CWE entry so you understand the root cause, not just the fix.
Security is becoming a core DevOps skill, not a specialist afterthought. If you want to build the broader DevOps foundation that security tooling like Snyk plugs into, HCL GUVI’s DevOps Course covers CI/CD pipelines, Docker, Kubernetes, and security integration with real-world projects and NSDC certification.
For developers who want to go deeper into secure software development, the AI Software Development Course is IITM Pravartak certified and designed for product company roles.
Integrating Snyk into GitHub Actions
The most impactful part of any Snyk vulnerability scanning tutorial is embedding it into your CI/CD pipeline so every pull request is automatically scanned. Here is a minimal GitHub Actions workflow that does exactly that.
Add a file called .github/workflows/snyk.yml to your repository with this content:
name: Snyk Security Scan
on:
  push:
    branches: [main]
  pull_request:
    branches: [main]
jobs:
  security:
    runs-on: ubuntu-latest
    steps:
      - uses: actions/checkout@master
      - name: Run Snyk vulnerability scan
        uses: snyk/actions/node@master
        env:
          SNYK_TOKEN: ${{ secrets.SNYK_TOKEN }}
        with:
          args: --severity-threshold=high
Add your Snyk API token as a GitHub Actions secret named SNYK_TOKEN (find it under Account Settings in your Snyk dashboard). Now every time you open a pull request or push a commit to the main branch, Snyk will run and check for any dependency with security vulnerabilities.
Change node to python, maven, or gradle in the action reference depending on your project type.
💡 Did You Know?
- The DeepCode AI engine powering Snyk Code was trained on curated security datasets and can detect vulnerabilities across 19+ programming languages. Its AI-driven analysis produces significantly fewer false positives compared to many traditional static analysis tools. Unlike basic dependency checkers that only scan for known CVEs in package versions, Snyk Code can analyze actual application logic to identify deeper security risks.
Common Mistakes to Avoid
- Only scanning dependencies and ignoring code. Most beginners run snyk test and think they are done. Running snyk code test is equally important because it finds security bugs in the code you wrote, like hardcoded secrets, SQL injection points, and insecure cryptography that a dependency scanner will never catch.
- Not adding Snyk to CI/CD. Running a one-time scan is useful but not enough. The real value of a Snyk vulnerability scanning tutorial comes from putting it in your pipeline so every future change is scanned automatically. Without the pipeline integration, new vulnerabilities introduced in future commits go undetected.
- Ignoring Low and Medium findings indefinitely. It is fine to deprioritise them initially, but they compound over time. A Medium severity vulnerability that gets ignored for six months is often re-classified as High when a new exploit is published. Set a recurring ticket to review Medium findings monthly.
Conclusion
This Snyk vulnerability scanning tutorial covered everything you need to go from zero to automated security scanning: creating an account, installing the CLI, running your first scan across dependencies, code, containers, and IaC, understanding what the results mean, and embedding Snyk into GitHub Actions so future code is automatically checked. Security is not a final step before deployment. It is something you build into every stage of development. Snyk makes that practical and achievable in a single afternoon.
FAQs
1. What is a Snyk vulnerability scanning tutorial and who is it for?
A Snyk vulnerability scanning tutorial teaches developers how to find and fix security vulnerabilities in their code, dependencies, containers, and infrastructure. It is useful for any developer who wants to catch security issues before production.
2. Is Snyk free to use?
Yes. Snyk’s free tier covers all four scanning types with generous limits for individual developers. No credit card required.
3. What languages and package managers does Snyk support?
JavaScript (npm, Yarn), Python (pip), Java (Maven, Gradle), Go, Ruby, PHP, .NET, and more. Container scanning works with any Docker image and IaC scanning covers Terraform, Kubernetes, and CloudFormation.
4. How is Snyk different from npm audit or pip check?
Those tools only check packages against known CVEs. Snyk also scans your own code for security bugs, checks container images and IaC configs, and raises automated fix pull requests.
5. How do I add Snyk to GitHub Actions?
Add a .github/workflows/snyk.yml file using the snyk/actions GitHub Action and set your SNYK_TOKEN as a repository secret. The GitHub Actions section above includes a complete ready-to-use workflow.
6. What is the difference between snyk test and snyk monitor?
snyk test scans once and shows results immediately. snyk monitor takes a snapshot and watches continuously, alerting you when new vulnerabilities are disclosed for your dependencies even if you have not changed your code.
Success Stories

About the Author
Jebasta
I translate the language of data into stories that anyone can understand. As a writer with a data science background, I simplify analytics, AI, and decision-making so beginners and enthusiasts can confidently explore the world of data.
View all posts by Jebasta
Connect with me @






Did you enjoy this article?