


Full Stack Development Articles
Claude for Architecture and Engineering Documentation
Freelancing as a Python Developer: Getting Your First Client


Get In Touch For Details! Request More Information
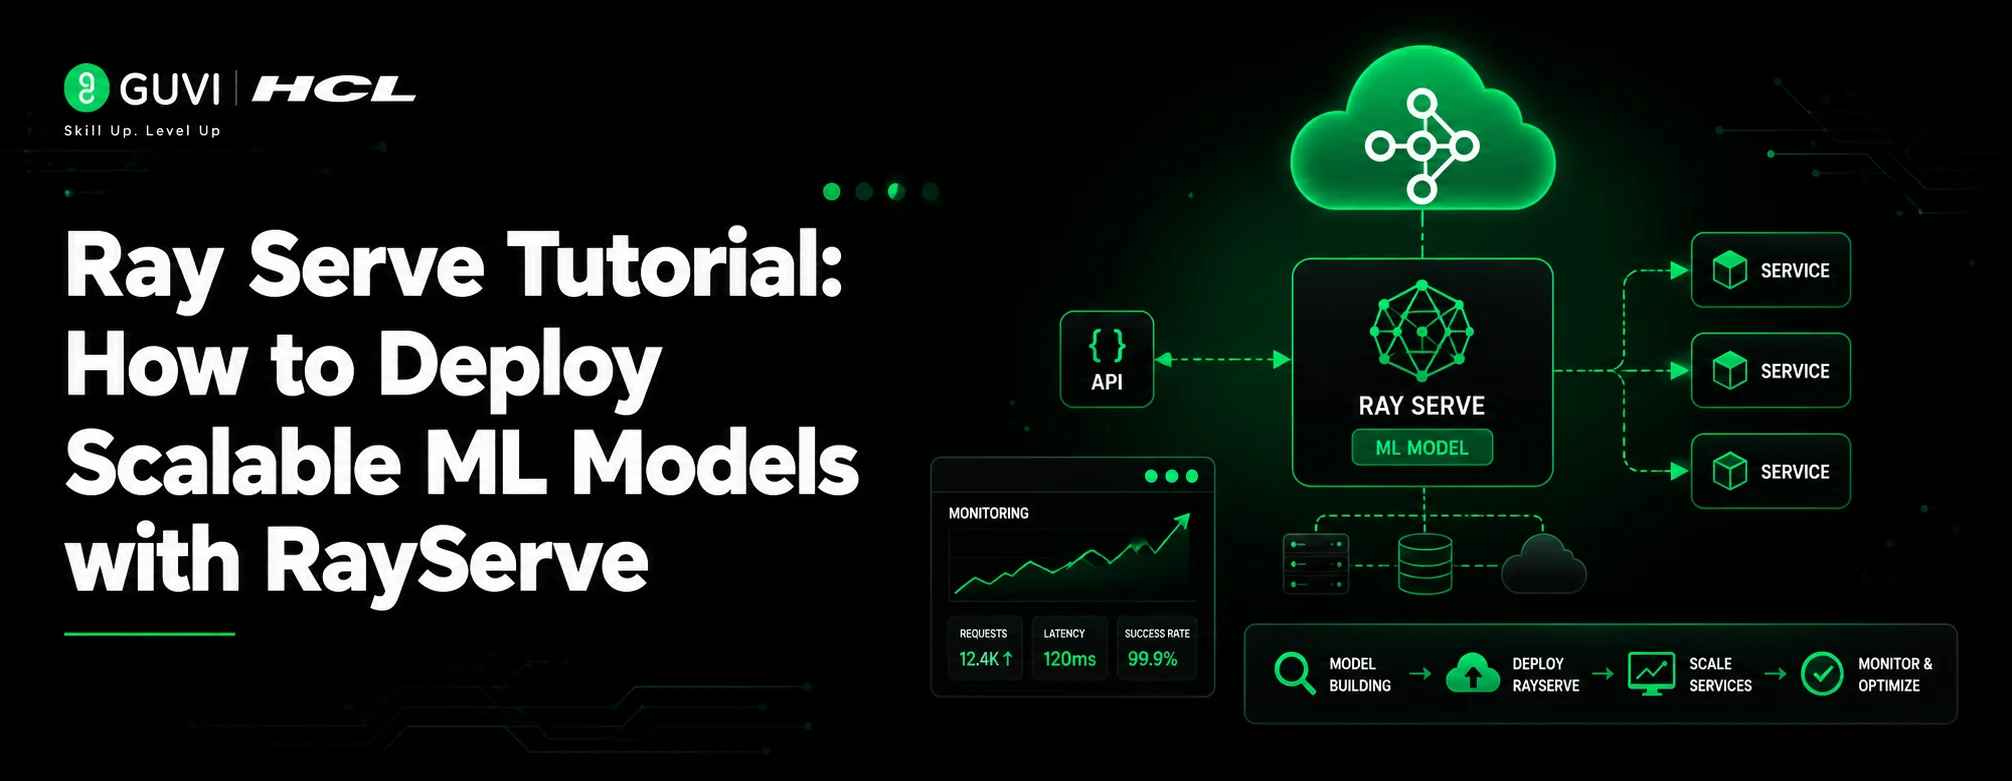
Ray Serve Tutorial: How to Deploy Scalable ML Models with RayServe
Jul 10, 2026 3 Min Read 477 Views
(Last Updated)
Ray Serve is a scalable model serving library built on Ray. It helps developers turn Python functions, machine learning models, and AI pipelines into production-ready APIs. Ray Serve is framework-agnostic, so it can serve models built with PyTorch, TensorFlow, scikit-learn, Hugging Face, or custom Python code.
A Ray Serve tutorial is useful when you want to deploy an ML model as an HTTP API, scale replicas, handle multiple requests, and move from local testing to production deployment.
Table of contents
- TL;DR
- What is Ray Serve?
- Key Ray Serve Functions
- Ray Serve Tutorial: Step-by-Step Guide
- Step 1: Install Ray Serve
- Step 2: Create a Ray Serve Application
- Step 3: Run the Application Locally
- Step 4: Test the API
- Step 5: Scale the Deployment
- Step 6: Create a Production Serve Config
- Conclusion
- FAQs
- What is Ray Serve used for?
- Is Ray Serve only for machine learning models?
- Can Ray Serve run with FastAPI?
TL;DR
- Ray Serve helps you deploy machine learning models as scalable APIs.
- You define a deployment using @serve.deployment.
- You create an application using .bind().
- You run it locally using serve.run().
- FastAPI can be added using @serve.ingress() for clean API routes.
- Production deployments should use a Serve config file and serve deploy.
What is Ray Serve?
Ray Serve is a scalable model serving framework built on top of Ray, designed to deploy machine learning models, Python functions, and AI applications as production-ready APIs. It lets developers define deployments using Python classes or functions, expose them through HTTP endpoints, and scale them across CPU or GPU resources using Ray’s distributed execution engine.
Ray Serve is not limited to traditional ML models. It can serve LLMs, stable diffusion models, object detection systems, and even plain Python functions, all through the same scalable deployment framework.
Key Ray Serve Functions
- serve.deployment()
Defines a Python class or function as a Ray Serve deployment. It is the main decorator used to wrap model inference logic, API logic, or pipeline steps. A deployment can run with one or more replicas for scaling.
- .bind()
Creates a Ray Serve application from a deployment. It connects the deployment with its arguments and prepares it to be run using serve.run() or deployed through a config file.
- serve.run()
Runs a Ray Serve application locally or inside a Ray cluster. It accepts an application returned by .bind() and returns a handle to the ingress deployment.
- @serve.ingress()
Connects a Ray Serve deployment with a FastAPI app. This is useful when you want clean HTTP routes such as /predict, /health, or /classify.
- num_replicas
Controls how many copies of a deployment run at the same time. More replicas allow Ray Serve to process more requests in parallel.
- ray_actor_options
Defines compute resources for each deployment replica. It can assign CPUs, GPUs, memory, or custom resources to model-serving workloads.
- max_ongoing_requests
Limits how many requests a replica can handle at once. This helps control latency and prevent a model replica from being overloaded.
- serve deploy
Deploys a Ray Serve application using a YAML config file. This is commonly used for production because it separates deployment settings from Python code.
Ray Serve Tutorial: Step-by-Step Guide
Step 1: Install Ray Serve
Create a virtual environment first.
python -m venv rayserve-env
source rayserve-env/bin/activate
For Windows:
rayserve-env\Scripts\activate
Install Ray Serve and required packages.
pip install -U "ray[serve]" fastapi requests
The ray[serve] extra installs Ray Core, dashboard, cluster launcher, and Serve components.
Step 2: Create a Ray Serve Application
Create a file named app.py.
from fastapi import FastAPI
from pydantic import BaseModel
from ray import serve

api = FastAPI()


class ReviewRequest(BaseModel):
    text: str

@serve.deployment(num_replicas=1)
@serve.ingress(api)
class SentimentModel:
    def __init__(self):
        self.positive_words = {"good", "great", "excellent", "love", "fast"}

    @api.get("/")
    def health_check(self):
        return {"status": "running", "service": "ray-serve"}

    @api.post("/predict")
    def predict(self, request: ReviewRequest):
        text = request.text.lower()
        score = sum(word in text for word in self.positive_words)

        label = "positive" if score > 0 else "neutral"

        return {
            "input": request.text,
            "prediction": label,
            "score": score
        }

app = SentimentModel.bind()
The @serve.deployment decorator turns the class into a Ray Serve deployment. Requests are handled by deployment replicas, and these replicas can be scaled independently.
Ray now has over 39,000 GitHub stars and has been downloaded more than 237 million times. It recently joined the PyTorch Foundation alongside projects like vLLM as part of the open-source AI compute stack.

Step 3: Run the Application Locally
Create another file named run.py.
from ray import serve
from app import app

serve.run(app, route_prefix="/sentiment")
Run the file.
python run.py
The serve.run() method runs a Serve application created through .bind(). It also exposes the app through the route prefix when HTTP routing is enabled.
Step 4: Test the API
Open a new terminal and send a test request.
curl -X POST "http://127.0.0.1:8000/sentiment/predict" \
-H "Content-Type: application/json" \
-d '{"text": "Ray Serve is fast and great"}'
Expected response:
{
  "input": "Ray Serve is fast and great",
  "prediction": "positive",
  "score": 2
}
You can also test the health endpoint.
curl http://127.0.0.1:8000/sentiment/
Expected response:
{
  "status": "running",
  "service": "ray-serve"
}
Build production-ready machine learning skills with HCL GUVI’s Machine Learning Course. Learn ML model development, deployment workflows, MLOps basics, and real-world AI applications through structured, hands-on training designed for aspiring machine learning engineers.
Step 5: Scale the Deployment
Update the deployment line in app.py.
@serve.deployment(num_replicas=2)
This runs two replicas of the deployment. More replicas help the service handle more concurrent requests, especially when model inference takes time.
For production, scaling should usually be managed through a Serve config file instead of changing code manually.
Step 6: Create a Production Serve Config
Create a file named serve_config.yaml.
applications:
  - name: sentiment_app
    route_prefix: /sentiment
    import_path: app:app
    deployments:
      - name: SentimentModel
        num_replicas: 2
Start a local Ray cluster.
ray start --head
Deploy the application.
serve deploy serve_config.yaml
Check deployment status.
serve status
Ray Serve recommends config files for production because they let teams configure applications, routes, replicas, HTTP options, and deployment parameters in one place.
Conclusion
Ray Serve makes model deployment easier by combining Python-native development with scalable serving infrastructure. A developer can start with a simple deployment, expose it through FastAPI, test it locally, and later move the same application into a production setup using Serve config files.
For teams building AI applications, Ray Serve is useful because it supports scalable inference, multiple replicas, model composition, and HTTP-based serving without forcing a specific ML framework.
FAQs
What is Ray Serve used for?
Ray Serve is used to deploy machine learning models, Python functions, and AI pipelines as scalable APIs.
Is Ray Serve only for machine learning models?
No. Ray Serve can serve ML models, FastAPI apps, Python functions, and multi-step inference pipelines.
Can Ray Serve run with FastAPI?
Yes. Ray Serve supports FastAPI through @serve.ingress(), which lets developers define clean HTTP routes inside a Serve deployment.
Success Stories

About the Author
Vaishali
I'm a seasoned writer with four years of experience across technical, non-technical, and just about every genre or niche you can imagine. Adaptable and curious, I enjoy exploring new topics and making information engaging and easy to understand. Fueled by a steady stream of tea, I approach each project with creativity, reliability, and genuine enthusiasm for storytelling.
View all posts by Vaishali
Connect with me @





































Did you enjoy this article?