

'%3e%3cpath%20d='M20.134%2023.75H14.266L13.42%2026H10.18L15.4%2013.4H19L24.22%2026H20.98L20.134%2023.75ZM17.2%2015.866L15.238%2021.14H19.162L17.2%2015.866ZM24.9185%2013.724C24.9185%2012.752%2025.7105%2011.96%2026.6825%2011.96C27.6545%2011.96%2028.4465%2012.752%2028.4465%2013.724C28.4465%2014.696%2027.6545%2015.488%2026.6825%2015.488C25.7105%2015.488%2024.9185%2014.696%2024.9185%2013.724ZM25.2065%2016.64H28.1765V26H25.2065V16.64Z'%20fill='url(%23paint0_linear_1812_470)'/%3e%3c/g%3e%3cdefs%3e%3cfilter%20id='filter0_dd_1812_470'%20x='7.18018'%20y='9.95996'%20width='24.2661'%20height='20.04'%20filterUnits='userSpaceOnUse'%20color-interpolation-filters='sRGB'%3e%3cfeFlood%20flood-opacity='0'%20result='BackgroundImageFix'/%3e%3cfeColorMatrix%20in='SourceAlpha'%20type='matrix'%20values='0%200%200%200%200%200%200%200%200%200%200%200%200%200%200%200%200%200%20127%200'%20result='hardAlpha'/%3e%3cfeOffset%20dy='1'/%3e%3cfeGaussianBlur%20stdDeviation='1.5'/%3e%3cfeColorMatrix%20type='matrix'%20values='0%200%200%200%200.0627451%200%200%200%200%200.109804%200%200%200%200%200.156863%200%200%200%200.1%200'/%3e%3cfeBlend%20mode='normal'%20in2='BackgroundImageFix'%20result='effect1_dropShadow_1812_470'/%3e%3cfeColorMatrix%20in='SourceAlpha'%20type='matrix'%20values='0%200%200%200%200%200%200%200%200%200%200%200%200%200%200%200%200%200%20127%200'%20result='hardAlpha'/%3e%3cfeOffset%20dy='1'/%3e%3cfeGaussianBlur%20stdDeviation='1'/%3e%3cfeColorMatrix%20type='matrix'%20values='0%200%200%200%200.0627451%200%200%200%200%200.109804%200%200%200%200%200.156863%200%200%200%200.06%200'/%3e%3cfeBlend%20mode='normal'%20in2='effect1_dropShadow_1812_470'%20result='effect2_dropShadow_1812_470'/%3e%3cfeBlend%20mode='normal'%20in='SourceGraphic'%20in2='effect2_dropShadow_1812_470'%20result='shape'/%3e%3c/filter%3e%3clinearGradient%20id='paint0_linear_1812_470'%20x1='10'%20y1='21.5'%20x2='29'%20y2='21.5'%20gradientUnits='userSpaceOnUse'%3e%3cstop%20stop-color='%236729FF'/%3e%3cstop%20offset='1'%20stop-color='%238A5CFF'/%3e%3c/linearGradient%3e%3c/defs%3e%3c/svg%3e)
'%3e%3cpath%20d='M10.9424%2022.8545C11.3105%2022.8545%2011.6092%2023.1525%2011.6094%2023.5205V30.1875C11.6094%2030.5557%2011.3105%2030.8545%2010.9424%2030.8545H8.27637C7.9082%2030.8545%207.60938%2030.5557%207.60938%2030.1875V23.5205C7.60951%2023.1525%207.90828%2022.8545%208.27637%2022.8545H10.9424ZM17.6104%2017.5205C17.9785%2017.5205%2018.2773%2017.8193%2018.2773%2018.1875V30.1875C18.2773%2030.5557%2017.9785%2030.8545%2017.6104%2030.8545H14.9434C14.5754%2030.8542%2014.2773%2030.5555%2014.2773%2030.1875V18.1875C14.2773%2017.8195%2014.5754%2017.5208%2014.9434%2017.5205H17.6104ZM24.2754%2020.1875C24.6433%2020.1878%2024.9414%2020.4865%2024.9414%2020.8545V30.1875C24.9414%2030.5555%2024.6433%2030.8542%2024.2754%2030.8545H21.6084C21.2402%2030.8545%2020.9414%2030.5557%2020.9414%2030.1875V20.8545C20.9414%2020.4863%2021.2402%2020.1875%2021.6084%2020.1875H24.2754ZM30.9424%2016.1875C31.3105%2016.1875%2031.6094%2016.4863%2031.6094%2016.8545V30.1875C31.6094%2030.5557%2031.3105%2030.8545%2030.9424%2030.8545H28.2764C27.9082%2030.8545%2027.6094%2030.5557%2027.6094%2030.1875V16.8545C27.6094%2016.4863%2027.9082%2016.1875%2028.2764%2016.1875H30.9424ZM29.6094%208.1875C30.7139%208.1875%2031.6094%209.08301%2031.6094%2010.1875C31.6094%2011.292%2030.7139%2012.1875%2029.6094%2012.1875C29.2368%2012.1863%2028.8723%2012.0798%2028.5576%2011.8809L24.9277%2014.0391C24.9314%2014.0889%2024.9424%2014.1367%2024.9424%2014.1875C24.9436%2015.2062%2024.1783%2016.0619%2023.166%2016.1748C22.1536%2016.2876%2021.2183%2015.6208%2020.9951%2014.627L17.6475%2012.9688C17.0271%2013.5698%2016.0864%2013.6931%2015.332%2013.2725L11.4756%2016.1514C11.5624%2016.3756%2011.6077%2016.6139%2011.6094%2016.8545C11.6092%2017.9589%2010.7138%2018.8545%209.60938%2018.8545C8.50496%2018.8545%207.60951%2017.9589%207.60938%2016.8545C7.60938%2015.7498%208.50488%2014.8545%209.60938%2014.8545C9.96191%2014.8564%2010.3076%2014.9524%2010.6104%2015.1328L14.4287%2012.2832C14.1184%2011.5355%2014.2896%2010.6748%2014.8623%2010.1025C15.4347%209.53038%2016.2955%209.35961%2017.043%209.66992C17.7905%209.98068%2018.2777%2010.711%2018.2764%2011.5205C18.2732%2011.6071%2018.2644%2011.6937%2018.25%2011.7793L21.1934%2013.2373C21.4939%2012.6739%2022.0476%2012.2898%2022.6807%2012.2051C23.3132%2012.1205%2023.9478%2012.3454%2024.3857%2012.8096L27.7236%2010.8262C27.6506%2010.6211%2027.6121%2010.4053%2027.6094%2010.1875C27.6106%209.0835%2028.5054%208.18872%2029.6094%208.1875Z'%20fill='url(%23paint0_linear_1812_508)'/%3e%3c/g%3e%3cdefs%3e%3cfilter%20id='filter0_dd_1812_508'%20x='4.60938'%20y='6.1875'%20width='30'%20height='28.667'%20filterUnits='userSpaceOnUse'%20color-interpolation-filters='sRGB'%3e%3cfeFlood%20flood-opacity='0'%20result='BackgroundImageFix'/%3e%3cfeColorMatrix%20in='SourceAlpha'%20type='matrix'%20values='0%200%200%200%200%200%200%200%200%200%200%200%200%200%200%200%200%200%20127%200'%20result='hardAlpha'/%3e%3cfeOffset%20dy='1'/%3e%3cfeGaussianBlur%20stdDeviation='1.5'/%3e%3cfeColorMatrix%20type='matrix'%20values='0%200%200%200%200.0627451%200%200%200%200%200.109804%200%200%200%200%200.156863%200%200%200%200.1%200'/%3e%3cfeBlend%20mode='normal'%20in2='BackgroundImageFix'%20result='effect1_dropShadow_1812_508'/%3e%3cfeColorMatrix%20in='SourceAlpha'%20type='matrix'%20values='0%200%200%200%200%200%200%200%200%200%200%200%200%200%200%200%200%200%20127%200'%20result='hardAlpha'/%3e%3cfeOffset%20dy='1'/%3e%3cfeGaussianBlur%20stdDeviation='1'/%3e%3cfeColorMatrix%20type='matrix'%20values='0%200%200%200%200.0627451%200%200%200%200%200.109804%200%200%200%200%200.156863%200%200%200%200.06%200'/%3e%3cfeBlend%20mode='normal'%20in2='effect1_dropShadow_1812_508'%20result='effect2_dropShadow_1812_508'/%3e%3cfeBlend%20mode='normal'%20in='SourceGraphic'%20in2='effect2_dropShadow_1812_508'%20result='shape'/%3e%3c/filter%3e%3clinearGradient%20id='paint0_linear_1812_508'%20x1='7.60938'%20y1='19.521'%20x2='31.6094'%20y2='19.521'%20gradientUnits='userSpaceOnUse'%3e%3cstop%20stop-color='%236729FF'/%3e%3cstop%20offset='1'%20stop-color='%238A5CFF'/%3e%3c/linearGradient%3e%3c/defs%3e%3c/svg%3e)
'%3e%3cpath%20d='M29.2646%2023.1094C29.4038%2023.0408%2029.5668%2023.0408%2029.7061%2023.1094L29.7568%2023.1338C30.8936%2023.6938%2030.8937%2025.3073%2029.7568%2025.8672L21.0049%2030.1758C20.1262%2030.6084%2019.0926%2030.6084%2018.2139%2030.1758L9.46191%2025.8672C8.3249%2025.3073%208.32502%2023.6938%209.46191%2023.1338L9.5127%2023.1094C9.65194%2023.0408%209.81488%2023.0408%209.9541%2023.1094L18.2139%2027.1758C19.0926%2027.6084%2020.1262%2027.6084%2021.0049%2027.1758L29.2646%2023.1094ZM29.2646%2018.1094C29.4038%2018.0408%2029.5668%2018.0408%2029.7061%2018.1094L29.7568%2018.1338C30.8936%2018.6938%2030.8937%2020.3073%2029.7568%2020.8672L21.0049%2025.1758C20.1262%2025.6084%2019.0926%2025.6084%2018.2139%2025.1758L9.46191%2020.8672C8.32488%2020.3073%208.32505%2018.6938%209.46191%2018.1338L9.5127%2018.1094C9.65194%2018.0408%209.81487%2018.0408%209.9541%2018.1094L18.2139%2022.1758C19.0926%2022.6084%2020.1262%2022.6084%2021.0049%2022.1758L29.2646%2018.1094ZM18.2139%208.82422C19.0926%208.39162%2020.1262%208.39162%2021.0049%208.82422L29.7568%2013.1338C30.8936%2013.6938%2030.8937%2015.3073%2029.7568%2015.8672L21.0049%2020.1758C20.1262%2020.6084%2019.0926%2020.6085%2018.2139%2020.1758L9.46191%2015.8672C8.32488%2015.3073%208.32502%2013.6938%209.46191%2013.1338L18.2139%208.82422Z'%20fill='url(%23paint0_linear_1812_474)'/%3e%3c/g%3e%3cdefs%3e%3cfilter%20id='filter0_dd_1812_474'%20x='5.60938'%20y='6.5'%20width='28'%20height='28'%20filterUnits='userSpaceOnUse'%20color-interpolation-filters='sRGB'%3e%3cfeFlood%20flood-opacity='0'%20result='BackgroundImageFix'/%3e%3cfeColorMatrix%20in='SourceAlpha'%20type='matrix'%20values='0%200%200%200%200%200%200%200%200%200%200%200%200%200%200%200%200%200%20127%200'%20result='hardAlpha'/%3e%3cfeOffset%20dy='1'/%3e%3cfeGaussianBlur%20stdDeviation='1.5'/%3e%3cfeColorMatrix%20type='matrix'%20values='0%200%200%200%200.0627451%200%200%200%200%200.109804%200%200%200%200%200.156863%200%200%200%200.1%200'/%3e%3cfeBlend%20mode='normal'%20in2='BackgroundImageFix'%20result='effect1_dropShadow_1812_474'/%3e%3cfeColorMatrix%20in='SourceAlpha'%20type='matrix'%20values='0%200%200%200%200%200%200%200%200%200%200%200%200%200%200%200%200%200%20127%200'%20result='hardAlpha'/%3e%3cfeOffset%20dy='1'/%3e%3cfeGaussianBlur%20stdDeviation='1'/%3e%3cfeColorMatrix%20type='matrix'%20values='0%200%200%200%200.0627451%200%200%200%200%200.109804%200%200%200%200%200.156863%200%200%200%200.06%200'/%3e%3cfeBlend%20mode='normal'%20in2='effect1_dropShadow_1812_474'%20result='effect2_dropShadow_1812_474'/%3e%3cfeBlend%20mode='normal'%20in='SourceGraphic'%20in2='effect2_dropShadow_1812_474'%20result='shape'/%3e%3c/filter%3e%3clinearGradient%20id='paint0_linear_1812_474'%20x1='8.60938'%20y1='19.5002'%20x2='30.6096'%20y2='19.5002'%20gradientUnits='userSpaceOnUse'%3e%3cstop%20stop-color='%236729FF'/%3e%3cstop%20offset='1'%20stop-color='%238A5CFF'/%3e%3c/linearGradient%3e%3c/defs%3e%3c/svg%3e)
'%3e%3cpath%20d='M21.7207%2028.6406C22.9675%2028.6407%2024.0267%2029.5026%2024.3945%2030.6279C24.5363%2031.0618%2024.1674%2031.5%2023.7109%2031.5H15.5117C15.0552%2031.5%2014.6855%2031.0618%2014.8271%2030.6279C15.1949%2029.5025%2016.2551%2028.6406%2017.502%2028.6406H21.7207ZM25.8193%2021.9229C26.0053%2022.2016%2025.9683%2022.5727%2025.7314%2022.8096C24.4407%2024.1004%2023.6153%2025.7631%2023.2969%2027.5469C22.8085%2027.3489%2022.2774%2027.2344%2021.7188%2027.2344H17.5C16.9414%2027.2344%2016.4102%2027.3488%2015.9219%2027.5469C15.6034%2025.7632%2014.7781%2024.1003%2013.4873%2022.8096C13.2505%2022.5727%2013.2135%2022.2016%2013.3994%2021.9229L18.9062%2013.6621V20.333C18.0897%2020.6243%2017.5%2021.3971%2017.5%2022.3125C17.5%2023.4757%2018.4462%2024.4219%2019.6094%2024.4219C20.7725%2024.4219%2021.7188%2023.4757%2021.7188%2022.3125C21.7188%2021.3971%2021.1291%2020.6243%2020.3125%2020.333V13.6621L25.8193%2021.9229ZM19.6094%2021.6094C19.9973%2021.6094%2020.3125%2021.9246%2020.3125%2022.3125C20.3125%2022.7004%2019.9973%2023.0156%2019.6094%2023.0156C19.2214%2023.0156%2018.9062%2022.7004%2018.9062%2022.3125C18.9062%2021.9246%2019.2214%2021.6094%2019.6094%2021.6094ZM11.1719%207.5C11.5605%207.5%2011.875%207.81448%2011.875%208.20312V8.90625H17.6299C17.9211%208.08965%2018.6939%207.5%2019.6094%207.5C20.5248%207.5%2021.2976%208.08965%2021.5889%208.90625L27.3438%208.90625V8.20312C27.3438%207.81448%2027.6582%207.5%2028.0469%207.5H30.9062C31.2949%207.5%2031.6094%207.81448%2031.6094%208.20312V11.0156C31.6094%2011.4043%2031.2949%2011.7188%2030.9062%2011.7188H28.0469C27.6582%2011.7188%2027.3438%2011.4043%2027.3438%2011.0156V10.3125H24.4561C26.8962%2011.8369%2028.5049%2014.5051%2028.6973%2017.5039C29.5409%2017.78%2030.1562%2018.5653%2030.1562%2019.5C30.1562%2020.6632%2029.21%2021.6094%2028.0469%2021.6094C26.8837%2021.6094%2025.9375%2020.6632%2025.9375%2019.5C25.9375%2018.6028%2026.5027%2017.8396%2027.2939%2017.5352C27.0539%2014.1921%2024.7213%2011.3743%2021.4766%2010.5703C21.1256%2011.2489%2020.4247%2011.7188%2019.6094%2011.7188C18.7941%2011.7188%2018.0931%2011.2489%2017.7422%2010.5703C14.4975%2011.3744%2012.1649%2014.1921%2011.9248%2017.5352C12.716%2017.8396%2013.2812%2018.6028%2013.2812%2019.5C13.2812%2020.6632%2012.335%2021.6094%2011.1719%2021.6094C10.0087%2021.6094%209.0625%2020.6632%209.0625%2019.5C9.0625%2018.5653%209.67783%2017.78%2010.5215%2017.5039C10.7138%2014.5051%2012.3225%2011.8272%2014.7627%2010.3027H11.875V11.0156C11.875%2011.4043%2011.5605%2011.7188%2011.1719%2011.7188H8.3125C7.92386%2011.7188%207.60938%2011.4043%207.60938%2011.0156V8.20312C7.60938%207.81448%207.92386%207.5%208.3125%207.5H11.1719Z'%20fill='url(%23paint0_linear_1812_524)'/%3e%3c/g%3e%3cdefs%3e%3cfilter%20id='filter0_dd_1812_524'%20x='4.60938'%20y='5.5'%20width='30'%20height='30'%20filterUnits='userSpaceOnUse'%20color-interpolation-filters='sRGB'%3e%3cfeFlood%20flood-opacity='0'%20result='BackgroundImageFix'/%3e%3cfeColorMatrix%20in='SourceAlpha'%20type='matrix'%20values='0%200%200%200%200%200%200%200%200%200%200%200%200%200%200%200%200%200%20127%200'%20result='hardAlpha'/%3e%3cfeOffset%20dy='1'/%3e%3cfeGaussianBlur%20stdDeviation='1.5'/%3e%3cfeColorMatrix%20type='matrix'%20values='0%200%200%200%200.0627451%200%200%200%200%200.109804%200%200%200%200%200.156863%200%200%200%200.1%200'/%3e%3cfeBlend%20mode='normal'%20in2='BackgroundImageFix'%20result='effect1_dropShadow_1812_524'/%3e%3cfeColorMatrix%20in='SourceAlpha'%20type='matrix'%20values='0%200%200%200%200%200%200%200%200%200%200%200%200%200%200%200%200%200%20127%200'%20result='hardAlpha'/%3e%3cfeOffset%20dy='1'/%3e%3cfeGaussianBlur%20stdDeviation='1'/%3e%3cfeColorMatrix%20type='matrix'%20values='0%200%200%200%200.0627451%200%200%200%200%200.109804%200%200%200%200%200.156863%200%200%200%200.06%200'/%3e%3cfeBlend%20mode='normal'%20in2='effect1_dropShadow_1812_524'%20result='effect2_dropShadow_1812_524'/%3e%3cfeBlend%20mode='normal'%20in='SourceGraphic'%20in2='effect2_dropShadow_1812_524'%20result='shape'/%3e%3c/filter%3e%3clinearGradient%20id='paint0_linear_1812_524'%20x1='7.60938'%20y1='19.5'%20x2='31.6094'%20y2='19.5'%20gradientUnits='userSpaceOnUse'%3e%3cstop%20stop-color='%236729FF'/%3e%3cstop%20offset='1'%20stop-color='%238A5CFF'/%3e%3c/linearGradient%3e%3c/defs%3e%3c/svg%3e)
'%3e%3cpath%20d='M33.9999%200.400391H5.9999C2.90711%200.400391%200.399902%202.9076%200.399902%206.00039V34.0004C0.399902%2037.0932%202.90711%2039.6004%205.9999%2039.6004H33.9999C37.0927%2039.6004%2039.5999%2037.0932%2039.5999%2034.0004V6.00039C39.5999%202.9076%2037.0927%200.400391%2033.9999%200.400391Z'%20fill='white'%20stroke='%23E4E8EC'%20stroke-width='0.8'/%3e%3cg%20filter='url(%23filter0_dd_4322_3743)'%3e%3cpath%20d='M27.874%2013.3767C26.7727%2013.323%2025.7215%2013.55%2024.7897%2013.9943C24.5776%2014.0953%2024.3758%2014.2161%2024.1725%2014.3334C23.9762%2014.4466%2023.8022%2014.5904%2023.6152%2014.7175C23.6135%2014.7187%2023.6117%2014.7199%2023.61%2014.721L22.9464%2015.181L21.929%2013.9332L21.5398%2016.1558L21.388%2017.023L21.1564%2018.346L23.1154%2018.461L23.301%2018.4718L25.7471%2018.6154L24.7615%2017.4069L25.2915%2017.0205L25.7217%2016.7215C26.3093%2016.3732%2027.0018%2016.1869%2027.7351%2016.2227C29.7261%2016.3199%2031.2613%2018.0127%2031.1641%2020.0037C31.0507%2022.3259%2028.6157%2023.9488%2026.4149%2023.2429C25.5114%2022.953%2024.8454%2022.2337%2024.1381%2021.6335C23.4004%2021.0075%2022.6626%2020.3813%2021.9248%2019.7553C21.8396%2019.683%2021.7543%2019.6106%2021.6691%2019.5383L19.4169%2017.6273L19.3504%2017.5708L19.3503%2017.5725L16.7577%2015.3667C16.6695%2015.2872%2016.5788%2015.2104%2016.4862%2015.1358C16.4862%2015.1358%2016.4808%2015.1311%2016.4806%2015.1312C15.4545%2014.306%2014.1691%2013.7854%2012.7564%2013.7164C9.19933%2013.5427%206.16411%2016.2953%205.99042%2019.8524C5.81674%2023.4095%208.56936%2026.4447%2012.1264%2026.6184C13.2277%2026.6721%2014.2789%2026.4451%2015.2107%2026.0009C15.4228%2025.8998%2015.6246%2025.779%2015.8279%2025.6618C16.0242%2025.5485%2016.1982%2025.4047%2016.3852%2025.2776C16.387%2025.2764%2016.3887%2025.2752%2016.3905%2025.2741L17.054%2024.8142L18.0715%2026.0618L18.4606%2023.8392L18.6124%2022.972L18.844%2021.6491L16.885%2021.5341L16.6994%2021.5232L14.2534%2021.3796L15.2388%2022.5881L14.7088%2022.9746L14.2786%2023.2736C13.691%2023.622%2012.9985%2023.8082%2012.2652%2023.7724C10.2742%2023.6752%208.73905%2021.9824%208.83626%2019.9914C8.94965%2017.6692%2011.3846%2016.0463%2013.5854%2016.7523C14.4889%2017.0421%2015.1549%2017.7614%2015.8622%2018.3616C16.5999%2018.9877%2017.3378%2019.6138%2018.0755%2020.2398C18.1608%2020.3121%2018.246%2020.3846%2018.3312%2020.4569L20.5831%2022.3678L20.6497%2022.4243L20.6498%2022.4226L23.2423%2024.6284C23.3305%2024.7079%2023.4213%2024.7848%2023.5138%2024.8593L23.5195%2024.8639C24.5455%2025.6891%2025.8309%2026.2098%2027.2436%2026.2787C30.8007%2026.4524%2033.8359%2023.6998%2034.0096%2020.1427C34.1837%2016.5856%2031.4311%2013.5504%2027.874%2013.3767Z'%20fill='url(%23paint0_linear_4322_3743)'/%3e%3c/g%3e%3c/g%3e%3cdefs%3e%3cfilter%20id='filter0_dd_4322_3743'%20x='1.18237'%20y='10.1689'%20width='37.6354'%20height='22.8584'%20filterUnits='userSpaceOnUse'%20color-interpolation-filters='sRGB'%3e%3cfeFlood%20flood-opacity='0'%20result='BackgroundImageFix'/%3e%3cfeColorMatrix%20in='SourceAlpha'%20type='matrix'%20values='0%200%200%200%200%200%200%200%200%200%200%200%200%200%200%200%200%200%20127%200'%20result='hardAlpha'/%3e%3cfeOffset%20dy='1.6001'/%3e%3cfeGaussianBlur%20stdDeviation='2.40015'/%3e%3cfeColorMatrix%20type='matrix'%20values='0%200%200%200%200.0627451%200%200%200%200%200.109804%200%200%200%200%200.156863%200%200%200%200.1%200'/%3e%3cfeBlend%20mode='normal'%20in2='BackgroundImageFix'%20result='effect1_dropShadow_4322_3743'/%3e%3cfeColorMatrix%20in='SourceAlpha'%20type='matrix'%20values='0%200%200%200%200%200%200%200%200%200%200%200%200%200%200%200%200%200%20127%200'%20result='hardAlpha'/%3e%3cfeOffset%20dy='1.6001'/%3e%3cfeGaussianBlur%20stdDeviation='1.6001'/%3e%3cfeColorMatrix%20type='matrix'%20values='0%200%200%200%200.0627451%200%200%200%200%200.109804%200%200%200%200%200.156863%200%200%200%200.06%200'/%3e%3cfeBlend%20mode='normal'%20in2='effect1_dropShadow_4322_3743'%20result='effect2_dropShadow_4322_3743'/%3e%3cfeBlend%20mode='normal'%20in='SourceGraphic'%20in2='effect2_dropShadow_4322_3743'%20result='shape'/%3e%3c/filter%3e%3clinearGradient%20id='paint0_linear_4322_3743'%20x1='6.0167'%20y1='19.3147'%20x2='33.9835'%20y2='20.6802'%20gradientUnits='userSpaceOnUse'%3e%3cstop%20stop-color='%236729FF'/%3e%3cstop%20offset='1'%20stop-color='%238A5CFF'/%3e%3c/linearGradient%3e%3cclipPath%20id='clip0_4322_3743'%3e%3crect%20width='40'%20height='40'%20fill='white'/%3e%3c/clipPath%3e%3c/defs%3e%3c/svg%3e)

'%3e%3cpath%20d='M14.6667%2024.6663C14.399%2024.6663%2014.1477%2024.562%2013.9593%2024.373L10.293%2020.7067C10.1043%2020.5187%2010%2020.2673%2010%2019.9997C10%2019.732%2010.1043%2019.4807%2010.2933%2019.2923L13.9597%2015.626C14.1477%2015.4373%2014.399%2015.333%2014.6667%2015.333C15.218%2015.333%2015.6667%2015.7817%2015.6667%2016.333C15.6667%2016.6007%2015.5623%2016.852%2015.3733%2017.0403L12.414%2019.9997L15.3737%2022.9593C15.5627%2023.1473%2015.6667%2023.3987%2015.6667%2023.6663C15.6667%2024.2177%2015.218%2024.6663%2014.6667%2024.6663Z'%20fill='%230A0F14'/%3e%3cpath%20d='M14.6667%2024.6663C14.399%2024.6663%2014.1477%2024.562%2013.9593%2024.373L10.293%2020.7067C10.1043%2020.5187%2010%2020.2673%2010%2019.9997C10%2019.732%2010.1043%2019.4807%2010.2933%2019.2923L13.9597%2015.626C14.1477%2015.4373%2014.399%2015.333%2014.6667%2015.333C15.218%2015.333%2015.6667%2015.7817%2015.6667%2016.333C15.6667%2016.6007%2015.5623%2016.852%2015.3733%2017.0403L12.414%2019.9997L15.3737%2022.9593C15.5627%2023.1473%2015.6667%2023.3987%2015.6667%2023.6663C15.6667%2024.2177%2015.218%2024.6663%2014.6667%2024.6663Z'%20fill='url(%23paint0_linear_1812_1508)'/%3e%3cpath%20d='M25.334%2024.9993C24.7827%2024.9993%2024.334%2024.5507%2024.334%2023.9993C24.334%2023.7317%2024.4383%2023.4803%2024.6273%2023.292L27.5867%2020.3327L24.627%2017.373C24.4383%2017.1843%2024.334%2016.933%2024.334%2016.666C24.334%2016.1147%2024.7827%2015.666%2025.334%2015.666C25.6017%2015.666%2025.853%2015.7703%2026.0413%2015.9593L29.7077%2019.6257C29.8967%2019.8143%2030.0007%2020.0657%2030.0007%2020.3327C30.0007%2020.6003%2029.8963%2020.8517%2029.7073%2021.04L26.041%2024.7063C25.853%2024.8953%2025.6017%2024.9993%2025.334%2024.9993Z'%20fill='%230A0F14'/%3e%3cpath%20d='M25.334%2024.9993C24.7827%2024.9993%2024.334%2024.5507%2024.334%2023.9993C24.334%2023.7317%2024.4383%2023.4803%2024.6273%2023.292L27.5867%2020.3327L24.627%2017.373C24.4383%2017.1843%2024.334%2016.933%2024.334%2016.666C24.334%2016.1147%2024.7827%2015.666%2025.334%2015.666C25.6017%2015.666%2025.853%2015.7703%2026.0413%2015.9593L29.7077%2019.6257C29.8967%2019.8143%2030.0007%2020.0657%2030.0007%2020.3327C30.0007%2020.6003%2029.8963%2020.8517%2029.7073%2021.04L26.041%2024.7063C25.853%2024.8953%2025.6017%2024.9993%2025.334%2024.9993Z'%20fill='url(%23paint1_linear_1812_1508)'/%3e%3cpath%20d='M17%2027.6663C16.4487%2027.6663%2016%2027.2177%2016%2026.6663C16%2026.5337%2016.026%2026.404%2016.0767%2026.2813L22.077%2012.9473C22.2337%2012.574%2022.596%2012.333%2023%2012.333C23.5513%2012.333%2024%2012.7817%2024%2013.333C24%2013.4657%2023.974%2013.5953%2023.9233%2013.718L17.923%2027.052C17.7663%2027.4253%2017.404%2027.6663%2017%2027.6663Z'%20fill='%230A0F14'/%3e%3cpath%20d='M17%2027.6663C16.4487%2027.6663%2016%2027.2177%2016%2026.6663C16%2026.5337%2016.026%2026.404%2016.0767%2026.2813L22.077%2012.9473C22.2337%2012.574%2022.596%2012.333%2023%2012.333C23.5513%2012.333%2024%2012.7817%2024%2013.333C24%2013.4657%2023.974%2013.5953%2023.9233%2013.718L17.923%2027.052C17.7663%2027.4253%2017.404%2027.6663%2017%2027.6663Z'%20fill='url(%23paint2_linear_1812_1508)'/%3e%3c/g%3e%3cdefs%3e%3clinearGradient%20id='paint0_linear_1812_1508'%20x1='10'%20y1='19.9997'%20x2='15.6667'%20y2='19.9997'%20gradientUnits='userSpaceOnUse'%3e%3cstop%20stop-color='%236729FF'/%3e%3cstop%20offset='1'%20stop-color='%238A5CFF'/%3e%3c/linearGradient%3e%3clinearGradient%20id='paint1_linear_1812_1508'%20x1='24.334'%20y1='20.3327'%20x2='30.0007'%20y2='20.3327'%20gradientUnits='userSpaceOnUse'%3e%3cstop%20stop-color='%236729FF'/%3e%3cstop%20offset='1'%20stop-color='%238A5CFF'/%3e%3c/linearGradient%3e%3clinearGradient%20id='paint2_linear_1812_1508'%20x1='16'%20y1='19.9997'%20x2='24'%20y2='19.9997'%20gradientUnits='userSpaceOnUse'%3e%3cstop%20stop-color='%236729FF'/%3e%3cstop%20offset='1'%20stop-color='%238A5CFF'/%3e%3c/linearGradient%3e%3cclipPath%20id='clip0_1812_1508'%3e%3crect%20width='20'%20height='20'%20fill='white'%20transform='translate(10%2010)'/%3e%3c/clipPath%3e%3c/defs%3e%3c/svg%3e)
'/%3e%3cpath%20d='M28%2025.5C28.5523%2025.5%2029%2025.0523%2029%2024.5C29%2023.9477%2028.5523%2023.5%2028%2023.5H20C19.4477%2023.5%2019%2023.9477%2019%2024.5C19%2025.0523%2019.4477%2025.5%2020%2025.5H28Z'%20fill='url(%23paint1_linear_1812_1498)'/%3e%3cdefs%3e%3clinearGradient%20id='paint0_linear_1812_1498'%20x1='11'%20y1='20'%20x2='18'%20y2='20'%20gradientUnits='userSpaceOnUse'%3e%3cstop%20stop-color='%236729FF'/%3e%3cstop%20offset='1'%20stop-color='%238A5CFF'/%3e%3c/linearGradient%3e%3clinearGradient%20id='paint1_linear_1812_1498'%20x1='19'%20y1='24.5'%20x2='29'%20y2='24.5'%20gradientUnits='userSpaceOnUse'%3e%3cstop%20stop-color='%236729FF'/%3e%3cstop%20offset='1'%20stop-color='%238A5CFF'/%3e%3c/linearGradient%3e%3c/defs%3e%3c/svg%3e)
'%3e%3cpath%20d='M31.009%2019.258V16.9295C31.009%2016.687%2030.7179%2016.5414%2030.5239%2016.687C28.1469%2018.5789%2023.8779%2019.5491%2019.609%2019.5491C15.3886%2019.5491%2011.1196%2018.5789%208.69409%2016.687C8.50005%2016.5414%208.20898%2016.687%208.20898%2016.9295V19.258V19.4521C8.20898%2022.1687%2013.3026%2024.4002%2019.609%2024.4002C25.9154%2024.4002%2031.009%2022.1687%2031.009%2019.4036C31.009%2019.3551%2031.009%2019.3065%2031.009%2019.258Z'%20fill='%230A0F14'/%3e%3cpath%20d='M31.009%2019.258V16.9295C31.009%2016.687%2030.7179%2016.5414%2030.5239%2016.687C28.1469%2018.5789%2023.8779%2019.5491%2019.609%2019.5491C15.3886%2019.5491%2011.1196%2018.5789%208.69409%2016.687C8.50005%2016.5414%208.20898%2016.687%208.20898%2016.9295V19.258V19.4521C8.20898%2022.1687%2013.3026%2024.4002%2019.609%2024.4002C25.9154%2024.4002%2031.009%2022.1687%2031.009%2019.4036C31.009%2019.3551%2031.009%2019.3065%2031.009%2019.258Z'%20fill='url(%23paint0_linear_1812_1488)'/%3e%3cpath%20d='M31.009%2025.758V23.4295C31.009%2023.187%2030.7179%2023.0414%2030.5239%2023.187C28.1469%2025.0789%2023.8779%2026.0491%2019.609%2026.0491C15.3886%2026.0491%2011.1196%2025.0789%208.69409%2023.187C8.50005%2023.0414%208.20898%2023.187%208.20898%2023.4295V25.758V25.9521C8.20898%2028.6687%2013.3026%2030.9002%2019.609%2030.9002C25.9154%2030.9002%2031.009%2028.6687%2031.009%2025.9036C31.009%2025.8551%2031.009%2025.8065%2031.009%2025.758Z'%20fill='%230A0F14'/%3e%3cpath%20d='M31.009%2025.758V23.4295C31.009%2023.187%2030.7179%2023.0414%2030.5239%2023.187C28.1469%2025.0789%2023.8779%2026.0491%2019.609%2026.0491C15.3886%2026.0491%2011.1196%2025.0789%208.69409%2023.187C8.50005%2023.0414%208.20898%2023.187%208.20898%2023.4295V25.758V25.9521C8.20898%2028.6687%2013.3026%2030.9002%2019.609%2030.9002C25.9154%2030.9002%2031.009%2028.6687%2031.009%2025.9036C31.009%2025.8551%2031.009%2025.8065%2031.009%2025.758Z'%20fill='url(%23paint1_linear_1812_1488)'/%3e%3cpath%20d='M19.609%2018.0927C25.905%2018.0927%2031.009%2015.8557%2031.009%2013.0962C31.009%2010.3366%2025.905%208.09961%2019.609%208.09961C13.3129%208.09961%208.20898%2010.3366%208.20898%2013.0962C8.20898%2015.8557%2013.3129%2018.0927%2019.609%2018.0927Z'%20fill='%230A0F14'/%3e%3cpath%20d='M19.609%2018.0927C25.905%2018.0927%2031.009%2015.8557%2031.009%2013.0962C31.009%2010.3366%2025.905%208.09961%2019.609%208.09961C13.3129%208.09961%208.20898%2010.3366%208.20898%2013.0962C8.20898%2015.8557%2013.3129%2018.0927%2019.609%2018.0927Z'%20fill='url(%23paint2_linear_1812_1488)'/%3e%3c/g%3e%3cdefs%3e%3clinearGradient%20id='paint0_linear_1812_1488'%20x1='8.20898'%20y1='20.5145'%20x2='31.009'%20y2='20.5145'%20gradientUnits='userSpaceOnUse'%3e%3cstop%20stop-color='%236729FF'/%3e%3cstop%20offset='1'%20stop-color='%238A5CFF'/%3e%3c/linearGradient%3e%3clinearGradient%20id='paint1_linear_1812_1488'%20x1='8.20898'%20y1='27.0145'%20x2='31.009'%20y2='27.0145'%20gradientUnits='userSpaceOnUse'%3e%3cstop%20stop-color='%236729FF'/%3e%3cstop%20offset='1'%20stop-color='%238A5CFF'/%3e%3c/linearGradient%3e%3clinearGradient%20id='paint2_linear_1812_1488'%20x1='8.20898'%20y1='13.0962'%20x2='31.009'%20y2='13.0962'%20gradientUnits='userSpaceOnUse'%3e%3cstop%20stop-color='%236729FF'/%3e%3cstop%20offset='1'%20stop-color='%238A5CFF'/%3e%3c/linearGradient%3e%3cclipPath%20id='clip0_1812_1488'%3e%3crect%20width='24'%20height='24'%20fill='white'%20transform='translate(7.60938%207.5)'/%3e%3c/clipPath%3e%3c/defs%3e%3c/svg%3e)


'/%3e%3cpath%20d='M21.8957%207.53398L22.8013%208.98336L24.4594%209.39648C24.7344%209.46523%2024.8426%209.79773%2024.6607%2010.0152L23.5619%2011.324L23.6813%2013.0284C23.7013%2013.3109%2023.4182%2013.5171%2023.1551%2013.4109L21.5707%2012.7702L19.9863%2013.4109C19.7238%2013.5171%2019.4401%2013.3115%2019.4601%2013.0284L19.5794%2011.324L18.4807%2010.0152C18.2982%209.79836%2018.4069%209.46523%2018.6819%209.39648L20.3401%208.98336L21.2457%207.53398C21.3951%207.29336%2021.7457%207.29336%2021.8957%207.53398Z'%20fill='%230A0F14'/%3e%3cpath%20d='M21.8957%207.53398L22.8013%208.98336L24.4594%209.39648C24.7344%209.46523%2024.8426%209.79773%2024.6607%2010.0152L23.5619%2011.324L23.6813%2013.0284C23.7013%2013.3109%2023.4182%2013.5171%2023.1551%2013.4109L21.5707%2012.7702L19.9863%2013.4109C19.7238%2013.5171%2019.4401%2013.3115%2019.4601%2013.0284L19.5794%2011.324L18.4807%2010.0152C18.2982%209.79836%2018.4069%209.46523%2018.6819%209.39648L20.3401%208.98336L21.2457%207.53398C21.3951%207.29336%2021.7457%207.29336%2021.8957%207.53398Z'%20fill='url(%23paint1_linear_1812_1874)'/%3e%3cdefs%3e%3clinearGradient%20id='paint0_linear_1812_1874'%20x1='6.6875'%20y1='17.5217'%20x2='22.7875'%20y2='17.5217'%20gradientUnits='userSpaceOnUse'%3e%3cstop%20stop-color='%236729FF'/%3e%3cstop%20offset='1'%20stop-color='%238A5CFF'/%3e%3c/linearGradient%3e%3clinearGradient%20id='paint1_linear_1812_1874'%20x1='18.3906'%20y1='10.3964'%20x2='24.7505'%20y2='10.3964'%20gradientUnits='userSpaceOnUse'%3e%3cstop%20stop-color='%236729FF'/%3e%3cstop%20offset='1'%20stop-color='%238A5CFF'/%3e%3c/linearGradient%3e%3c/defs%3e%3c/svg%3e)

'/%3e%3cdefs%3e%3clinearGradient%20id='paint0_linear_1812_1827'%20x1='6.1333'%20y1='15.9947'%20x2='25.8635'%20y2='15.9947'%20gradientUnits='userSpaceOnUse'%3e%3cstop%20stop-color='%236729FF'/%3e%3cstop%20offset='1'%20stop-color='%238A5CFF'/%3e%3c/linearGradient%3e%3c/defs%3e%3c/svg%3e)
'%3e%3cmask%20id='mask0_1812_1767'%20style='mask-type:luminance'%20maskUnits='userSpaceOnUse'%20x='6'%20y='6'%20width='20'%20height='20'%3e%3cpath%20d='M6%206H26V26H6V6Z'%20fill='white'/%3e%3c/mask%3e%3cg%20mask='url(%23mask0_1812_1767)'%3e%3cpath%20d='M19.8244%2013.5H18.4994V9.33333C18.4994%208.875%2018.1244%208.5%2017.666%208.5H14.3327C13.8743%208.5%2013.4993%208.875%2013.4993%209.33333V13.5H12.1743C11.4327%2013.5%2011.0577%2014.4%2011.5827%2014.925L15.4077%2018.75C15.7327%2019.075%2016.2577%2019.075%2016.5827%2018.75L20.4077%2014.925C20.9327%2014.4%2020.566%2013.5%2019.8244%2013.5ZM10.166%2021.8333C10.166%2022.2917%2010.541%2022.6667%2010.9993%2022.6667H20.9994C21.4577%2022.6667%2021.8327%2022.2917%2021.8327%2021.8333C21.8327%2021.375%2021.4577%2021%2020.9994%2021H10.9993C10.541%2021%2010.166%2021.375%2010.166%2021.8333Z'%20fill='%230A0F14'/%3e%3cpath%20d='M19.8244%2013.5H18.4994V9.33333C18.4994%208.875%2018.1244%208.5%2017.666%208.5H14.3327C13.8743%208.5%2013.4993%208.875%2013.4993%209.33333V13.5H12.1743C11.4327%2013.5%2011.0577%2014.4%2011.5827%2014.925L15.4077%2018.75C15.7327%2019.075%2016.2577%2019.075%2016.5827%2018.75L20.4077%2014.925C20.9327%2014.4%2020.566%2013.5%2019.8244%2013.5ZM10.166%2021.8333C10.166%2022.2917%2010.541%2022.6667%2010.9993%2022.6667H20.9994C21.4577%2022.6667%2021.8327%2022.2917%2021.8327%2021.8333C21.8327%2021.375%2021.4577%2021%2020.9994%2021H10.9993C10.541%2021%2010.166%2021.375%2010.166%2021.8333Z'%20fill='url(%23paint0_linear_1812_1767)'/%3e%3c/g%3e%3c/g%3e%3cdefs%3e%3clinearGradient%20id='paint0_linear_1812_1767'%20x1='10.166'%20y1='15.5833'%20x2='21.8327'%20y2='15.5833'%20gradientUnits='userSpaceOnUse'%3e%3cstop%20stop-color='%236729FF'/%3e%3cstop%20offset='1'%20stop-color='%238A5CFF'/%3e%3c/linearGradient%3e%3cclipPath%20id='clip0_1812_1767'%3e%3crect%20width='20'%20height='20'%20fill='white'%20transform='translate(6%206)'/%3e%3c/clipPath%3e%3c/defs%3e%3c/svg%3e)
'/%3e%3cdefs%3e%3clinearGradient%20id='paint0_linear_1812_1798'%20x1='6'%20y1='15.9814'%20x2='26'%20y2='15.9814'%20gradientUnits='userSpaceOnUse'%3e%3cstop%20stop-color='%236729FF'/%3e%3cstop%20offset='1'%20stop-color='%238A5CFF'/%3e%3c/linearGradient%3e%3c/defs%3e%3c/svg%3e)

'/%3e%3cdefs%3e%3clinearGradient%20id='paint0_linear_1812_3580'%20x1='8.33301'%20y1='19.5873'%20x2='31.667'%20y2='19.5873'%20gradientUnits='userSpaceOnUse'%3e%3cstop%20stop-color='%236729FF'/%3e%3cstop%20offset='1'%20stop-color='%238A5CFF'/%3e%3c/linearGradient%3e%3c/defs%3e%3c/svg%3e)


Setting Up Angular
Setting Up Angular
Installing Node.js and Angular CLI
Step 1 – Install Node.js
Angular requires Node.js v20 or later. Download and install the latest LTS version from the official Node.js website.
After installation, verify that Node.js and npm are installed correctly by running the following commands:
node -v
npm -v
Example output:

Step 2 – Install Angular CLI
Install Angular CLI globally using npm:
npm install -g @angular/cli
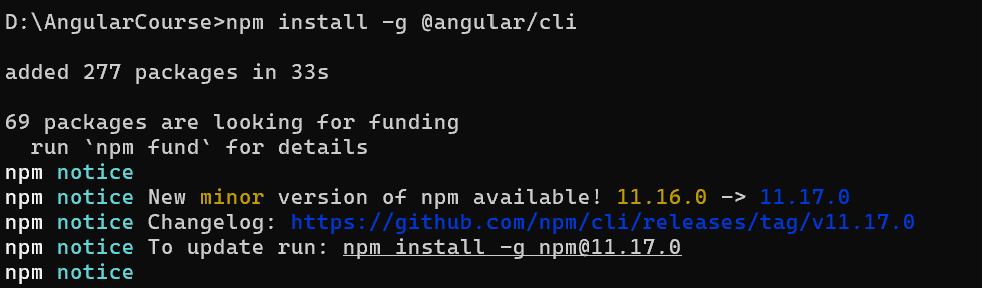
Once the installation is complete, verify it by running:
ng version
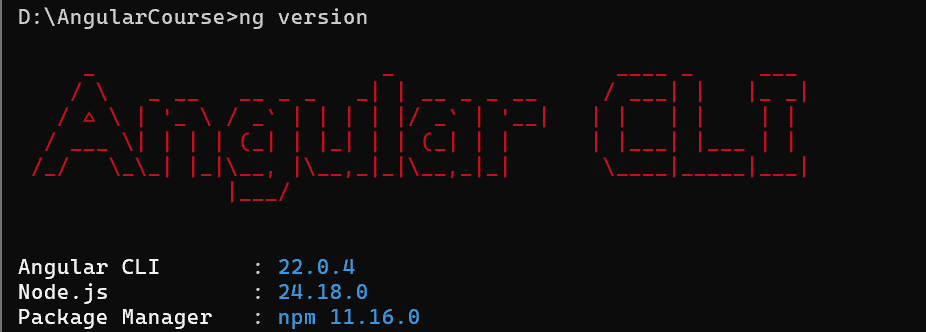
Creating Your First Angular Project
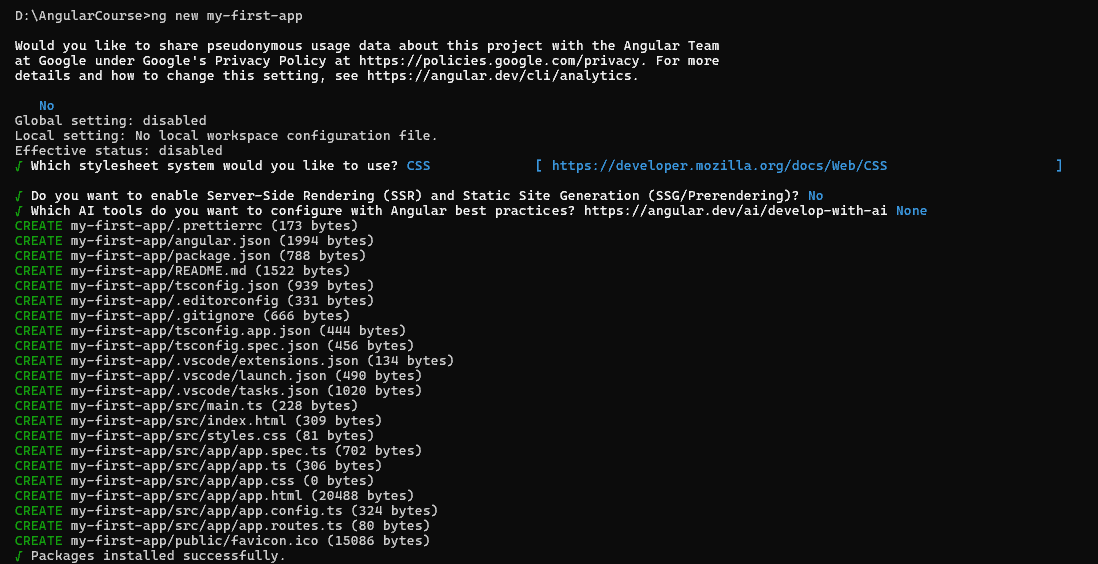
Create a new Angular application by running:
ng new my-first-app
Angular CLI will ask you to configure a few project settings.
Share anonymous usage data.
Select No.
Stylesheet system
Select CSS.
Enable Server-Side Rendering (SSR) and Static Site Generation (SSG)
Select No.
Configure AI tools
Select None.
After the project is created successfully, navigate to the project folder:
cd my-first-app
Running Your First Angular Application
Start the Angular development server by running:
ng serve --open
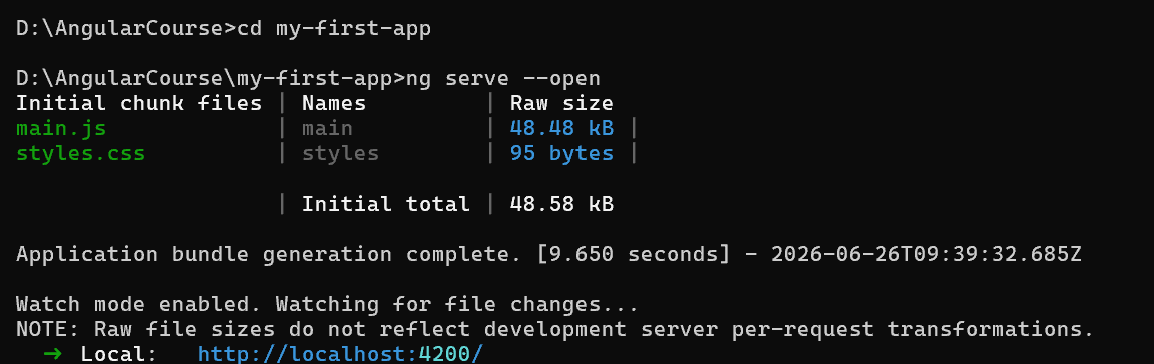
The application automatically opens in your default browser at:
If everything is configured correctly, you'll see the default Angular welcome page.

Tip: The Angular development server automatically watches your project files. Whenever you save a change, the application recompiles and the browser refreshes automatically, allowing you to view updates instantly.
Angular Handbook
Harini A
Recommended Handbooks

C++ Handbook

Python Basics Handbook

Javascript Handbook

ReactJS Projects Handbook

Computer Networks Tutorial

Operating System Tutorial

DBMS and SQL Tutorial

Java Tutorial

C Language Tutorial

PHP Tutorial

Android Tutorial

Linux Guide Tutorial

Data Structures and Algorithms Tutorial

Computer Architecture

HTML 5 References Tutorial

Docker Tutorial

GIT (Using Github) Tutorial

Go Language Tutorial

GIT Guide

CSS Tutorial

Advanced Data Structures

Spring Framework Tutorial

Spring Boot Tutorial

Kotlin Tutorial

Apache Cordova Tutorial

Python Tutorial

SASS-SCSS Tutorial

MongoDB Tutorial

Numpy Tutorial

PL-SQL Tutorial

Python Built-in Functions Tutorial

Pandas Tutorial

Elasticsearch Tutorial

Matplotlib Tutorial

Web Scraping Tutorial

Networking with Python

Tkinter Tutorial

Java Programs Tutorial

Java Examples Tutorial

Servlet Tutorial

JSP Tutorial

Java Type Conversion Tutorial

Java 8 Tutorial

Java 9 Tutorial

Java 10 Tutorial

Java 11 Tutorial

Java Util Library Tutorial

Building a Contact Us Form in ReactJS

Building a Age Calculator App Using ReactJS

Movie Recommendation System Project Using Content-Based Filtering

Recipe Finder App using ReactJS

Sales Data Analysis Project for Beginners Using Data Science

Student Performance Analysis Project for Beginners Using Data Science

Word Counter Tool Using ReactJS

Customer Churn Prediction Project Using Classification Techniques

Basic Expense Tracker App using ReactJS

Simple Binary to Decimal Converter in React

Real-Time Unit Converter in React

House Price Prediction Using Machine Learning (XGBoost)

Weather Data Analysis and Visualization Using Python

Expandable Accordion Component using React

OTP Verification Component using React

Cricket Data Analysis Using Python

Credit Card Fraud Detection for Beginners using Data Science

Deep learning Tutorial

Software Development Life Cycle Tutorial

Stock Price Prediction for Beginners using Data Science

Apache Kafka Tutorial

Django Handbook

Computer Programming Tutorial

Tensorflow Tutorial

Java OOPs Concepts Tutorial

Building an Image Classification System Using CNN

News Recommendation System Using Machine Learning

Fake Review Detection System using Machine Learning

Product Feedback App Using Full Stack Development - Customer Review and Rating System