

Artificial Intelligence and Machine Learning Articles
How Generative AI in Business is Changing Operations
Claude + Obsidian: AI-Powered Note-Taking Setup


Get In Touch For Details! Request More Information
Build your own personal voice assistant like Siri, Alexa using Python in 2026
May 29, 2026 9 Min Read 33947 Views
(Last Updated)
Have you ever looked at Siri or Alexa and thought, “I wish I could build something like that”? The good news is, you absolutely can. With just Python and a few free libraries, you can build your very own personal voice assistant that listens to your voice, talks back, searches the web, tells the weather, cracks jokes, and even sends emails for you.
This tutorial is written for complete beginners. You do not need a computer science degree. You do not need to know machine learning. If you know basic Python, like what a function is and how a loop works, you are ready to follow along.
Quick Answer: To build a personal voice assistant using Python, install the SpeechRecognition and pyttsx3 libraries, set up a speech engine, write a listening function that uses Google’s audio API, and build commands for tasks like weather, Wikipedia search, and browser control. Follow this step-by-step guide to build your own working assistant from scratch.
Table of contents
- A Quick History: From IBM Shoebox to Smart Speakers
- Where Personal Voice Assistants Stand in 2026
- What Will Your Personal Voice Assistant Be Able to Do?
- Let's get started with Personal Voice-Assistant AI development
- The components & Python Packages for Voice interface
- Voice Input/output
- NLP & Intelligent Interpretation
- Subprocesses
- Compress the speech
- Other libraries
- Writing script for Personal Voice Assistants
- Setting up Speech Engine
- 'RunAndWait' Command
- Greeting the User
- Setting up command function for our personal voice assistant
- The Ongoing Function
- Summoning Skills
- Accessing Data from Web Browsers-G-Mail, Google Chrome & YouTube
- Fetching Data with Wikipedia API
- Time Prediction
- Clicking Pictures
- To fetch latest news
- Fetching Data from web
- Wolfram Alpha API for geographical and computational questions
- Weather Forecasting
- Credits
- Subprcesses-Log Off Your System
- Telling a Joke
- Sending an Email
- Upgrading JARVIS-One with ChatGPT (New)
- Quick Reference: All Voice Commands
- Common Errors and How to Fix Them
- Tips to Make JARVIS-One Better
- What You Can Build Next
- 💡 Did You Know?
- Wrapping up
- FAQs
- What Python libraries are needed to build a personal voice assistant?
- Can I build a Python voice assistant without an internet connection?
- Is this Python voice assistant project suitable for absolute beginners?
- How do I add ChatGPT to my Python voice assistant?
- What is the difference between pyttsx3 and gTTS for text-to-speech in Python?
A Quick History: From IBM Shoebox to Smart Speakers
Let us take two minutes to understand where voice assistants came from. It makes the whole thing feel a lot more exciting.
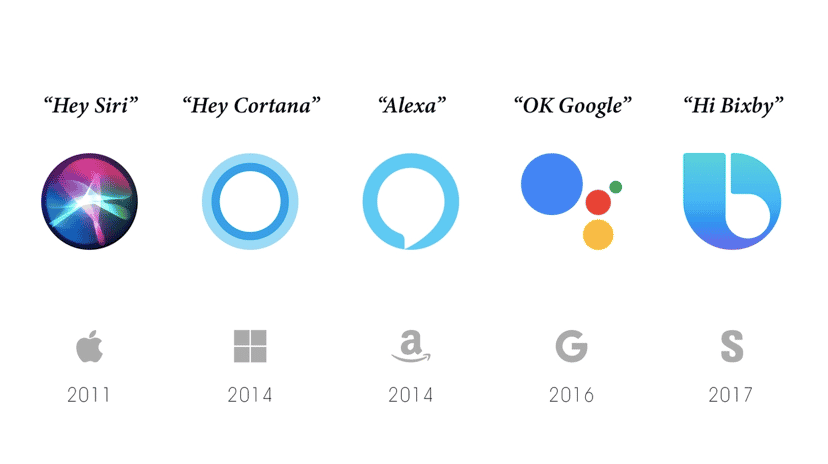
Back in the early 1960s, IBM built a machine called the Shoebox. It could recognize 16 words and 9 digits spoken aloud. That was considered incredible at the time. In the 1990s, Dragon Systems released the first commercial speech software that could transcribe full sentences. That was the real turning point.
Then in 2011, Apple launched Siri with the iPhone 4S, and suddenly millions of people were talking to their phones. Google Now and Microsoft Cortana followed. Amazon took it even further with Alexa and the Echo Dot, which gave birth to the smart speaker category we know today.
Fast forward to 2026, and voice assistants have evolved massively. Apple has upgraded Siri with on-device AI. Google Assistant now runs on Gemini. Amazon Alexa supports third-party AI plugins. And with tools like OpenAI’s Whisper and GPT-4o available to developers, you can now build a voice assistant at home that is genuinely intelligent.
Where Personal Voice Assistants Stand in 2026
| Assistant | Company | Key Technology in 2026 |
|---|---|---|
| Siri | Apple | On-device LLM, Apple Intelligence |
| Google Assistant | Gemini integration, contextual memory | |
| Alexa | Amazon | Third-party LLM plugin support |
| Cortana | Microsoft | Merged into Microsoft 365 Copilot |
| JARVIS-One (yours!) | You | Python, SpeechRecognition, pyttsx3, OpenAI |

If you would like to explore Python programming through a Self-paced course, try HCL GUVI’s Python Course with IIT Certification.
What Will Your Personal Voice Assistant Be Able to Do?
Before writing code, let us be clear about what we are building. Here is everything JARVIS-One, the voice assistant you will build in this tutorial, will be able to do:
| Skill | What It Does |
|---|---|
| Greet you | Says good morning, afternoon, or evening based on the time |
| Tell the time | Reads out the current time on command |
| Open YouTube, Google, Gmail | Launches websites in your browser |
| Search Wikipedia | Finds and reads a summary of any topic |
| Fetch the latest news | Opens Times of India headlines in your browser |
| Forecast the weather | Gets live weather for any city you name |
| Answer smart questions | Uses Wolfram Alpha to answer geography and math questions |
| Take a photo | Clicks a picture from your webcam |
| Tell a joke | Tells a random programming joke |
| Send an email | Composes and sends an email using your Gmail |
| Answer open-ended questions | Uses ChatGPT (GPT-4o) for anything it does not know |
| Shut down or log off | Signs you out of your PC on command |
Pause here for a second: which of these 12 skills would save you the most time every day?

Let’s get started with Personal Voice-Assistant AI development
Let’s make a distinction here before we start. If you want to build voice and NLP capabilities into your own application, you have several cloud and API options. For Apple, you can use their Sirikit API, along with the $99 cost of registering yourself as an Apple developer and publishing on the Apple Store. One such example is Swiggy and its UI voice command to track the delivery partner. Other cloud options include Amazon’s Alexa with AWS account & Google Now.
But in case you don’t wanna lock yourself in a particular ecosystem, you can develop your own system to enable voice-assistant. It’s just a matter of speech recognition, a pipeline, a rules engine, a query parser, and pluggable architecture with open APIs
The components & Python Packages for Voice interface
Now we’d like to discuss the basic technologies in AI voice assistants. Simply put, what makes it different from a visual one, and characterize it as a voice interface.
There are few components of Voice assistant:
Voice Input/output
It implies that the user does not need to touch their screen or GUI elements to make a request. Voice command is more than enough. Our voice assistant software will perform the given task using STT. They convert voice tasks given by the user into text scripts, analyze and perform them. We will be using Speech recognition & the pyttsx3 package library to convert speech to text and vice versa. The packages support Mac OS X, Linux, and Windows.
NLP & Intelligent Interpretation
Our voice assistant shouldn’t be limited to certain catchphrases, the user should be free while communicating. The response is made by tagging certain elements that can be credible for your user. We will be integrating Wolfram Alpha API to compute expert-level answers using Wolfram’s knowledge base algorithms and AI technology. All made possible by Wolfram Language.
Subprocesses
This is a standard library from Python to process various system commands like to log off or restart, predict the current time, and set alarms. We will be using OS Library in python to enable the functions to interact with the operating system.
Compress the speech
This feature of our voice assistant is responsible for the fast delivery of a command response to the user. We will use JSON Module for storing and exchanging data. It’s reliable and fast.
Other libraries
Apart from the essential features, we will use several other Python libraries such as Wikipedia, Ecapture, Time, DateTime, request, and others to enable more functions.
To begin with, it’s necessary to install all the above-mentioned package libraries in your system using the pip command. If you wanna clear your Python Fundamentals, visit here.
Writing script for Personal Voice Assistants

First of all, let’s import all the libraries using the pip command or terminal. For sake of clarity, we’ll name our personal voice assistant “JARVIS-One”. ( Any Resemblance is uncanny )
import speech_recognition as sr
import pyttsx3
import datetime
import os
import time
import subprocess
import wikipedia
import webbrowser
from ecapture import ecapture as ec
import wolframalpha
import json
import requests
Setting up Speech Engine
We are going to use Sapi5, a Microsoft text to speech engine for voice recognition. The Pyttsx3 module is stored in a variable name engine. We can set the voice id as either 0 or 1. ‘0’ indicates male voice & ‘1’ indicates Female Voice.
engine=pyttsx3.init('sapi5')
voices=engine.getProperty('voices')
engine.setProperty('voice','voices[0].id')
Further, we will define a function speak which will convert text to speech. The speak function will take the texts as an argument and it will further initialise the engine.
‘RunAndWait’ Command
Just as the name suggests, this function blocks other voice requests while processing all currently queued commands. It invokes callbacks for appropriate engine notification and returns back all the commands queued before the next call are emptied from the queue.
def speak(text):
    engine.say(text)
    engine.runAndWait()
Greeting the User
The Python Library supports wishMe function for personal voice assistant to greet the user. The now().hour function abstract’s the hour from the current time.
If the hour is greater than zero and less than 12, the voice assistant wishes you with the message “Good Morning <F_name>”.
If the hour is greater than 12 and less than 18, the voice assistant wishes you the following message “Good Afternoon <F_name>”.
Else it voices out the message “Good evening”
def wishMe():
    hour=datetime.datetime.now().hour
    if hour>=0 and hour<12:
        speak("Hello F_name,Good Morning")
        print("Hello F_name,Good Morning")
    elif hour>=12 and hour<18:
        speak("Hello F_name,Good Afternoon")
        print("Hello F_name,Good Afternoon")
    else:
        speak("Hello F_name,Good Evening")
        print("Hello F_name,Good Evening")
Setting up command function for our personal voice assistant
Now we need to define a specific function takecommand for the personal voice assistant to understand, adapt and analyze the human language. The microphones capture the voice input and the recognizer recognizes the speech to give a response.
We will also incorporate exception handling to rule out all exceptions during the run time error. The recognize_Google function uses google audio to recognize speech.
def takeCommand():
    r=sr.Recognizer()
    with sr.Microphone() as source:
        print("Listening...")
        audio=r.listen(source)
        try:
            statement=r.recognize_google(audio,language='en-in')
            print(f"user said:{statement}\n")
        except Exception as e:
            speak("Pardon me, please say that again")
            return "None"
        return statement
print("Loading your AI personal assistant JARVIS-One")
speak("Loading your AI personal assistant JARVIS-One")
wishMe()
The Ongoing Function
The main function starts from here, the command given by the human interaction/user is stored in the variable statement.
if __name__=='__main__':
    while True:
        speak("How can I help you now?")
        statement = takeCommand().lower()
        if statement==0:
            continue
The voice assitant-JARVIS can now listen to some trigger words assigned by the user.
if "good bye" in statement or "ok bye" in statement or "stop" in statement:
            speak('your personal assistant JARVIS-one is shutting down,Good bye')
            print('your personal assistant JARVIS-one is shutting down,Good bye')
            break
Summoning Skills
Now that we have finished setting up the voice assistant, we will build the essential skills.
1. Accessing Data from Web Browsers-G-Mail, Google Chrome & YouTube
The Open_new_tab function accepts web browser URL’s as a parameter that needs to be accessed. While Python time sleep function delays the execution of the program for a given time.
   elif 'open youtube' in statement:
            webbrowser.open_new_tab("https://www.youtube.com")
            speak("youtube is open now")
            time.sleep(5)
        elif 'open google' in statement:
            webbrowser.open_new_tab("https://www.google.com")
            speak("Google chrome is open now")
            time.sleep(5)
        elif 'open gmail' in statement:
            webbrowser.open_new_tab("gmail.com")
            speak("Google Mail open now")
            time.sleep(5)
2. Fetching Data with Wikipedia API
Once we have successfully imported the Wikipedia API, we will use the following command to extract data from it. The wikipedia.summary() function helps users ask for any trivia, and execute it with a short summary as a variable result.
if 'wikipedia' in statement:
            speak('Searching Wikipedia...')
            statement =statement.replace("wikipedia", "")
            results = wikipedia.summary(statement, sentences=3)
            speak("According to Wikipedia")
            print(results)
            speak(results)
3. Time Prediction
JARVIS-one can predict the current time from datetime.now() function, which will display time in hour, minute & second in a variable name strTime.
        elif 'time' in statement:
            strTime=datetime.datetime.now().strftime("%H:%M:%S")
            speak(f"the time is {strTime}")
4. Clicking Pictures
The ec.capture() function enables JARVIS-One click pictures from your camera. It has 3 parameters: Camera Index, Window Name & Save Name.
If there are two webcams, the first will has an indication with ‘0’, and the second will have an indication of ‘1’. Moreover, it can either be a string or a variable. In case you don’t wanna access this window, type as False.
You can also give the name to the clicked image, if you don’t wish to save the image, type as False.
  elif "camera" in statement or "take a photo" in statement:
            ec.capture(0,"robo camera","img.jpg")
5. To fetch latest news
JARVIS-One is programmed to fetch top headline news from Time of India by using the web browser function.
    elif 'news' in statement:
            news = webbrowser.open_new_tab("https://timesofindia.indiatimes.com/home/headlines”)
            speak('Here are some headlines from the Times of India,Happy reading')
            time.sleep(6)
6. Fetching Data from web
The open_new_tab() function will help search and extract data from a web browser. For instance, you can search for pictures of blue dandelions. Jarvis-One will help open google images and fetch them.
        elif 'search'  in statement:
            statement = statement.replace("search", "")
            webbrowser.open_new_tab(statement)
            time.sleep(5)
7. Wolfram Alpha API for geographical and computational questions
Third-party API Wolfram Alpha API enables Jarvis-one to answer computational and geographical questions. However, to access Wolfram alpha API, you need to create an account and have a unique app ID from their official website. The client is an instance (class) created for wolfram alpha whereas res variable stores the response given by the wolfram alpha.
lif 'ask' in statement:
            speak('I can answer to computational and geographical questions  and what question do you want to ask now')
            question=takeCommand()
            app_id="Paste your unique ID here "
            client = wolframalpha.Client('R2K75H-7ELALHR35X')
            res = client.query(question)
            answer = next(res.results).text
            speak(answer)
            print(answer)
8. Weather Forecasting
With an API key from Open Weather Map, your personal voice assistant can detect weather. It is an online service that offers weather data for all locations. We can use city_name_variables command using takecommand() function. Here is the following code.
        elif "weather" in statement:
            api_key="Apply your unique ID"
            base_url="https://api.openweathermap.org/data/2.5/weather?"
            speak("what is the city name")
            city_name=takeCommand()
            complete_url=base_url+"appid="+api_key+"&q="+city_name
            response = requests.get(complete_url)
            x=response.json()
            if x["cod"]!="404":
                y=x["main"]
                current_temperature = y["temp"]
                current_humidiy = y["humidity"]
                z = x["weather"]
                weather_description = z[0]["description"]
                speak(" Temperature in kelvin unit is " +
                      str(current_temperature) +
                      "\n humidity in percentage is " +
                      str(current_humidiy) +
                      "\n description  " +
                      str(weather_description))
                print(" Temperature in kelvin unit = " +
                      str(current_temperature) +
                      "\n humidity (in percentage) = " +
                      str(current_humidiy) +
                      "\n description = " +
                      str(weather_description))
view rawVoice_assistant.py hosted with ❤ by GitHub
9. Credits
It will add an element of fun to program Jarvis_ONE to answer the questions such as “what it can do” and “who created it”.
       elif 'who are you' in statement or 'what can you do' in statement:
            speak('I am JARVIS-one version 1 point O your personal assistant. I am programmed to minor tasks like'
                  'opening youtube,google chrome, gmail and stackoverflow ,predict time,take a photo,search wikipedia,predict weather'
                  'In different cities, get top headline news from times of india and you can ask me computational or geographical questions too!')
        elif "who made you" in statement or "who created you" in statement or "who discovered you" in statement:
            speak("I was built by F_NAME")
            print("I was built by F_NAME")
10. Subprcesses-Log Off Your System
The subprocess.call() function here is used to process the system function to log off or to turn off your PC. Further, it invokes your AI assistant to automatically turn off your PC.
        elif "log off" in statement or "sign out" in statement:
            speak("Ok , your pc will log off in 10 sec make sure you exit from all applications")
            subprocess.call(["shutdown", "/l"])

time.sleep(3)
11. Telling a Joke
The pyjokes library returns a random programming joke on demand. Say “tell me a joke” and JARVIS-One picks one and reads it out:
elif 'joke' in statement:
    joke = pyjokes.get_joke()
    speak(joke)
    print(joke)
12. Sending an Email
JARVIS-One can compose and send emails on your behalf using Python’s built-in smtplib. You need a Gmail App Password for this, not your regular password. Go to your Google Account, click Security, and generate an App Password from there:
elif 'email' in statement or 'send mail' in statement:
    speak("Who should I send the email to?")
    recipient = takeCommand()
    speak("What is the subject?")
    subject = takeCommand()
    speak("What should I say in the email?")
    body = takeCommand()
    try:
        server = smtplib.SMTP('smtp.gmail.com', 587)
        server.ehlo()
        server.starttls()
        server.login("[email protected]", "your_app_password")
        message = f"Subject: {subject}\n\n{body}"
        server.sendmail("[email protected]", recipient, message)
        server.close()
        speak("Email sent successfully.")
    except Exception as e:
        speak("Sorry, I was unable to send the email. Please check your credentials.")
13. Upgrading JARVIS-One with ChatGPT (New)
This upgrade makes JARVIS-One handle any open-ended question intelligently using GPT-4o. Sign up at platform.openai.com and get your API key, then install the library: pip install openai
Add these lines near the top of your file after your other imports:
import openai openai.api_key = “YOUR_OPENAI_API_KEY”
Add this function above your main loop:
def ask_chatgpt(question):
    response = openai.chat.completions.create(
        model="gpt-4o",
        messages=[{"role": "user", "content": question}]
    )
    return response.choices[0].message.content
Add this as the very last block inside your while True loop, after all other elif blocks. This sends any unrecognized command straight to ChatGPT:
else:
    response = ask_chatgpt(statement)
    speak(response)
    print(response)
Quick Reference: All Voice Commands
| What You Say | What JARVIS-One Does |
|---|---|
| “What is the time” | Reads the current time |
| “Open YouTube” | Opens YouTube in your browser |
| “Open Google” | Opens Google in your browser |
| “Open Gmail” | Opens Gmail in your browser |
| “Search Wikipedia for [topic]” | Reads a Wikipedia summary |
| “News” | Opens Times of India headlines |
| “Weather” | Asks for a city and reads the forecast |
| “Ask” | Opens a Wolfram Alpha question |
| “Take a photo” | Captures a webcam photo |
| “Tell me a joke” | Reads a random programming joke |
| “Send mail” | Walks you through sending an email |
| “Who are you” | Assistant introduces itself |
| “Log off” | Logs off your PC |
| “Good bye” or “Stop” | Shuts down JARVIS-One |
Common Errors and How to Fix Them
| Error | What It Means | How to Fix It |
|---|---|---|
| PyAudio install fails on Windows | Missing compiler dependency | Run pip install pipwin then pipwin install pyaudio |
| PyAudio install fails on Mac | PortAudio not installed | Run brew install portaudio first |
| “No module named speech_recognition” | Library not installed | Run pip install SpeechRecognition |
| Assistant does not respond to voice | Google Audio needs internet | Check your internet connection |
| Microphone not detected | Wrong default device | Set your mic as the default input in system sound settings |
| pyttsx3 is silent on Linux | espeak not installed | Run sudo apt install espeak in terminal |
| Wolfram returns no result | Query outside Wolfram’s scope | Wrap next(res.results) in a try/except block |
| ecapture not working | OpenCV conflict | Replace with import cv2 and cv2.VideoCapture(0) |
Tips to Make JARVIS-One Better
- Use a USB microphone for dramatically better recognition accuracy compared to a built-in laptop mic.
- Add noise cancellation by calling r.adjust_for_ambient_noise(source) right before r.listen(source) inside your takeCommand function.
- Use a virtual environment by running python -m venv jarvis_env before installing packages to keep your dependencies clean.
- Test each skill one at a time before running the full script so you can isolate issues faster.
- Never use your regular Gmail password for the email skill. Always generate a Google App Password from your account’s security settings.
- Add a wake word using the free Picovoice Porcupine library so JARVIS-One only activates when triggered, just like “Hey Siri.”
What You Can Build Next
| Extension Idea | Library to Use | What It Adds |
|---|---|---|
| Add a visual interface | Tkinter or PyQt5 | A window showing what the assistant hears and says |
| Control Spotify | Spotipy | Play, pause, and skip songs with your voice |
| Read your Google Calendar | gcsa | Hear your schedule and add new events by voice |
| Control smart home devices | Home Assistant API | Turn lights and fans on or off by voice |
| Add face recognition | face_recognition + OpenCV | Assistant identifies who is speaking |
| Deploy on Raspberry Pi | No extra library | A standalone always-on voice device |
| Make it multilingual | Google Translate API | Respond in Hindi, Tamil, or any language |
💡 Did You Know?
- Amazon Alexa supports over 100,000 third-party skills as of 2026, showing how voice assistant technologies power real-world commercial products.
- Python’s pyttsx3 library works completely offline, allowing voice assistants to speak even without an internet connection.
- The global voice assistant market was valued at over USD 11 billion in 2025 and is projected to exceed USD 47 billion by 2033.
- OpenAI’s Whisper remains one of the most accurate open-source speech recognition models in 2026 and was trained on 680,000 hours of multilingual audio data.
Wrapping up
Now that you have got the hang of it, you can build your own personal voice assistant from scratch. Similarly, you can incorporate so many other free APIs available to enable more functionalities.
In case you want to realign your code, visit this Git Repository. (All credit goes to the developer). HCL GUVI is an IIT-M incubated springboard for knowledge and has helped millions of students with their programming journey.
If you would like to explore Python programming through a Self-paced course, try HCL GUVI’s Python Course with IIT Certification.
FAQs
1. What Python libraries are needed to build a personal voice assistant?
The core libraries are SpeechRecognition to capture your voice, pyttsx3 to convert text to speech, and PyAudio to access your microphone. For advanced skills, add wikipedia, wolframalpha, requests, pyjokes, smtplib, and openai.
2. Can I build a Python voice assistant without an internet connection?
Partially. The pyttsx3 speech engine works completely offline. However, Google Audio for speech recognition, OpenWeatherMap, Wolfram Alpha, and OpenAI all require an active internet connection.
3. Is this Python voice assistant project suitable for absolute beginners?
Yes. A basic understanding of Python functions and loops is enough to follow this tutorial. Every code block is explained before you write it.
4. How do I add ChatGPT to my Python voice assistant?
Install the openai library, set your API key, and define a function that calls openai.chat.completions.create(). Then add an else block at the end of your main loop to route unrecognized commands to GPT-4o.
5. What is the difference between pyttsx3 and gTTS for text-to-speech in Python?
pyttsx3 works offline and uses your system’s built-in voice engine so responses are instant. gTTS uses Google’s voice synthesis and sounds more natural but needs internet access and adds a small delay. For a beginner project, pyttsx3 is easier to set up.
Success Stories

About the Author
Jebasta
I translate the language of data into stories that anyone can understand. As a writer with a data science background, I simplify analytics, AI, and decision-making so beginners and enthusiasts can confidently explore the world of data.
View all posts by Jebasta
Connect with me @


Did you enjoy this article?