

'%3e%3cpath%20d='M20.134%2023.75H14.266L13.42%2026H10.18L15.4%2013.4H19L24.22%2026H20.98L20.134%2023.75ZM17.2%2015.866L15.238%2021.14H19.162L17.2%2015.866ZM24.9185%2013.724C24.9185%2012.752%2025.7105%2011.96%2026.6825%2011.96C27.6545%2011.96%2028.4465%2012.752%2028.4465%2013.724C28.4465%2014.696%2027.6545%2015.488%2026.6825%2015.488C25.7105%2015.488%2024.9185%2014.696%2024.9185%2013.724ZM25.2065%2016.64H28.1765V26H25.2065V16.64Z'%20fill='url(%23paint0_linear_1812_470)'/%3e%3c/g%3e%3cdefs%3e%3cfilter%20id='filter0_dd_1812_470'%20x='7.18018'%20y='9.95996'%20width='24.2661'%20height='20.04'%20filterUnits='userSpaceOnUse'%20color-interpolation-filters='sRGB'%3e%3cfeFlood%20flood-opacity='0'%20result='BackgroundImageFix'/%3e%3cfeColorMatrix%20in='SourceAlpha'%20type='matrix'%20values='0%200%200%200%200%200%200%200%200%200%200%200%200%200%200%200%200%200%20127%200'%20result='hardAlpha'/%3e%3cfeOffset%20dy='1'/%3e%3cfeGaussianBlur%20stdDeviation='1.5'/%3e%3cfeColorMatrix%20type='matrix'%20values='0%200%200%200%200.0627451%200%200%200%200%200.109804%200%200%200%200%200.156863%200%200%200%200.1%200'/%3e%3cfeBlend%20mode='normal'%20in2='BackgroundImageFix'%20result='effect1_dropShadow_1812_470'/%3e%3cfeColorMatrix%20in='SourceAlpha'%20type='matrix'%20values='0%200%200%200%200%200%200%200%200%200%200%200%200%200%200%200%200%200%20127%200'%20result='hardAlpha'/%3e%3cfeOffset%20dy='1'/%3e%3cfeGaussianBlur%20stdDeviation='1'/%3e%3cfeColorMatrix%20type='matrix'%20values='0%200%200%200%200.0627451%200%200%200%200%200.109804%200%200%200%200%200.156863%200%200%200%200.06%200'/%3e%3cfeBlend%20mode='normal'%20in2='effect1_dropShadow_1812_470'%20result='effect2_dropShadow_1812_470'/%3e%3cfeBlend%20mode='normal'%20in='SourceGraphic'%20in2='effect2_dropShadow_1812_470'%20result='shape'/%3e%3c/filter%3e%3clinearGradient%20id='paint0_linear_1812_470'%20x1='10'%20y1='21.5'%20x2='29'%20y2='21.5'%20gradientUnits='userSpaceOnUse'%3e%3cstop%20stop-color='%236729FF'/%3e%3cstop%20offset='1'%20stop-color='%238A5CFF'/%3e%3c/linearGradient%3e%3c/defs%3e%3c/svg%3e)
'%3e%3cpath%20d='M10.9424%2022.8545C11.3105%2022.8545%2011.6092%2023.1525%2011.6094%2023.5205V30.1875C11.6094%2030.5557%2011.3105%2030.8545%2010.9424%2030.8545H8.27637C7.9082%2030.8545%207.60938%2030.5557%207.60938%2030.1875V23.5205C7.60951%2023.1525%207.90828%2022.8545%208.27637%2022.8545H10.9424ZM17.6104%2017.5205C17.9785%2017.5205%2018.2773%2017.8193%2018.2773%2018.1875V30.1875C18.2773%2030.5557%2017.9785%2030.8545%2017.6104%2030.8545H14.9434C14.5754%2030.8542%2014.2773%2030.5555%2014.2773%2030.1875V18.1875C14.2773%2017.8195%2014.5754%2017.5208%2014.9434%2017.5205H17.6104ZM24.2754%2020.1875C24.6433%2020.1878%2024.9414%2020.4865%2024.9414%2020.8545V30.1875C24.9414%2030.5555%2024.6433%2030.8542%2024.2754%2030.8545H21.6084C21.2402%2030.8545%2020.9414%2030.5557%2020.9414%2030.1875V20.8545C20.9414%2020.4863%2021.2402%2020.1875%2021.6084%2020.1875H24.2754ZM30.9424%2016.1875C31.3105%2016.1875%2031.6094%2016.4863%2031.6094%2016.8545V30.1875C31.6094%2030.5557%2031.3105%2030.8545%2030.9424%2030.8545H28.2764C27.9082%2030.8545%2027.6094%2030.5557%2027.6094%2030.1875V16.8545C27.6094%2016.4863%2027.9082%2016.1875%2028.2764%2016.1875H30.9424ZM29.6094%208.1875C30.7139%208.1875%2031.6094%209.08301%2031.6094%2010.1875C31.6094%2011.292%2030.7139%2012.1875%2029.6094%2012.1875C29.2368%2012.1863%2028.8723%2012.0798%2028.5576%2011.8809L24.9277%2014.0391C24.9314%2014.0889%2024.9424%2014.1367%2024.9424%2014.1875C24.9436%2015.2062%2024.1783%2016.0619%2023.166%2016.1748C22.1536%2016.2876%2021.2183%2015.6208%2020.9951%2014.627L17.6475%2012.9688C17.0271%2013.5698%2016.0864%2013.6931%2015.332%2013.2725L11.4756%2016.1514C11.5624%2016.3756%2011.6077%2016.6139%2011.6094%2016.8545C11.6092%2017.9589%2010.7138%2018.8545%209.60938%2018.8545C8.50496%2018.8545%207.60951%2017.9589%207.60938%2016.8545C7.60938%2015.7498%208.50488%2014.8545%209.60938%2014.8545C9.96191%2014.8564%2010.3076%2014.9524%2010.6104%2015.1328L14.4287%2012.2832C14.1184%2011.5355%2014.2896%2010.6748%2014.8623%2010.1025C15.4347%209.53038%2016.2955%209.35961%2017.043%209.66992C17.7905%209.98068%2018.2777%2010.711%2018.2764%2011.5205C18.2732%2011.6071%2018.2644%2011.6937%2018.25%2011.7793L21.1934%2013.2373C21.4939%2012.6739%2022.0476%2012.2898%2022.6807%2012.2051C23.3132%2012.1205%2023.9478%2012.3454%2024.3857%2012.8096L27.7236%2010.8262C27.6506%2010.6211%2027.6121%2010.4053%2027.6094%2010.1875C27.6106%209.0835%2028.5054%208.18872%2029.6094%208.1875Z'%20fill='url(%23paint0_linear_1812_508)'/%3e%3c/g%3e%3cdefs%3e%3cfilter%20id='filter0_dd_1812_508'%20x='4.60938'%20y='6.1875'%20width='30'%20height='28.667'%20filterUnits='userSpaceOnUse'%20color-interpolation-filters='sRGB'%3e%3cfeFlood%20flood-opacity='0'%20result='BackgroundImageFix'/%3e%3cfeColorMatrix%20in='SourceAlpha'%20type='matrix'%20values='0%200%200%200%200%200%200%200%200%200%200%200%200%200%200%200%200%200%20127%200'%20result='hardAlpha'/%3e%3cfeOffset%20dy='1'/%3e%3cfeGaussianBlur%20stdDeviation='1.5'/%3e%3cfeColorMatrix%20type='matrix'%20values='0%200%200%200%200.0627451%200%200%200%200%200.109804%200%200%200%200%200.156863%200%200%200%200.1%200'/%3e%3cfeBlend%20mode='normal'%20in2='BackgroundImageFix'%20result='effect1_dropShadow_1812_508'/%3e%3cfeColorMatrix%20in='SourceAlpha'%20type='matrix'%20values='0%200%200%200%200%200%200%200%200%200%200%200%200%200%200%200%200%200%20127%200'%20result='hardAlpha'/%3e%3cfeOffset%20dy='1'/%3e%3cfeGaussianBlur%20stdDeviation='1'/%3e%3cfeColorMatrix%20type='matrix'%20values='0%200%200%200%200.0627451%200%200%200%200%200.109804%200%200%200%200%200.156863%200%200%200%200.06%200'/%3e%3cfeBlend%20mode='normal'%20in2='effect1_dropShadow_1812_508'%20result='effect2_dropShadow_1812_508'/%3e%3cfeBlend%20mode='normal'%20in='SourceGraphic'%20in2='effect2_dropShadow_1812_508'%20result='shape'/%3e%3c/filter%3e%3clinearGradient%20id='paint0_linear_1812_508'%20x1='7.60938'%20y1='19.521'%20x2='31.6094'%20y2='19.521'%20gradientUnits='userSpaceOnUse'%3e%3cstop%20stop-color='%236729FF'/%3e%3cstop%20offset='1'%20stop-color='%238A5CFF'/%3e%3c/linearGradient%3e%3c/defs%3e%3c/svg%3e)
'%3e%3cpath%20d='M29.2646%2023.1094C29.4038%2023.0408%2029.5668%2023.0408%2029.7061%2023.1094L29.7568%2023.1338C30.8936%2023.6938%2030.8937%2025.3073%2029.7568%2025.8672L21.0049%2030.1758C20.1262%2030.6084%2019.0926%2030.6084%2018.2139%2030.1758L9.46191%2025.8672C8.3249%2025.3073%208.32502%2023.6938%209.46191%2023.1338L9.5127%2023.1094C9.65194%2023.0408%209.81488%2023.0408%209.9541%2023.1094L18.2139%2027.1758C19.0926%2027.6084%2020.1262%2027.6084%2021.0049%2027.1758L29.2646%2023.1094ZM29.2646%2018.1094C29.4038%2018.0408%2029.5668%2018.0408%2029.7061%2018.1094L29.7568%2018.1338C30.8936%2018.6938%2030.8937%2020.3073%2029.7568%2020.8672L21.0049%2025.1758C20.1262%2025.6084%2019.0926%2025.6084%2018.2139%2025.1758L9.46191%2020.8672C8.32488%2020.3073%208.32505%2018.6938%209.46191%2018.1338L9.5127%2018.1094C9.65194%2018.0408%209.81487%2018.0408%209.9541%2018.1094L18.2139%2022.1758C19.0926%2022.6084%2020.1262%2022.6084%2021.0049%2022.1758L29.2646%2018.1094ZM18.2139%208.82422C19.0926%208.39162%2020.1262%208.39162%2021.0049%208.82422L29.7568%2013.1338C30.8936%2013.6938%2030.8937%2015.3073%2029.7568%2015.8672L21.0049%2020.1758C20.1262%2020.6084%2019.0926%2020.6085%2018.2139%2020.1758L9.46191%2015.8672C8.32488%2015.3073%208.32502%2013.6938%209.46191%2013.1338L18.2139%208.82422Z'%20fill='url(%23paint0_linear_1812_474)'/%3e%3c/g%3e%3cdefs%3e%3cfilter%20id='filter0_dd_1812_474'%20x='5.60938'%20y='6.5'%20width='28'%20height='28'%20filterUnits='userSpaceOnUse'%20color-interpolation-filters='sRGB'%3e%3cfeFlood%20flood-opacity='0'%20result='BackgroundImageFix'/%3e%3cfeColorMatrix%20in='SourceAlpha'%20type='matrix'%20values='0%200%200%200%200%200%200%200%200%200%200%200%200%200%200%200%200%200%20127%200'%20result='hardAlpha'/%3e%3cfeOffset%20dy='1'/%3e%3cfeGaussianBlur%20stdDeviation='1.5'/%3e%3cfeColorMatrix%20type='matrix'%20values='0%200%200%200%200.0627451%200%200%200%200%200.109804%200%200%200%200%200.156863%200%200%200%200.1%200'/%3e%3cfeBlend%20mode='normal'%20in2='BackgroundImageFix'%20result='effect1_dropShadow_1812_474'/%3e%3cfeColorMatrix%20in='SourceAlpha'%20type='matrix'%20values='0%200%200%200%200%200%200%200%200%200%200%200%200%200%200%200%200%200%20127%200'%20result='hardAlpha'/%3e%3cfeOffset%20dy='1'/%3e%3cfeGaussianBlur%20stdDeviation='1'/%3e%3cfeColorMatrix%20type='matrix'%20values='0%200%200%200%200.0627451%200%200%200%200%200.109804%200%200%200%200%200.156863%200%200%200%200.06%200'/%3e%3cfeBlend%20mode='normal'%20in2='effect1_dropShadow_1812_474'%20result='effect2_dropShadow_1812_474'/%3e%3cfeBlend%20mode='normal'%20in='SourceGraphic'%20in2='effect2_dropShadow_1812_474'%20result='shape'/%3e%3c/filter%3e%3clinearGradient%20id='paint0_linear_1812_474'%20x1='8.60938'%20y1='19.5002'%20x2='30.6096'%20y2='19.5002'%20gradientUnits='userSpaceOnUse'%3e%3cstop%20stop-color='%236729FF'/%3e%3cstop%20offset='1'%20stop-color='%238A5CFF'/%3e%3c/linearGradient%3e%3c/defs%3e%3c/svg%3e)
'%3e%3cpath%20d='M21.7207%2028.6406C22.9675%2028.6407%2024.0267%2029.5026%2024.3945%2030.6279C24.5363%2031.0618%2024.1674%2031.5%2023.7109%2031.5H15.5117C15.0552%2031.5%2014.6855%2031.0618%2014.8271%2030.6279C15.1949%2029.5025%2016.2551%2028.6406%2017.502%2028.6406H21.7207ZM25.8193%2021.9229C26.0053%2022.2016%2025.9683%2022.5727%2025.7314%2022.8096C24.4407%2024.1004%2023.6153%2025.7631%2023.2969%2027.5469C22.8085%2027.3489%2022.2774%2027.2344%2021.7188%2027.2344H17.5C16.9414%2027.2344%2016.4102%2027.3488%2015.9219%2027.5469C15.6034%2025.7632%2014.7781%2024.1003%2013.4873%2022.8096C13.2505%2022.5727%2013.2135%2022.2016%2013.3994%2021.9229L18.9062%2013.6621V20.333C18.0897%2020.6243%2017.5%2021.3971%2017.5%2022.3125C17.5%2023.4757%2018.4462%2024.4219%2019.6094%2024.4219C20.7725%2024.4219%2021.7188%2023.4757%2021.7188%2022.3125C21.7188%2021.3971%2021.1291%2020.6243%2020.3125%2020.333V13.6621L25.8193%2021.9229ZM19.6094%2021.6094C19.9973%2021.6094%2020.3125%2021.9246%2020.3125%2022.3125C20.3125%2022.7004%2019.9973%2023.0156%2019.6094%2023.0156C19.2214%2023.0156%2018.9062%2022.7004%2018.9062%2022.3125C18.9062%2021.9246%2019.2214%2021.6094%2019.6094%2021.6094ZM11.1719%207.5C11.5605%207.5%2011.875%207.81448%2011.875%208.20312V8.90625H17.6299C17.9211%208.08965%2018.6939%207.5%2019.6094%207.5C20.5248%207.5%2021.2976%208.08965%2021.5889%208.90625L27.3438%208.90625V8.20312C27.3438%207.81448%2027.6582%207.5%2028.0469%207.5H30.9062C31.2949%207.5%2031.6094%207.81448%2031.6094%208.20312V11.0156C31.6094%2011.4043%2031.2949%2011.7188%2030.9062%2011.7188H28.0469C27.6582%2011.7188%2027.3438%2011.4043%2027.3438%2011.0156V10.3125H24.4561C26.8962%2011.8369%2028.5049%2014.5051%2028.6973%2017.5039C29.5409%2017.78%2030.1562%2018.5653%2030.1562%2019.5C30.1562%2020.6632%2029.21%2021.6094%2028.0469%2021.6094C26.8837%2021.6094%2025.9375%2020.6632%2025.9375%2019.5C25.9375%2018.6028%2026.5027%2017.8396%2027.2939%2017.5352C27.0539%2014.1921%2024.7213%2011.3743%2021.4766%2010.5703C21.1256%2011.2489%2020.4247%2011.7188%2019.6094%2011.7188C18.7941%2011.7188%2018.0931%2011.2489%2017.7422%2010.5703C14.4975%2011.3744%2012.1649%2014.1921%2011.9248%2017.5352C12.716%2017.8396%2013.2812%2018.6028%2013.2812%2019.5C13.2812%2020.6632%2012.335%2021.6094%2011.1719%2021.6094C10.0087%2021.6094%209.0625%2020.6632%209.0625%2019.5C9.0625%2018.5653%209.67783%2017.78%2010.5215%2017.5039C10.7138%2014.5051%2012.3225%2011.8272%2014.7627%2010.3027H11.875V11.0156C11.875%2011.4043%2011.5605%2011.7188%2011.1719%2011.7188H8.3125C7.92386%2011.7188%207.60938%2011.4043%207.60938%2011.0156V8.20312C7.60938%207.81448%207.92386%207.5%208.3125%207.5H11.1719Z'%20fill='url(%23paint0_linear_1812_524)'/%3e%3c/g%3e%3cdefs%3e%3cfilter%20id='filter0_dd_1812_524'%20x='4.60938'%20y='5.5'%20width='30'%20height='30'%20filterUnits='userSpaceOnUse'%20color-interpolation-filters='sRGB'%3e%3cfeFlood%20flood-opacity='0'%20result='BackgroundImageFix'/%3e%3cfeColorMatrix%20in='SourceAlpha'%20type='matrix'%20values='0%200%200%200%200%200%200%200%200%200%200%200%200%200%200%200%200%200%20127%200'%20result='hardAlpha'/%3e%3cfeOffset%20dy='1'/%3e%3cfeGaussianBlur%20stdDeviation='1.5'/%3e%3cfeColorMatrix%20type='matrix'%20values='0%200%200%200%200.0627451%200%200%200%200%200.109804%200%200%200%200%200.156863%200%200%200%200.1%200'/%3e%3cfeBlend%20mode='normal'%20in2='BackgroundImageFix'%20result='effect1_dropShadow_1812_524'/%3e%3cfeColorMatrix%20in='SourceAlpha'%20type='matrix'%20values='0%200%200%200%200%200%200%200%200%200%200%200%200%200%200%200%200%200%20127%200'%20result='hardAlpha'/%3e%3cfeOffset%20dy='1'/%3e%3cfeGaussianBlur%20stdDeviation='1'/%3e%3cfeColorMatrix%20type='matrix'%20values='0%200%200%200%200.0627451%200%200%200%200%200.109804%200%200%200%200%200.156863%200%200%200%200.06%200'/%3e%3cfeBlend%20mode='normal'%20in2='effect1_dropShadow_1812_524'%20result='effect2_dropShadow_1812_524'/%3e%3cfeBlend%20mode='normal'%20in='SourceGraphic'%20in2='effect2_dropShadow_1812_524'%20result='shape'/%3e%3c/filter%3e%3clinearGradient%20id='paint0_linear_1812_524'%20x1='7.60938'%20y1='19.5'%20x2='31.6094'%20y2='19.5'%20gradientUnits='userSpaceOnUse'%3e%3cstop%20stop-color='%236729FF'/%3e%3cstop%20offset='1'%20stop-color='%238A5CFF'/%3e%3c/linearGradient%3e%3c/defs%3e%3c/svg%3e)
'%3e%3cpath%20d='M33.9999%200.400391H5.9999C2.90711%200.400391%200.399902%202.9076%200.399902%206.00039V34.0004C0.399902%2037.0932%202.90711%2039.6004%205.9999%2039.6004H33.9999C37.0927%2039.6004%2039.5999%2037.0932%2039.5999%2034.0004V6.00039C39.5999%202.9076%2037.0927%200.400391%2033.9999%200.400391Z'%20fill='white'%20stroke='%23E4E8EC'%20stroke-width='0.8'/%3e%3cg%20filter='url(%23filter0_dd_4322_3743)'%3e%3cpath%20d='M27.874%2013.3767C26.7727%2013.323%2025.7215%2013.55%2024.7897%2013.9943C24.5776%2014.0953%2024.3758%2014.2161%2024.1725%2014.3334C23.9762%2014.4466%2023.8022%2014.5904%2023.6152%2014.7175C23.6135%2014.7187%2023.6117%2014.7199%2023.61%2014.721L22.9464%2015.181L21.929%2013.9332L21.5398%2016.1558L21.388%2017.023L21.1564%2018.346L23.1154%2018.461L23.301%2018.4718L25.7471%2018.6154L24.7615%2017.4069L25.2915%2017.0205L25.7217%2016.7215C26.3093%2016.3732%2027.0018%2016.1869%2027.7351%2016.2227C29.7261%2016.3199%2031.2613%2018.0127%2031.1641%2020.0037C31.0507%2022.3259%2028.6157%2023.9488%2026.4149%2023.2429C25.5114%2022.953%2024.8454%2022.2337%2024.1381%2021.6335C23.4004%2021.0075%2022.6626%2020.3813%2021.9248%2019.7553C21.8396%2019.683%2021.7543%2019.6106%2021.6691%2019.5383L19.4169%2017.6273L19.3504%2017.5708L19.3503%2017.5725L16.7577%2015.3667C16.6695%2015.2872%2016.5788%2015.2104%2016.4862%2015.1358C16.4862%2015.1358%2016.4808%2015.1311%2016.4806%2015.1312C15.4545%2014.306%2014.1691%2013.7854%2012.7564%2013.7164C9.19933%2013.5427%206.16411%2016.2953%205.99042%2019.8524C5.81674%2023.4095%208.56936%2026.4447%2012.1264%2026.6184C13.2277%2026.6721%2014.2789%2026.4451%2015.2107%2026.0009C15.4228%2025.8998%2015.6246%2025.779%2015.8279%2025.6618C16.0242%2025.5485%2016.1982%2025.4047%2016.3852%2025.2776C16.387%2025.2764%2016.3887%2025.2752%2016.3905%2025.2741L17.054%2024.8142L18.0715%2026.0618L18.4606%2023.8392L18.6124%2022.972L18.844%2021.6491L16.885%2021.5341L16.6994%2021.5232L14.2534%2021.3796L15.2388%2022.5881L14.7088%2022.9746L14.2786%2023.2736C13.691%2023.622%2012.9985%2023.8082%2012.2652%2023.7724C10.2742%2023.6752%208.73905%2021.9824%208.83626%2019.9914C8.94965%2017.6692%2011.3846%2016.0463%2013.5854%2016.7523C14.4889%2017.0421%2015.1549%2017.7614%2015.8622%2018.3616C16.5999%2018.9877%2017.3378%2019.6138%2018.0755%2020.2398C18.1608%2020.3121%2018.246%2020.3846%2018.3312%2020.4569L20.5831%2022.3678L20.6497%2022.4243L20.6498%2022.4226L23.2423%2024.6284C23.3305%2024.7079%2023.4213%2024.7848%2023.5138%2024.8593L23.5195%2024.8639C24.5455%2025.6891%2025.8309%2026.2098%2027.2436%2026.2787C30.8007%2026.4524%2033.8359%2023.6998%2034.0096%2020.1427C34.1837%2016.5856%2031.4311%2013.5504%2027.874%2013.3767Z'%20fill='url(%23paint0_linear_4322_3743)'/%3e%3c/g%3e%3c/g%3e%3cdefs%3e%3cfilter%20id='filter0_dd_4322_3743'%20x='1.18237'%20y='10.1689'%20width='37.6354'%20height='22.8584'%20filterUnits='userSpaceOnUse'%20color-interpolation-filters='sRGB'%3e%3cfeFlood%20flood-opacity='0'%20result='BackgroundImageFix'/%3e%3cfeColorMatrix%20in='SourceAlpha'%20type='matrix'%20values='0%200%200%200%200%200%200%200%200%200%200%200%200%200%200%200%200%200%20127%200'%20result='hardAlpha'/%3e%3cfeOffset%20dy='1.6001'/%3e%3cfeGaussianBlur%20stdDeviation='2.40015'/%3e%3cfeColorMatrix%20type='matrix'%20values='0%200%200%200%200.0627451%200%200%200%200%200.109804%200%200%200%200%200.156863%200%200%200%200.1%200'/%3e%3cfeBlend%20mode='normal'%20in2='BackgroundImageFix'%20result='effect1_dropShadow_4322_3743'/%3e%3cfeColorMatrix%20in='SourceAlpha'%20type='matrix'%20values='0%200%200%200%200%200%200%200%200%200%200%200%200%200%200%200%200%200%20127%200'%20result='hardAlpha'/%3e%3cfeOffset%20dy='1.6001'/%3e%3cfeGaussianBlur%20stdDeviation='1.6001'/%3e%3cfeColorMatrix%20type='matrix'%20values='0%200%200%200%200.0627451%200%200%200%200%200.109804%200%200%200%200%200.156863%200%200%200%200.06%200'/%3e%3cfeBlend%20mode='normal'%20in2='effect1_dropShadow_4322_3743'%20result='effect2_dropShadow_4322_3743'/%3e%3cfeBlend%20mode='normal'%20in='SourceGraphic'%20in2='effect2_dropShadow_4322_3743'%20result='shape'/%3e%3c/filter%3e%3clinearGradient%20id='paint0_linear_4322_3743'%20x1='6.0167'%20y1='19.3147'%20x2='33.9835'%20y2='20.6802'%20gradientUnits='userSpaceOnUse'%3e%3cstop%20stop-color='%236729FF'/%3e%3cstop%20offset='1'%20stop-color='%238A5CFF'/%3e%3c/linearGradient%3e%3cclipPath%20id='clip0_4322_3743'%3e%3crect%20width='40'%20height='40'%20fill='white'/%3e%3c/clipPath%3e%3c/defs%3e%3c/svg%3e)

'%3e%3cpath%20d='M14.6667%2024.6663C14.399%2024.6663%2014.1477%2024.562%2013.9593%2024.373L10.293%2020.7067C10.1043%2020.5187%2010%2020.2673%2010%2019.9997C10%2019.732%2010.1043%2019.4807%2010.2933%2019.2923L13.9597%2015.626C14.1477%2015.4373%2014.399%2015.333%2014.6667%2015.333C15.218%2015.333%2015.6667%2015.7817%2015.6667%2016.333C15.6667%2016.6007%2015.5623%2016.852%2015.3733%2017.0403L12.414%2019.9997L15.3737%2022.9593C15.5627%2023.1473%2015.6667%2023.3987%2015.6667%2023.6663C15.6667%2024.2177%2015.218%2024.6663%2014.6667%2024.6663Z'%20fill='%230A0F14'/%3e%3cpath%20d='M14.6667%2024.6663C14.399%2024.6663%2014.1477%2024.562%2013.9593%2024.373L10.293%2020.7067C10.1043%2020.5187%2010%2020.2673%2010%2019.9997C10%2019.732%2010.1043%2019.4807%2010.2933%2019.2923L13.9597%2015.626C14.1477%2015.4373%2014.399%2015.333%2014.6667%2015.333C15.218%2015.333%2015.6667%2015.7817%2015.6667%2016.333C15.6667%2016.6007%2015.5623%2016.852%2015.3733%2017.0403L12.414%2019.9997L15.3737%2022.9593C15.5627%2023.1473%2015.6667%2023.3987%2015.6667%2023.6663C15.6667%2024.2177%2015.218%2024.6663%2014.6667%2024.6663Z'%20fill='url(%23paint0_linear_1812_1508)'/%3e%3cpath%20d='M25.334%2024.9993C24.7827%2024.9993%2024.334%2024.5507%2024.334%2023.9993C24.334%2023.7317%2024.4383%2023.4803%2024.6273%2023.292L27.5867%2020.3327L24.627%2017.373C24.4383%2017.1843%2024.334%2016.933%2024.334%2016.666C24.334%2016.1147%2024.7827%2015.666%2025.334%2015.666C25.6017%2015.666%2025.853%2015.7703%2026.0413%2015.9593L29.7077%2019.6257C29.8967%2019.8143%2030.0007%2020.0657%2030.0007%2020.3327C30.0007%2020.6003%2029.8963%2020.8517%2029.7073%2021.04L26.041%2024.7063C25.853%2024.8953%2025.6017%2024.9993%2025.334%2024.9993Z'%20fill='%230A0F14'/%3e%3cpath%20d='M25.334%2024.9993C24.7827%2024.9993%2024.334%2024.5507%2024.334%2023.9993C24.334%2023.7317%2024.4383%2023.4803%2024.6273%2023.292L27.5867%2020.3327L24.627%2017.373C24.4383%2017.1843%2024.334%2016.933%2024.334%2016.666C24.334%2016.1147%2024.7827%2015.666%2025.334%2015.666C25.6017%2015.666%2025.853%2015.7703%2026.0413%2015.9593L29.7077%2019.6257C29.8967%2019.8143%2030.0007%2020.0657%2030.0007%2020.3327C30.0007%2020.6003%2029.8963%2020.8517%2029.7073%2021.04L26.041%2024.7063C25.853%2024.8953%2025.6017%2024.9993%2025.334%2024.9993Z'%20fill='url(%23paint1_linear_1812_1508)'/%3e%3cpath%20d='M17%2027.6663C16.4487%2027.6663%2016%2027.2177%2016%2026.6663C16%2026.5337%2016.026%2026.404%2016.0767%2026.2813L22.077%2012.9473C22.2337%2012.574%2022.596%2012.333%2023%2012.333C23.5513%2012.333%2024%2012.7817%2024%2013.333C24%2013.4657%2023.974%2013.5953%2023.9233%2013.718L17.923%2027.052C17.7663%2027.4253%2017.404%2027.6663%2017%2027.6663Z'%20fill='%230A0F14'/%3e%3cpath%20d='M17%2027.6663C16.4487%2027.6663%2016%2027.2177%2016%2026.6663C16%2026.5337%2016.026%2026.404%2016.0767%2026.2813L22.077%2012.9473C22.2337%2012.574%2022.596%2012.333%2023%2012.333C23.5513%2012.333%2024%2012.7817%2024%2013.333C24%2013.4657%2023.974%2013.5953%2023.9233%2013.718L17.923%2027.052C17.7663%2027.4253%2017.404%2027.6663%2017%2027.6663Z'%20fill='url(%23paint2_linear_1812_1508)'/%3e%3c/g%3e%3cdefs%3e%3clinearGradient%20id='paint0_linear_1812_1508'%20x1='10'%20y1='19.9997'%20x2='15.6667'%20y2='19.9997'%20gradientUnits='userSpaceOnUse'%3e%3cstop%20stop-color='%236729FF'/%3e%3cstop%20offset='1'%20stop-color='%238A5CFF'/%3e%3c/linearGradient%3e%3clinearGradient%20id='paint1_linear_1812_1508'%20x1='24.334'%20y1='20.3327'%20x2='30.0007'%20y2='20.3327'%20gradientUnits='userSpaceOnUse'%3e%3cstop%20stop-color='%236729FF'/%3e%3cstop%20offset='1'%20stop-color='%238A5CFF'/%3e%3c/linearGradient%3e%3clinearGradient%20id='paint2_linear_1812_1508'%20x1='16'%20y1='19.9997'%20x2='24'%20y2='19.9997'%20gradientUnits='userSpaceOnUse'%3e%3cstop%20stop-color='%236729FF'/%3e%3cstop%20offset='1'%20stop-color='%238A5CFF'/%3e%3c/linearGradient%3e%3cclipPath%20id='clip0_1812_1508'%3e%3crect%20width='20'%20height='20'%20fill='white'%20transform='translate(10%2010)'/%3e%3c/clipPath%3e%3c/defs%3e%3c/svg%3e)
'/%3e%3cpath%20d='M28%2025.5C28.5523%2025.5%2029%2025.0523%2029%2024.5C29%2023.9477%2028.5523%2023.5%2028%2023.5H20C19.4477%2023.5%2019%2023.9477%2019%2024.5C19%2025.0523%2019.4477%2025.5%2020%2025.5H28Z'%20fill='url(%23paint1_linear_1812_1498)'/%3e%3cdefs%3e%3clinearGradient%20id='paint0_linear_1812_1498'%20x1='11'%20y1='20'%20x2='18'%20y2='20'%20gradientUnits='userSpaceOnUse'%3e%3cstop%20stop-color='%236729FF'/%3e%3cstop%20offset='1'%20stop-color='%238A5CFF'/%3e%3c/linearGradient%3e%3clinearGradient%20id='paint1_linear_1812_1498'%20x1='19'%20y1='24.5'%20x2='29'%20y2='24.5'%20gradientUnits='userSpaceOnUse'%3e%3cstop%20stop-color='%236729FF'/%3e%3cstop%20offset='1'%20stop-color='%238A5CFF'/%3e%3c/linearGradient%3e%3c/defs%3e%3c/svg%3e)
'%3e%3cpath%20d='M31.009%2019.258V16.9295C31.009%2016.687%2030.7179%2016.5414%2030.5239%2016.687C28.1469%2018.5789%2023.8779%2019.5491%2019.609%2019.5491C15.3886%2019.5491%2011.1196%2018.5789%208.69409%2016.687C8.50005%2016.5414%208.20898%2016.687%208.20898%2016.9295V19.258V19.4521C8.20898%2022.1687%2013.3026%2024.4002%2019.609%2024.4002C25.9154%2024.4002%2031.009%2022.1687%2031.009%2019.4036C31.009%2019.3551%2031.009%2019.3065%2031.009%2019.258Z'%20fill='%230A0F14'/%3e%3cpath%20d='M31.009%2019.258V16.9295C31.009%2016.687%2030.7179%2016.5414%2030.5239%2016.687C28.1469%2018.5789%2023.8779%2019.5491%2019.609%2019.5491C15.3886%2019.5491%2011.1196%2018.5789%208.69409%2016.687C8.50005%2016.5414%208.20898%2016.687%208.20898%2016.9295V19.258V19.4521C8.20898%2022.1687%2013.3026%2024.4002%2019.609%2024.4002C25.9154%2024.4002%2031.009%2022.1687%2031.009%2019.4036C31.009%2019.3551%2031.009%2019.3065%2031.009%2019.258Z'%20fill='url(%23paint0_linear_1812_1488)'/%3e%3cpath%20d='M31.009%2025.758V23.4295C31.009%2023.187%2030.7179%2023.0414%2030.5239%2023.187C28.1469%2025.0789%2023.8779%2026.0491%2019.609%2026.0491C15.3886%2026.0491%2011.1196%2025.0789%208.69409%2023.187C8.50005%2023.0414%208.20898%2023.187%208.20898%2023.4295V25.758V25.9521C8.20898%2028.6687%2013.3026%2030.9002%2019.609%2030.9002C25.9154%2030.9002%2031.009%2028.6687%2031.009%2025.9036C31.009%2025.8551%2031.009%2025.8065%2031.009%2025.758Z'%20fill='%230A0F14'/%3e%3cpath%20d='M31.009%2025.758V23.4295C31.009%2023.187%2030.7179%2023.0414%2030.5239%2023.187C28.1469%2025.0789%2023.8779%2026.0491%2019.609%2026.0491C15.3886%2026.0491%2011.1196%2025.0789%208.69409%2023.187C8.50005%2023.0414%208.20898%2023.187%208.20898%2023.4295V25.758V25.9521C8.20898%2028.6687%2013.3026%2030.9002%2019.609%2030.9002C25.9154%2030.9002%2031.009%2028.6687%2031.009%2025.9036C31.009%2025.8551%2031.009%2025.8065%2031.009%2025.758Z'%20fill='url(%23paint1_linear_1812_1488)'/%3e%3cpath%20d='M19.609%2018.0927C25.905%2018.0927%2031.009%2015.8557%2031.009%2013.0962C31.009%2010.3366%2025.905%208.09961%2019.609%208.09961C13.3129%208.09961%208.20898%2010.3366%208.20898%2013.0962C8.20898%2015.8557%2013.3129%2018.0927%2019.609%2018.0927Z'%20fill='%230A0F14'/%3e%3cpath%20d='M19.609%2018.0927C25.905%2018.0927%2031.009%2015.8557%2031.009%2013.0962C31.009%2010.3366%2025.905%208.09961%2019.609%208.09961C13.3129%208.09961%208.20898%2010.3366%208.20898%2013.0962C8.20898%2015.8557%2013.3129%2018.0927%2019.609%2018.0927Z'%20fill='url(%23paint2_linear_1812_1488)'/%3e%3c/g%3e%3cdefs%3e%3clinearGradient%20id='paint0_linear_1812_1488'%20x1='8.20898'%20y1='20.5145'%20x2='31.009'%20y2='20.5145'%20gradientUnits='userSpaceOnUse'%3e%3cstop%20stop-color='%236729FF'/%3e%3cstop%20offset='1'%20stop-color='%238A5CFF'/%3e%3c/linearGradient%3e%3clinearGradient%20id='paint1_linear_1812_1488'%20x1='8.20898'%20y1='27.0145'%20x2='31.009'%20y2='27.0145'%20gradientUnits='userSpaceOnUse'%3e%3cstop%20stop-color='%236729FF'/%3e%3cstop%20offset='1'%20stop-color='%238A5CFF'/%3e%3c/linearGradient%3e%3clinearGradient%20id='paint2_linear_1812_1488'%20x1='8.20898'%20y1='13.0962'%20x2='31.009'%20y2='13.0962'%20gradientUnits='userSpaceOnUse'%3e%3cstop%20stop-color='%236729FF'/%3e%3cstop%20offset='1'%20stop-color='%238A5CFF'/%3e%3c/linearGradient%3e%3cclipPath%20id='clip0_1812_1488'%3e%3crect%20width='24'%20height='24'%20fill='white'%20transform='translate(7.60938%207.5)'/%3e%3c/clipPath%3e%3c/defs%3e%3c/svg%3e)


'/%3e%3cpath%20d='M21.8957%207.53398L22.8013%208.98336L24.4594%209.39648C24.7344%209.46523%2024.8426%209.79773%2024.6607%2010.0152L23.5619%2011.324L23.6813%2013.0284C23.7013%2013.3109%2023.4182%2013.5171%2023.1551%2013.4109L21.5707%2012.7702L19.9863%2013.4109C19.7238%2013.5171%2019.4401%2013.3115%2019.4601%2013.0284L19.5794%2011.324L18.4807%2010.0152C18.2982%209.79836%2018.4069%209.46523%2018.6819%209.39648L20.3401%208.98336L21.2457%207.53398C21.3951%207.29336%2021.7457%207.29336%2021.8957%207.53398Z'%20fill='%230A0F14'/%3e%3cpath%20d='M21.8957%207.53398L22.8013%208.98336L24.4594%209.39648C24.7344%209.46523%2024.8426%209.79773%2024.6607%2010.0152L23.5619%2011.324L23.6813%2013.0284C23.7013%2013.3109%2023.4182%2013.5171%2023.1551%2013.4109L21.5707%2012.7702L19.9863%2013.4109C19.7238%2013.5171%2019.4401%2013.3115%2019.4601%2013.0284L19.5794%2011.324L18.4807%2010.0152C18.2982%209.79836%2018.4069%209.46523%2018.6819%209.39648L20.3401%208.98336L21.2457%207.53398C21.3951%207.29336%2021.7457%207.29336%2021.8957%207.53398Z'%20fill='url(%23paint1_linear_1812_1874)'/%3e%3cdefs%3e%3clinearGradient%20id='paint0_linear_1812_1874'%20x1='6.6875'%20y1='17.5217'%20x2='22.7875'%20y2='17.5217'%20gradientUnits='userSpaceOnUse'%3e%3cstop%20stop-color='%236729FF'/%3e%3cstop%20offset='1'%20stop-color='%238A5CFF'/%3e%3c/linearGradient%3e%3clinearGradient%20id='paint1_linear_1812_1874'%20x1='18.3906'%20y1='10.3964'%20x2='24.7505'%20y2='10.3964'%20gradientUnits='userSpaceOnUse'%3e%3cstop%20stop-color='%236729FF'/%3e%3cstop%20offset='1'%20stop-color='%238A5CFF'/%3e%3c/linearGradient%3e%3c/defs%3e%3c/svg%3e)

'/%3e%3cdefs%3e%3clinearGradient%20id='paint0_linear_1812_1827'%20x1='6.1333'%20y1='15.9947'%20x2='25.8635'%20y2='15.9947'%20gradientUnits='userSpaceOnUse'%3e%3cstop%20stop-color='%236729FF'/%3e%3cstop%20offset='1'%20stop-color='%238A5CFF'/%3e%3c/linearGradient%3e%3c/defs%3e%3c/svg%3e)
'%3e%3cmask%20id='mask0_1812_1767'%20style='mask-type:luminance'%20maskUnits='userSpaceOnUse'%20x='6'%20y='6'%20width='20'%20height='20'%3e%3cpath%20d='M6%206H26V26H6V6Z'%20fill='white'/%3e%3c/mask%3e%3cg%20mask='url(%23mask0_1812_1767)'%3e%3cpath%20d='M19.8244%2013.5H18.4994V9.33333C18.4994%208.875%2018.1244%208.5%2017.666%208.5H14.3327C13.8743%208.5%2013.4993%208.875%2013.4993%209.33333V13.5H12.1743C11.4327%2013.5%2011.0577%2014.4%2011.5827%2014.925L15.4077%2018.75C15.7327%2019.075%2016.2577%2019.075%2016.5827%2018.75L20.4077%2014.925C20.9327%2014.4%2020.566%2013.5%2019.8244%2013.5ZM10.166%2021.8333C10.166%2022.2917%2010.541%2022.6667%2010.9993%2022.6667H20.9994C21.4577%2022.6667%2021.8327%2022.2917%2021.8327%2021.8333C21.8327%2021.375%2021.4577%2021%2020.9994%2021H10.9993C10.541%2021%2010.166%2021.375%2010.166%2021.8333Z'%20fill='%230A0F14'/%3e%3cpath%20d='M19.8244%2013.5H18.4994V9.33333C18.4994%208.875%2018.1244%208.5%2017.666%208.5H14.3327C13.8743%208.5%2013.4993%208.875%2013.4993%209.33333V13.5H12.1743C11.4327%2013.5%2011.0577%2014.4%2011.5827%2014.925L15.4077%2018.75C15.7327%2019.075%2016.2577%2019.075%2016.5827%2018.75L20.4077%2014.925C20.9327%2014.4%2020.566%2013.5%2019.8244%2013.5ZM10.166%2021.8333C10.166%2022.2917%2010.541%2022.6667%2010.9993%2022.6667H20.9994C21.4577%2022.6667%2021.8327%2022.2917%2021.8327%2021.8333C21.8327%2021.375%2021.4577%2021%2020.9994%2021H10.9993C10.541%2021%2010.166%2021.375%2010.166%2021.8333Z'%20fill='url(%23paint0_linear_1812_1767)'/%3e%3c/g%3e%3c/g%3e%3cdefs%3e%3clinearGradient%20id='paint0_linear_1812_1767'%20x1='10.166'%20y1='15.5833'%20x2='21.8327'%20y2='15.5833'%20gradientUnits='userSpaceOnUse'%3e%3cstop%20stop-color='%236729FF'/%3e%3cstop%20offset='1'%20stop-color='%238A5CFF'/%3e%3c/linearGradient%3e%3cclipPath%20id='clip0_1812_1767'%3e%3crect%20width='20'%20height='20'%20fill='white'%20transform='translate(6%206)'/%3e%3c/clipPath%3e%3c/defs%3e%3c/svg%3e)
'/%3e%3cdefs%3e%3clinearGradient%20id='paint0_linear_1812_1798'%20x1='6'%20y1='15.9814'%20x2='26'%20y2='15.9814'%20gradientUnits='userSpaceOnUse'%3e%3cstop%20stop-color='%236729FF'/%3e%3cstop%20offset='1'%20stop-color='%238A5CFF'/%3e%3c/linearGradient%3e%3c/defs%3e%3c/svg%3e)

'/%3e%3cdefs%3e%3clinearGradient%20id='paint0_linear_1812_3580'%20x1='8.33301'%20y1='19.5873'%20x2='31.667'%20y2='19.5873'%20gradientUnits='userSpaceOnUse'%3e%3cstop%20stop-color='%236729FF'/%3e%3cstop%20offset='1'%20stop-color='%238A5CFF'/%3e%3c/linearGradient%3e%3c/defs%3e%3c/svg%3e)


Django Admin Panel and First Application
Django Admin Panel and First Application
Introduction to Django Admin
Django's admin interface is one of the most powerful features you get for free. After creating a superuser, you can log into /admin/ and manage all your data through a polished, secure interface — without writing a single line of frontend code.

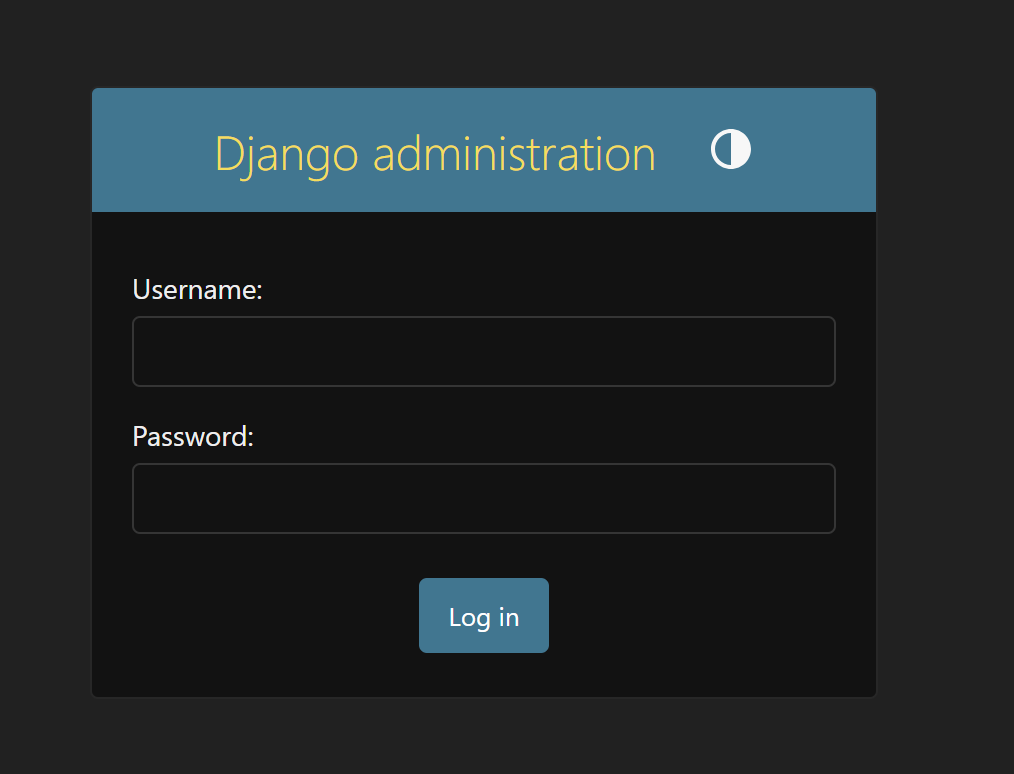
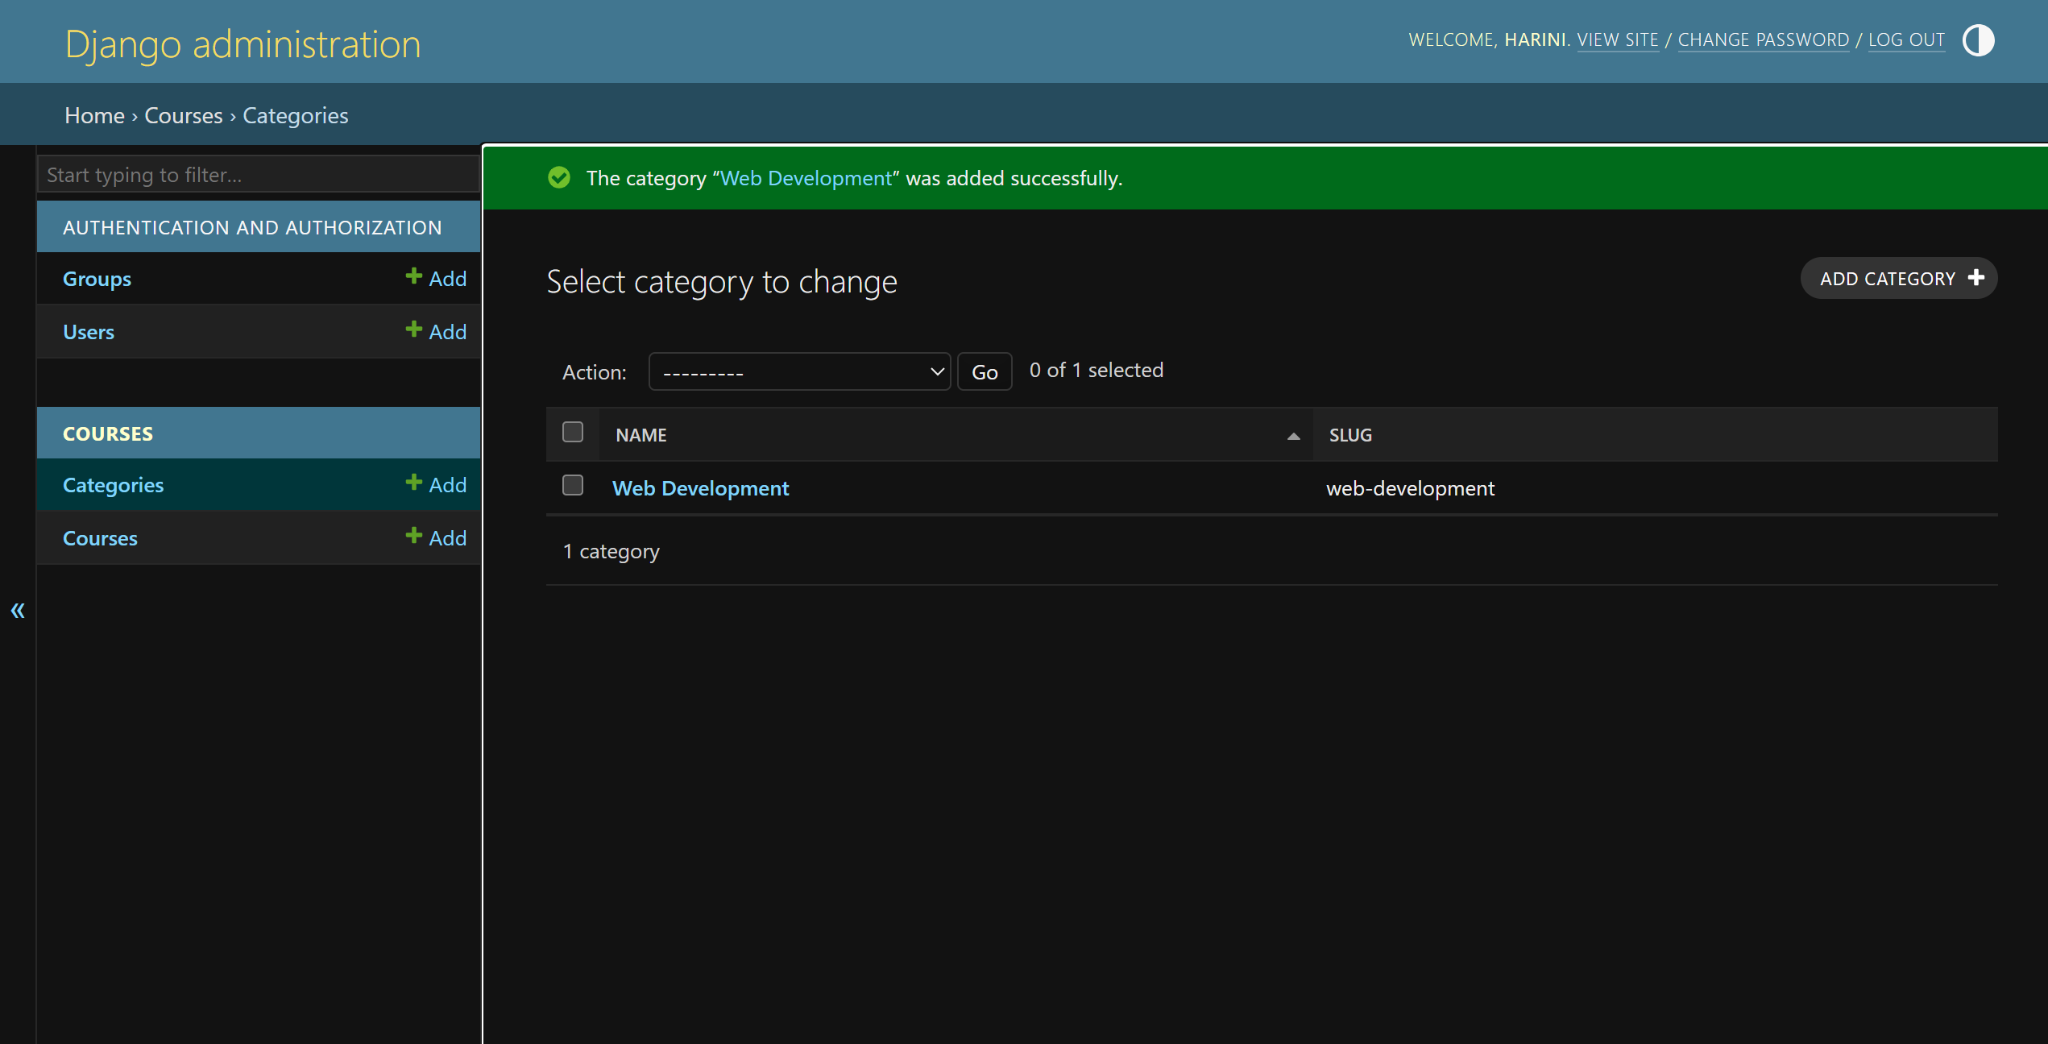
Django will ask for a username, email, and password. Once created, start the server and visit http://127.0.0.1:8000/admin/. Log in and you'll see the admin dashboard.
Managing Models Through Admin
To make your models appear in the admin, register them in your app's admin.py:
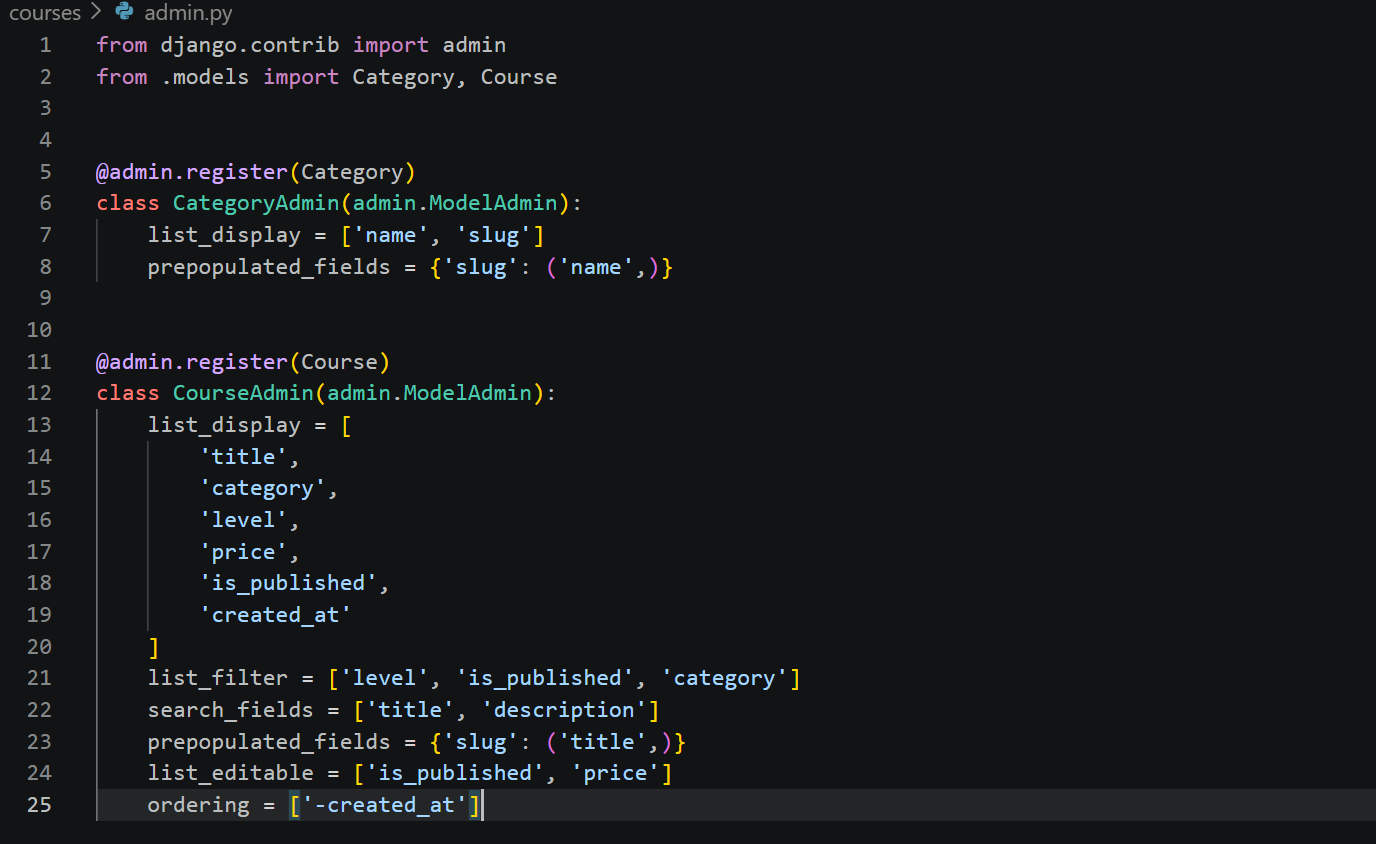
With this configuration you get a fully functional admin view with filtering, search, inline editing, and auto-generated slug fields — all from about fifteen lines of Python.
Building Your First Django Application
Let's put everything together and build a course listing application that shows all published courses and lets you view the detail of each one.
The model (already defined above in the Course class).
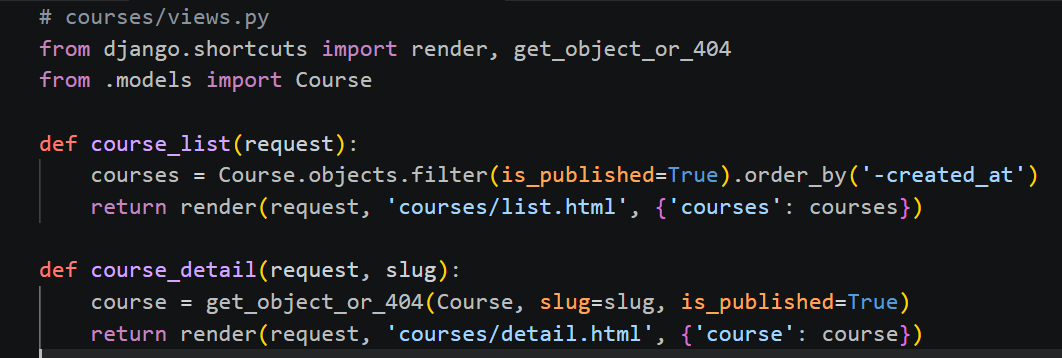
The views:
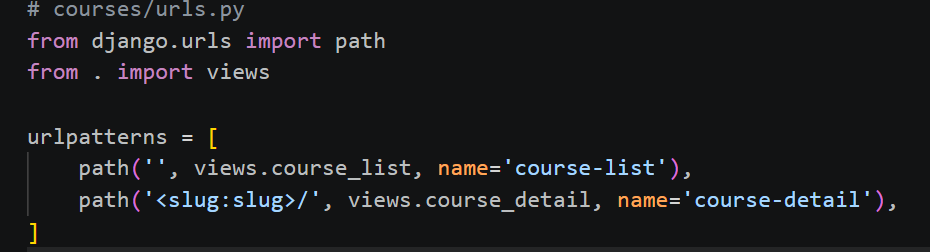
The URLs:
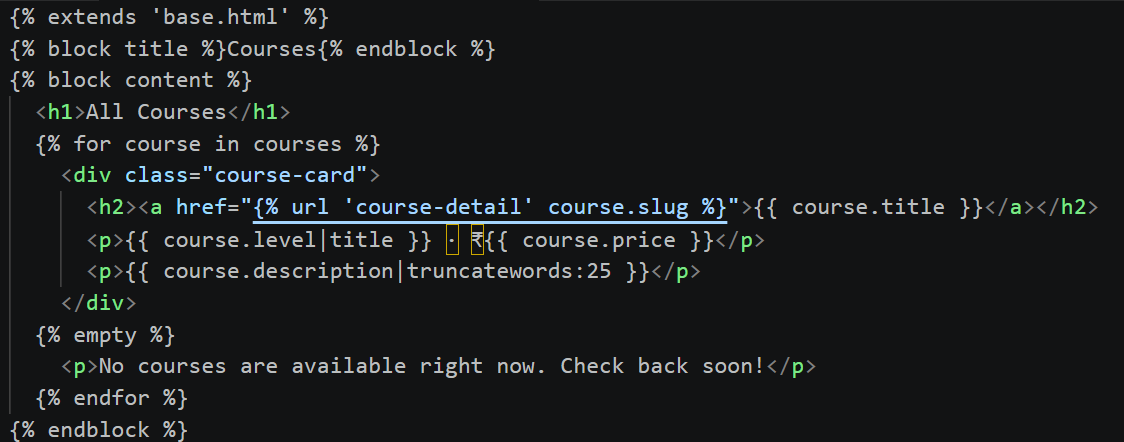
The list template:
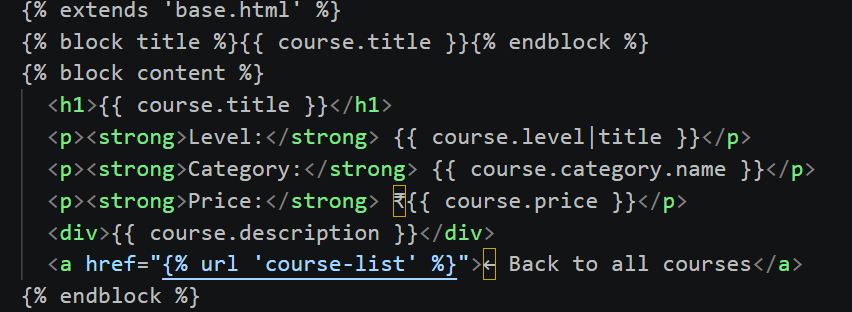
The detail template:
Add some courses through the admin panel and visit /courses/ — you'll see a working, database-driven course listing with detail pages, built entirely with what you've learned in this tutorial.

Key Takeaways
- Introduction to Django: Django overview, features, and real-world applications.
- Django Architecture: MVT architecture, core components, and request-response cycle.
- How Django Works: URL routing, views, templates, and models.
- Setting Up Django: Installation, project creation, and project structure.
- Django Apps, Views, and URLs: Creating apps, writing views, and configuring URLs.
- Templates and Static Files: Dynamic templates, template tags, filters, and static assets.
- Models and Database Basics: Models, migrations, and Django ORM.
- Django Admin Panel and First Application: Admin interface, model management, and building a complete Django app.
Django Handbook
Harini A
Recommended Handbooks

C++ Handbook

Python Basics Handbook

Javascript Handbook

ReactJS Projects Handbook

Computer Networks Tutorial

Operating System Tutorial

DBMS and SQL Tutorial

Java Tutorial

C Language Tutorial

PHP Tutorial

Android Tutorial

Linux Guide Tutorial

Data Structures and Algorithms Tutorial

Computer Architecture

HTML 5 References Tutorial

Docker Tutorial

GIT (Using Github) Tutorial

Go Language Tutorial

GIT Guide

CSS Tutorial

Advanced Data Structures

Spring Framework Tutorial

Spring Boot Tutorial

Kotlin Tutorial

Apache Cordova Tutorial

Python Tutorial

SASS-SCSS Tutorial

MongoDB Tutorial

Numpy Tutorial

PL-SQL Tutorial

Python Built-in Functions Tutorial

Pandas Tutorial

Elasticsearch Tutorial

Matplotlib Tutorial

Web Scraping Tutorial

Networking with Python

Tkinter Tutorial

Java Programs Tutorial

Java Examples Tutorial

Servlet Tutorial

JSP Tutorial

Java Type Conversion Tutorial

Java 8 Tutorial

Java 9 Tutorial

Java 10 Tutorial

Java 11 Tutorial

Java Util Library Tutorial

Building a Contact Us Form in ReactJS

Building a Age Calculator App Using ReactJS

Movie Recommendation System Project Using Content-Based Filtering

Recipe Finder App using ReactJS

Sales Data Analysis Project for Beginners Using Data Science

Student Performance Analysis Project for Beginners Using Data Science

Word Counter Tool Using ReactJS

Customer Churn Prediction Project Using Classification Techniques

Basic Expense Tracker App using ReactJS

Simple Binary to Decimal Converter in React

Real-Time Unit Converter in React

House Price Prediction Using Machine Learning (XGBoost)

Weather Data Analysis and Visualization Using Python

Expandable Accordion Component using React

OTP Verification Component using React

Cricket Data Analysis Using Python

Credit Card Fraud Detection for Beginners using Data Science

Deep learning Tutorial

Software Development Life Cycle Tutorial

Stock Price Prediction for Beginners using Data Science

Apache Kafka Tutorial

Angular Handbook

Computer Programming Tutorial

Tensorflow Tutorial

Java OOPs Concepts Tutorial

Building an Image Classification System Using CNN

News Recommendation System Using Machine Learning

Fake Review Detection System using Machine Learning

Product Feedback App Using Full Stack Development - Customer Review and Rating System